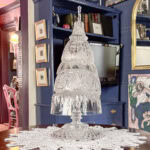
DIY Crystal Mini Christmas Tree
This DIY crystal mini Christmas tree uses thrifted glass bowls and glue to create a glam holiday decoration that looks more expensive than it is.
Ingredients
- 1 9 " wide shallow bowl with a smooth , straight bottom for the base
- 1 glass pillar candle stick , about 6" tall
- 4 crystal or cut glass bowls starting with 9" diameter and selecting the rest each about 1" in diameter smaller than the previous one. The diameter of the bowls is flexible as long as it is decreasing in size.
- 1 small crystal bell for the top
- Tube of E6000 clear glue
Instructions
- Turn the large shallow bowl upside down. Then glue the base of the candlestick in the center of the bottom of the bowl. Set aside to dry.
- Flip the two largest bowls upside down. Place the smaller bowl over the bottom of one large bowl and check where the rims meet. Flip the smaller bowl right side up, then glue around the inside rim where it will join the larger bowl (about 1/2" down from the rim if there's a 1" diameter difference). Press the bowls together firmly, keeping the top bowl level. Set the glued pair aside to let the glue set.
- Repeat the process with the two smallest bowls. Glue the smallest bowl to the bottom of the third bowl. Then press the two bowls firmly together, keeping the small bowl straight. Let the glue dry for about 4 hours before proceeding.
- When the glue is dry, apply a line of adhesive to the outside edge at the top of the candle holder. Invert the large bowl assembly, center it over the candle holder, and press the inside of the largest bowl firmly onto the top. Let the glue dry before proceeding.
- After the adhesive sets, glue the smaller bowl set to the top of the large bowl set using the same process as above. Make sure the top bowl is level. Let the glue dry before proceeding.
- Apply clear adhesive to the rim of the crystal bell, then press the bell firmly onto the center of the top inverted bowl. Let the adhesive dry for at least 4 hours before moving the tree to its final location.