
How to Claim Your Website On Pinterest Using WordPress (without editing code)
These days Pinterest is all about distributing content created by business accounts on its platform. One of the first steps to get on their distribution list is to claim your website on Pinterest. Luckily, if you’re using WordPress, it’s very easy to do…no editing code required!

Claim Your Website On Pinterest
This post may contain affiliate links. We make a small commission if you buy the products from these links (at no extra cost to you). As an Amazon Associate, I earn from qualifying purchases. But we only recommend products we would use ourselves. For more information, click here to see our disclosures.
With their new focus on content creators, Pinterest is giving all of us bloggers (even new ones!) a great opportunity to get more traffic to our sites. But in order for them to know which URLs they should be distributing, you need to claim your website on Pinterest. That way they know which content is yours, and which of the pins you create should get distribution priority.
In other words, the pins that you create with your website url will get shown to more people, and you definitely want that! Especially since it’s free! And who doesn’t want free traffic?
So how do you go about claiming your website?
Prerequisites
First, make sure you have these two things:
- You must have a Pinterest business account. It’s free and easy to do from your Pinterest profile.
- Install the Yoast SEO plugin on your wordpress site if you don’t already have it. The free version is fine.
Start On Pinterest
Now you’re ready to claim your website on Pinterest.
- Open up Pinterest in a browser.

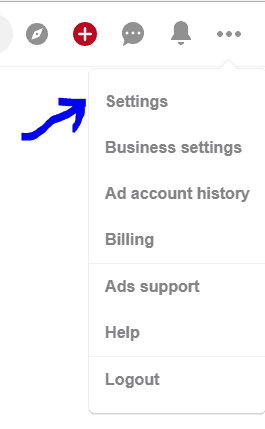
- Click on the three dots at the top right side of the screen to open your profile and select Settings.

- Open up Pinterest in a browser.
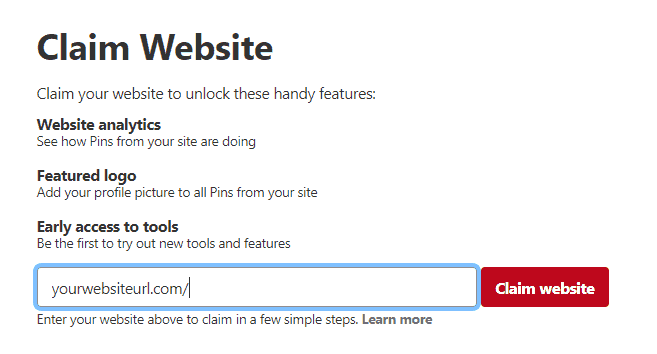
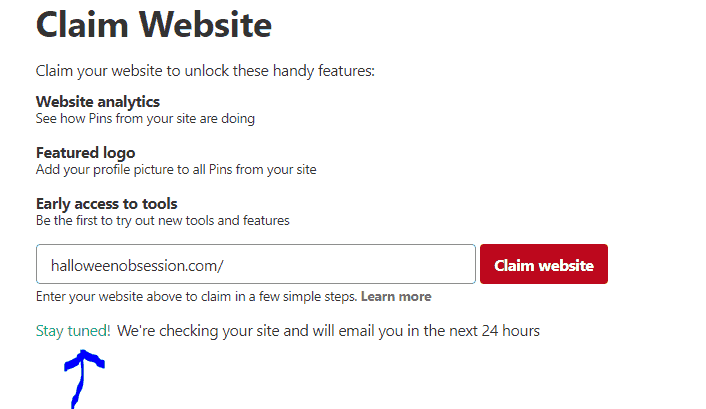
- Scroll down until you see the Claim Website section.
- Then enter your site url in the box and click the Claim website button.
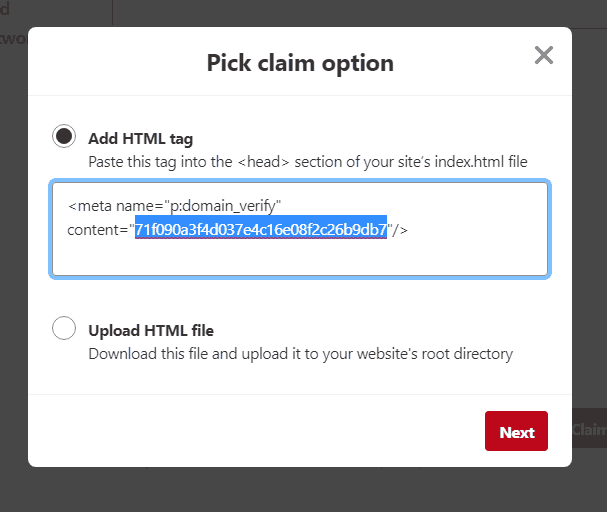
- You’ll see the Pick claim option come up.

- Select the Add HTML Tag option.
- Copy just the string of characters that are listed between the quotes beside the content= label.
Update Your Site
Next you’ll need to update your site with that string of characters.
1. Open another browser window (you’ll need to come back to this Pinterest page. Don’t worry if you accidentally close it, though. You can get back to it by clicking on the Claim Your Website button again).
2. Then go to the wordpress admin page for your website.
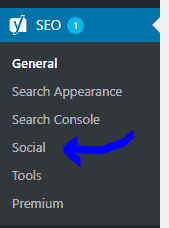
3. Scroll down until you see SEO in the menu on the left side of the screen.
4. Select the option underneath it that says Social.
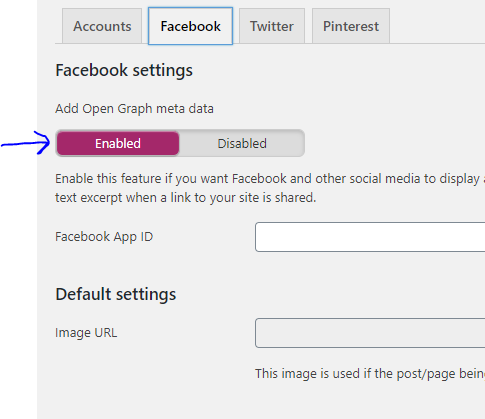
5. Now go to the Facebook tab and make sure the “Add Open Graph meta data” option is Enabled.
6. Then select the Pinterest tab.

7. Paste the content that you copied from the Pinterest “Claim your webiste” section into the Pinterest confirmation field and click Save changes.
8. If you are using Cloudflare or have a caching plugin installed, make sure you clear the cache before going back to Pinterest to confirm you have installed the code.
Go Back To Pinterest
Now you’ll need to finish the process on Pinterest.
- Go back to the “Pick claim option” Pinterest browser window. If you accidentally closed the window, you can re-open it by clicking the Claim Your Website button in your profile again.
- Click Next and it will take you back to your profile.

- You should now see a message that they are checking your site, and you’re all set. It may take a little while for them to get back to you, and I have occasionally had problems where it doesn’t work. If that happens, just repeat the process…it usually goes through the second time.
You’re all set and ready to take advantage of the Pinterest traffic machine. Click here to find out all of my tips on how to get traffic from Pinterest.
Have comments or questions on how to claim your website on Pinterest using WordPress? Tell us in the section below.
This post was originally published on August 21, 2018 but was updated with new content on November 29, 2020.
Thanks so much! I was struggling with this as the WordPress instructions made no sense. This was great.
You’re welcome, Jane! Glad it was helpful 🙂
Thanks for this blog post! I am actually taking a course about being a Pinterest Virtual Assistant and kept getting messages that my attempts to claim my website weren’t working. You made it so much clearer!
Thanks, Deb! I’m so glad you found it helpful 🙂
This was super helpful. I’ve tried so many times to get this one tiny little thing accomplished, and your instructions were spot-on. Thanks so very much!
Thanks, Traci! I’m happy you found it helpful.
it helpful, thank you so much
Thank you so much for posting this! I have gone around in circles for 2 weeks trying to figure this out!
You’re welcome, Danielle! I’m happy it helped 🙂
Thank you so much! The Pinterest instructions honestly made no sense to me and I haven’t found anyone that gave simple instructions like you. So helpful, I’ll definitely be checking out your other posts to learn some more. 🙂
Thanks, Nathaly! I’m happy you found it helpful.
Thank you so much!! I was lost! You walked me through it perfectly.