Pinterest for Bloggers 2023: How To Get More Traffic To Your Blog From Pinterest
Learn all the tips and tricks to get more traffic to your blog from Pinterest in 2023. Even with all its changes, it’s still the a great way to get FREE traffic.
Pinterest is one of the easiest ways to get free traffic to your blog or business website. But with all of its algorithm changes, it can be hard to keep up with what’s working on Pinterest today. So I’m breaking down what I do to get over a million page views a month to my blog.
A few years ago I started my blog, From House To Home, with the intention of using it as a creative outlet.
And realized soon after starting it that I really wanted to make it my full time job.
With very little traffic and no income coming in from the blog, it seemed like a pipe dream.
But I decided I didn’t have much to lose, so I tried everything I could think of to get more traffic to my blog.
Fast forward 3 years…I was getting 1,000,000 page views per month and was able to quit my full time job.
If you want to get the whole story, you can find all the details of how I grew my blog traffic HERE, but for all of you “get to the point” people, the short version is…Pinterest.
To this day, Pinterest drives more than 75% of my traffic, and it’s still growing.
I have been asked many times what I do on Pinterest to make this happen. So today I’m sharing what I know and what I do so that you can get more traffic to your blog from Pinterest, too.
In case you’re interested, you can find the Pinterest account for my blog HERE.
I have also started another Pinterest account where I gather blogging-related pins, so feel free to browse around there (and follow me) if you want more information.
Okay, now on to what you came here for…tips for getting more traffic to your blog from Pinterest.
Claim Your Website On Pinterest
This post may contain affiliate links. We make a small commission if you buy the products from these links (at no extra cost to you). As an Amazon Associate, I earn from qualifying purchases. But we only recommend products we would use ourselves. For more information, click here to see our disclosures.
The very first step to taking advantage to the new Pinterest focus on content creators is to claim your website.
Pinterest has said they will give priority to distributing pins that you pin from your website. And the only way they know its your website is for you to claim it.
If you haven’t done this yet and are not sure how, you can find the instructions for claiming your website on Pinterest HERE.
Enable Rich Pins
Enabling rich pins is another way to make the most out of Pinterest’s distribution capabilities. It allows them to read information about your blog posts like the title and published date. And the more information they can gather from your site, the more they know about your pins which allows them to be shown to the right people.
If you have a WordPress site, you can find out the easy way to enable rich pins for your blog HERE.
Create Awesome Content
This probably goes without saying, but in order to keep people coming back to your site, you need to have content they want to read. Which usually means solving some kind of a problem for them…what to wear to a wedding, how to redecorate my house, what to make for dinner.
While the pictures of your cat might get saved to a bunch of “Cute Cat Pictures” boards, they aren’t likely going to have a ton of people clicking through to your website.
Unless you’re actually writing about some problem that cat owner’s face…like the no-mess way to clean out a litter box…being a bit of a crazy cat lady myself, I’d definitely click to read that story!
If you’re looking for some help in this area, I’m a big fan of the Sticky Blogging course. It isn’t always open for enrollment, but if you want to learn techniques for getting and keeping readers on your blog, you might want to sign up for it if you get a chance.
Write A Click Worthy Title
There is a lot of competition on Pinterest, so use the title of your blog post to attract attention. Let readers know what problem you’ll be solving for them if they click through.
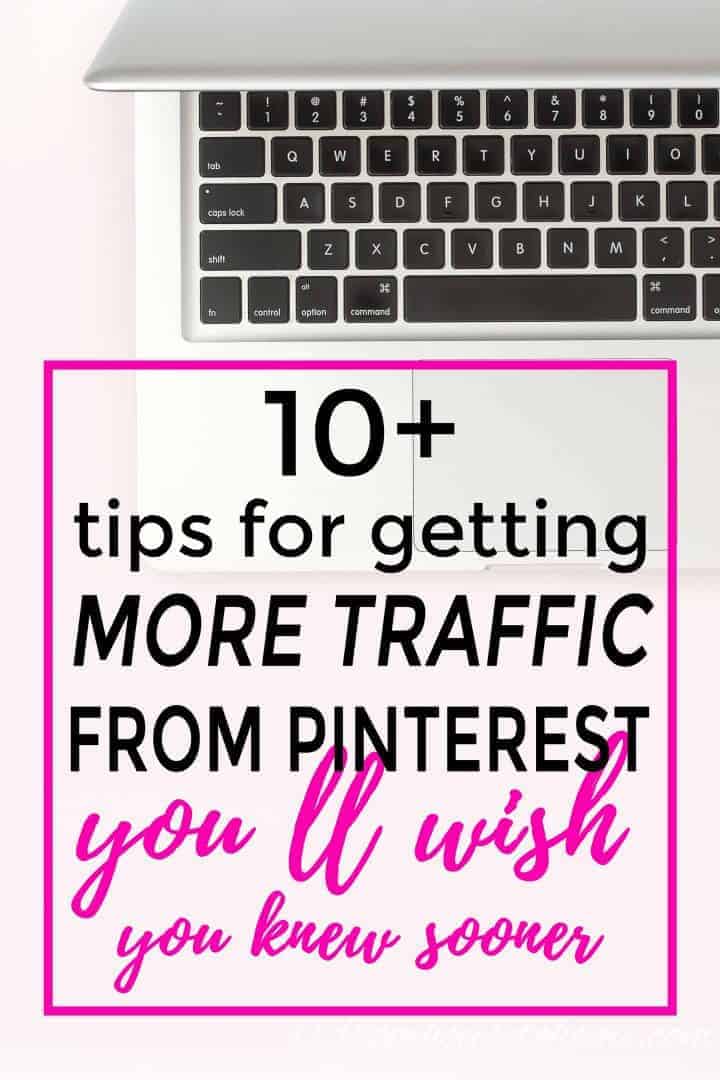
You can create a sense of urgency by adding time-based descriptions such as “You Must Try” or “You’ll Wish You Knew Sooner” to the end of your titles.
Or let the reader know how it will make their life better such as “How To Create An Office Space You’ll Actually Want To Work In”, rather than “My Home Office Makeover”.
Of course your content should actually do what the title is saying it will, otherwise you’ll have some very unhappy readers.
Use Beautiful Pictures
Pinterest is a visual platform, so using beautiful images is a must.
Vertical images (rather than horizontal) do best on the platform. Since 80% of Pinterest users are on a mobile device, the longer images take up more real estate on their phone and are easier to see in the feed.
Pinterest recommends images that are a 2:3 ratio with a minimum size of 1000 pixels X 1500 pixels. You can go up to 1000 pixels X 2000 pixels but I don’t recommend going longer than that. It may get truncated in the feed. If you’re creating longer images, make sure that the important content is on the top half of the picture…that way it will always be visible.
Pinterest has also said that taller images may take longer to get distributed (they may add a bit of a penalty for taking up extra screen space).
I usually create 2 versions of the images I want to distribute to Pinterest: One that is the recommended 2:3 ratio (1000 pixels x 1500 pixels) and one that is the 1:2 ratio (1000 pixels x 2000 pixels).
Then I can see which one performs better and stop using the other one.
In my experience so far, the longer ones usually win out, but that could be different for you depending on your audience. So it’s definitely worth trying for yourself.
Add Text To Your Images
Pinterest has done studies that show images with text overlay outperform images that don’t have text on them.
Use the text to let the reader know what they will find or learn by clicking through to your website.
The text that you use on your images does not have to be the same as your post title. Use it to make sure the reader knows the benefit of clicking through.
You can do this easily with a program like Canva which is a free online program that provides image templates for you to use.
Or if you really want to get into editing your own photos, Adobe Photoshop is the go-to picture editing software of most photographers.
In any case, make sure that the text is large and easy to read on mobile devices. Small sized fonts and fancy script fonts aren’t very legible on small devices so avoid using them.
SEO Your Description
In case you haven’t heard it before, Pinterest is a search engine not a social media platform.
People don’t go to Pinterest to talk to their friends or comment on people’s photos.
They go there to find ideas, products and inspiration for things they want to do or buy. And they do that by searching.
That means your pins need to be search engine optimized, just like your posts need to be for Google.
On Pinterest, this means including keywords related to your topic in the pin title and description.
How To Find The Keywords to Use?
The easiest way to find keywords is to use Pinterest.
Start typing your topic into the Pinterest search bar.
You’ll see a list of keywords appear in the drop down box.
Those are all the most searched terms for the term you entered.
To find more, try putting in other variations of your word to get even more suggestions.
Of course, you should only include the keyword if it is actually related to your post.
Add the SEO Description to All Of Your Images
To make sure your carefully crafted SEO description is used when other people pin pictures from your website, add the description to all of the images for your post so that it gets picked up automatically.
Pinterest Pin It buttons will look at different attributes of your image to see if they can find some text to use for the description. There are two places that I recommend putting your description:
- The image title of each of your images.
- If you’re comfortable editing code you can add an attribute: data-pin-description=”Your SEO Description” to the html <img> tag for each of your images.
- You can also get the Tasty Pins plugin which will add the Pin Description field to the image data box.
It is best not to use the image Alternative Text (or alt field) attribute for this.
Although most Pinterest Pin It buttons will pick up the value if you enter it in this field, it is really meant to be used for Google search engine optimization. So I would use it for that.
Pin the Same Pin Multiple Times
Once you have your post written and you’ve created an awesome pinnable image, you’re ready to start pinning!
Here’s where a lot of people miss the boat on Pinterest.
You can’t just pin your image one time and let it be.
You have to pin it to multiple boards to make sure your pin gets maximum exposure.
My rule is to have at least 5 (and up to 10) of my own boards on my Pinterest profile that I can put one pin on.
When you have just created a new post, the first board you pin to should be directly related to your pin topic.
Pinterest says they use the board title and description of this first board to help identify what the pin is about (which helps it to show up in the right search results).
So if I have a pin about “DIY Fall Decor”, the first board I would save that pin to might be called “DIY Fall Home Decor”.
The second board could be “Fall Craft Ideas”.
The third might be “DIY Home Decor Ideas”.
The fourth might be “Home Decorating Ideas”.
And the fifth one might be “DIY Home and Garden”.
Of course, I don’t pin them all at one time…but more on that later…
How To Decide On Boards?
If you’re wondering how to decide on which boards to create, a good place to start is the categories you have on your site.
At a minimum, you should have a board for every category.
Then as you develop more content for each of those categories, you can start creating more specific boards for sub-categories of content.
Boards also influence search results so the names you give them are very important.
As much fun as it is to create cute or funny titles, don’t! You’ll be hurting your Pinterest search engine juice.
Board names should contain keywords just like pin descriptions do. So I use the same keyword search process (from above) for coming up with board names as I do for creating pin descriptions.
Once you have your board name, make sure you also fill out the board description and pick your board Category.
Pinterest also uses those as queues for their search engine. It gives them more information about what the pins on that board are about.
How Often To Pin?
First, you don’t need to worry too much about spamming your followers. Pinterest removes duplicate images from the feed so they aren’t going to see the same pin repeated all in a row.
However, because duplicates are removed, saving the same pin to 5 of your boards in a row doesn’t really make much sense. Your followers will only see one of them!
To get the most out of the pin distribution, I pin them a few days apart.
That way there’s a better chance that your followers will see it on at least one of those days (and hopefully more than once, just in case they scrolled past it the first time).
Why Your Own Boards First?
Pinterest says they show your pins to your followers first.
If your followers like it, then they will open it up for distribution through search and to show to other people.
So you want to get your brand new pins out in front of as many of your followers as possible, and hopefully get a high rate of engagement.
That will tell Pinterest your content is good enough to share to the masses.
Use Group Boards
While group boards have been getting a bad rap lately, I still like to use them to get more eyes on my pins.
When you pin to a group board, only that board’s followers will see your pin (your own followers won’t see it unless they have are also following that board).
That means a whole new set of people can see and engage with your pin.
I think this is especially important when you are still trying to gain traction on Pinterest.
Once you have a few thousand followers of your own, you may find that your own boards perform better than the group boards (in which case, continuing to pin to the group board isn’t worth your while.)
A Few Group Board Tips
- Group boards that are more niche-specific do better (eg. a “DIY Christmas Decor” group board is more likely to perform better than a general “Bloggers Best Pins” board)
- If you get less traffic and re-pins from a group board than you get from your own boards, it’s probably time to stop pinning to that board. Creating a new board of your own will likely give you better results.
- When you’re thinking about leaving a group board, try archiving it instead of deleting it. That way it doesn’t show up on your profile, but you can bring it back if you change your mind (There have been a few times that I have regretted leaving a group board after the fact).
Make Multiple Pinnable Images For Every Post
Another trick to getting more traffic to your blog from Pinterest is to create multiple pinnable images for every post.
Even Pinterest recommends this as a way to reach different audiences.
Try using different text, fonts, colors and images to see what works best.
You can even create different images for the same post to make it relevant for different seasons or holidays.
An easy example is a DIY red, white and blue candle holder could have one image for Memorial Day and a different one for the 4th of July.
Pin Consistently
The next thing you need to do to get recognized as a Pinterest content creator is to pin consistently…as in every day.
They have publicly stated that they don’t care if you pin other people’s content or not.
So you can pin all of your own content if you have enough of it.
The old rule of pinning 80% of other people’s content and 20% of your own content definitely doesn’t apply any more.
This is another reason to create multiple images per post. You’ll have more of your own images to include in your daily pinning!
Consistency is the main point. Pinning 10 pins a day every day of the week is better than pinning 70 pins on one day and then not pinning again for another week.
Pinterest has also said that they don’t care if you use a scheduler as long as it is on their Approved Partner’s list.
How Many Pins Should I Pin Per Day?
Pinterest has said that most content creators post at least 5 pins per day, so that’s a good place to start.
I also have to say that I do a lot more than that.
Some people say 30 pins per day is the optimal number to get traffic.
Others swear that 150 to 200 pins per day is best.
I find that about 20 to 25 pins per day works best for me.
All of that to say, I think the optimal number of pins per day is different for everyone. So I would encourage you to try different numbers and see what works best for your account.
Just keep in mind while you’re testing:
- Run each test for at least a couple of weeks. It usually takes some time for changes you make on Pinterest to start making a difference in your traffic.
- Don’t increase or decrease your pinning rates too quickly (ie. by more than 5 pins per day at one time). I have seen that big changes cause my Pinterest traffic to drop significantly for a few days (I think they’re making sure the account hasn’t been hacked). It does eventually recover, but those few days can be really discouraging 🙂
My Favorite Scheduler
Since there’s no way I would ever be able to consistently pin 10 pins every day manually (never mind 50!), I definitely take advantage of the scheduling option by using Tailwind*.
That way I can schedule out all my pins for the week at one time and not have to worry about it again until the next week. (And of course, you can do more than a week at a time if you choose to…that’s just my schedule).
If you haven’t used Tailwind before, you can get a free trial period to see how you like it. Use this link* to sign up and if you decide to buy it, you’ll get a $15 discount off the purchase price.
Pin Your Popular Images At Regular Intervals
Another secret to getting more traffic to your blog from Pinterest is to keep pinning the images from your older content.
That makes sure those old images show up in the feeds of your new followers and makes a fresh version of the image available for the Pinterest search engine.
If you have the time, creating a new description for the image is also a good idea. Although not absolutely necessary, adding new keywords to your image could help it appear more often in search results.
Can You Pin The Same Pin To The Same Board?
The short answer is Yes!
Most people are not looking at your boards. They are either seeing your pins in their feed or finding them in search results.
So having duplicate pins on a board doesn’t matter to them.
Even if they do happen to click over to your board, most people won’t care that the same pin is on there more than once. On a mobile device you can only see a few pins at time, so in a lot of cases, they won’t even notice.
How Often Can You Pin The Same Pin To The Same Board?
Having said that, Pinterest doesn’t want to have the same pins being sent out all the time. That doesn’t add much value to their users.
So many people say that you should wait at least 30 to 60 days before pinning the same pin to the same board, which is probably a good general rule.
However, I actually think it depends more on how busy the board is. You don’t want to look at your boards and have the same few pins repeated over and over again. That’s not a very good user experience (and Pinterest may see it as being “spammy”).
If it’s a group board that gets hundreds of new pins and thousands of new followers every day, you could pin the same image to it more frequently than that without any issues.
Although I have never pinned the exact same image that often, I do pin my most popular posts every few days to busy group boards by rotating through the multiple images I have created for them.
That way I take advantage of the high traffic group boards without getting image burnout (that’s where so many people have seen the image that they stop engaging with it).
If it’s one of your small boards and you only pin to it a couple of times per month, then you should probably wait even longer than 60 days.
I try to have at least 25 to 30 other pins on the board between duplicates.
How Do You Know Which Pins Are Most Popular?
The best way to figure out which of your pins are the most popular is to use Pinterest Analytics and Google Analytics.
I use them for slightly different information.
Use Pinterest Analytics For Individual Pin Metrics
Pinterest analytics will show you individual pins that have been performing well over the last 30 days.
From your Pinterest account, find the Analytics tab at the top left, and then select Overview.
This will show you the boards and individual pins that are getting the most Impressions on Pinterest.
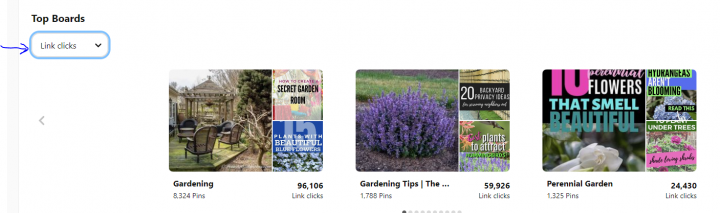
Change the drop down filter above the list to Link clicks in order to see how many people are being sent to your website from those boards or pins.
You can also look at the Saves option if you wish. This will show you which pins are being re-pinned the most.
But note that these are not necessarily driving traffic to your website. Lots of people save pins just because they like the picture.
Create New Pins (Rather Than Re-pinning)
With the new content creator-focused algorithm, pins that are created from your website seem to get more distribution than pins that are re-pinned using the Save button on Pinterest. (Pinterest has said they prefer creators to create new pins). So it pays to take the extra step of going to your website to create your pins.
That’s another bonus of using a scheduling tool like Tailwind.
It always creates new pins.
So even if you use it to repin from Pinterest, it will create a new pin for you. (In case you missed it above, here’s the link to sign up for the free Tailwind trial* and a $15 discount if you decide to purchase it).
Having said this, I would test this for yourself…I find when I’m creating pins for new blog posts, new pins work best.
But for content that has been out on Pinterest for a while, I sometimes find re-pinning existing pins works better…especially if that existing pin was created by someone else.
So if you see one of your images in the feed (or in analytics) that was pinned by someone else, try re-pinning it to see if it gets some Pinterest love.
Make It Easy For Your Readers To Pin Your Content
Another great way to get your content distributed on Pinterest is to get your blog readers to do it for you.
When they pin your post to their boards, it gets distributed to their followers, which is a whole new set of people. Plus Pinterest sees those new pins as validation that your content is worth pinning.
So make sure that you make it as easy as possible for your readers to pin from your site:
- Always have at least one vertical image (preferably with text overlay) that they can pin.
- Have Pin It buttons installed on your site that make it easy for them to pin even if they don’t have the browser extension installed. Click HERE to find out how to install pin it buttons on your WordPress site.
- Finally, ask your readers to pin your content. It’s amazing how many more pins you get by having a reminder like this:
How Important Are Followers?
A lot of people are very concerned about how many followers they have. And while there is definitely a benefit to having more followers, it isn’t necessary to get good traffic from Pinterest.
Remember…Pinterest is a search engine, so what really matters is that your pins show up in the search results.
And how does Pinterest determine what to show in search results? Besides the keywords that we talked about earlier, this is where your followers are important.
Pinterest has said that it uses the engagement rate of your followers to determine if your pins should be distributed to a wider audience.
In other words, they show your pins to your own followers first. If your followers click or save your pins at a high enough rate, then the pin gets distributed into other people’s feeds and search results. That’s where having more followers can be a benefit…even if the pin doesn’t make it into the search results, more people are seeing it because they are in the initial followers-only distribution.
The most important thing about your followers is that they actually like your content and are going to interact with it. So all of those follow threads on facebook? Don’t do them unless the people in the group are actually going to save or click on your pins.
I have found that followers come naturally once you start pinning regularly. So I would do all of the other steps we’ve talked about so far, and your follower count will increase on its own.
Well, I wasn’t intending to write a book about Pinterest…but it seems like I have 🙂 Hopefully you have learned some new strategies for getting traffic to your blog from Pinterest.
How to learn more
If you want to learn more about successful pinning, then I highly recommend taking a Pinterest course.
I have taken pretty much all of them.
And this one* from Amy LeBlanc is by far the best.
She actually reads the Pinterest Engineering Blog to come up with her pinning strategies.
It is written by the developers who work for Pinterest and actually tells you how their algorithm is coded.
You can read it yourself if you want to. But it’s very technical and so much faster just to get the big takeaways from Amy.
Pinterest Resources I Use
- My favorite Pinterest course
- Pinterest engineering blog
- Facebook group for finding Pinterest group boards to join
- Pinterest scheduler (with $15 discount if you get a paid account)*
- Simple Pin Media podcast
- Tailwind facebook page
- Pinterest business blog
- Pinterest best practices guide
Have comments or questions on how to get traffic to your blog from Pinterest? Tell me in the section below.
This post was originally published on September 3, 2018 but was updated with new content on August 19, 2023.
These are very unusual and interesting ideas. I will definitely use them. I hope that you will continue to share your ideas, experience and knowledge with beginner bloggers.
thank you!