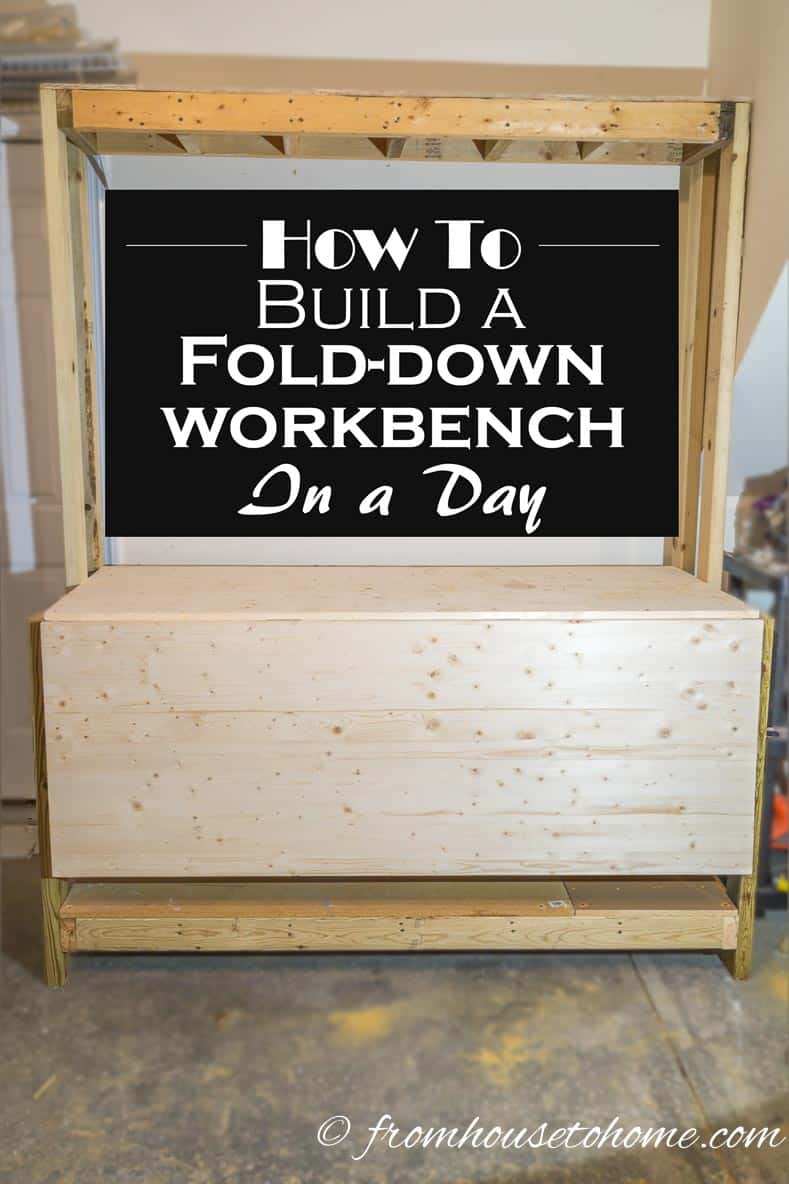
How To Build a Fold Down Workbench in a Day
This technically isn’t a decorating project, but if you like DIY projects like I do, then you may have this problem, too…I don’t have a big enough workbench area to do most of my projects, so I end up doing them on the dining room table or living room floor (not the most ideal location!)
The other issue I have is that although I want a big workbench area, the workbench is going in the garage. And I still want to be able to park my car in there….at least some of the time 🙂
So that’s how I ended up building a workbench that has a top that folds down. That way I can have a regular sized workbench for small projects, and still fit the car in the garage. But when I need a big surface, I can fold up the top to double the size of the work area.
This is a 2-part series…the first part is the how-to for building the workbench. It actually was much easier than I thought it would be…it literally took me less than 8 hours including the trip to the hardware store to buy the materials.
Click Next to find the instructions for how to build a fold-down workbench in a day.
A Sneak Peek
This post may contain affiliate links. We make a small commission if you buy the products from these links (at no extra cost to you). As an Amazon Associate, I earn from qualifying purchases. But we only recommend products we would use ourselves. For more information, click here to see our disclosures.
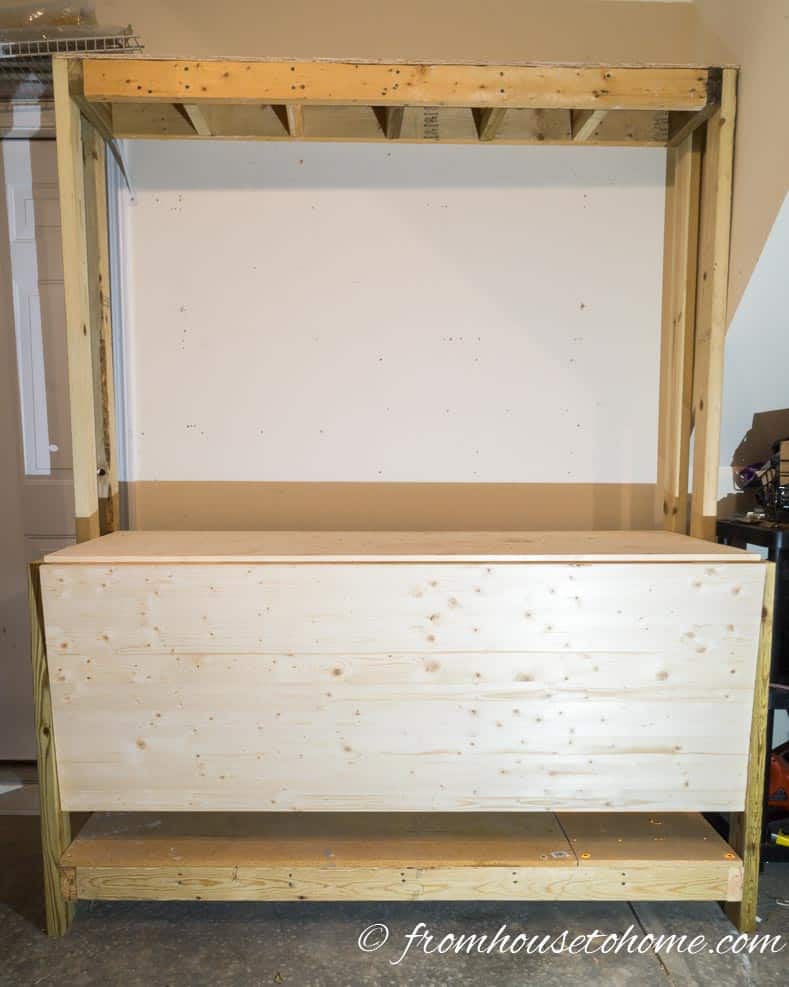
Here is the work bench with the top folded down.
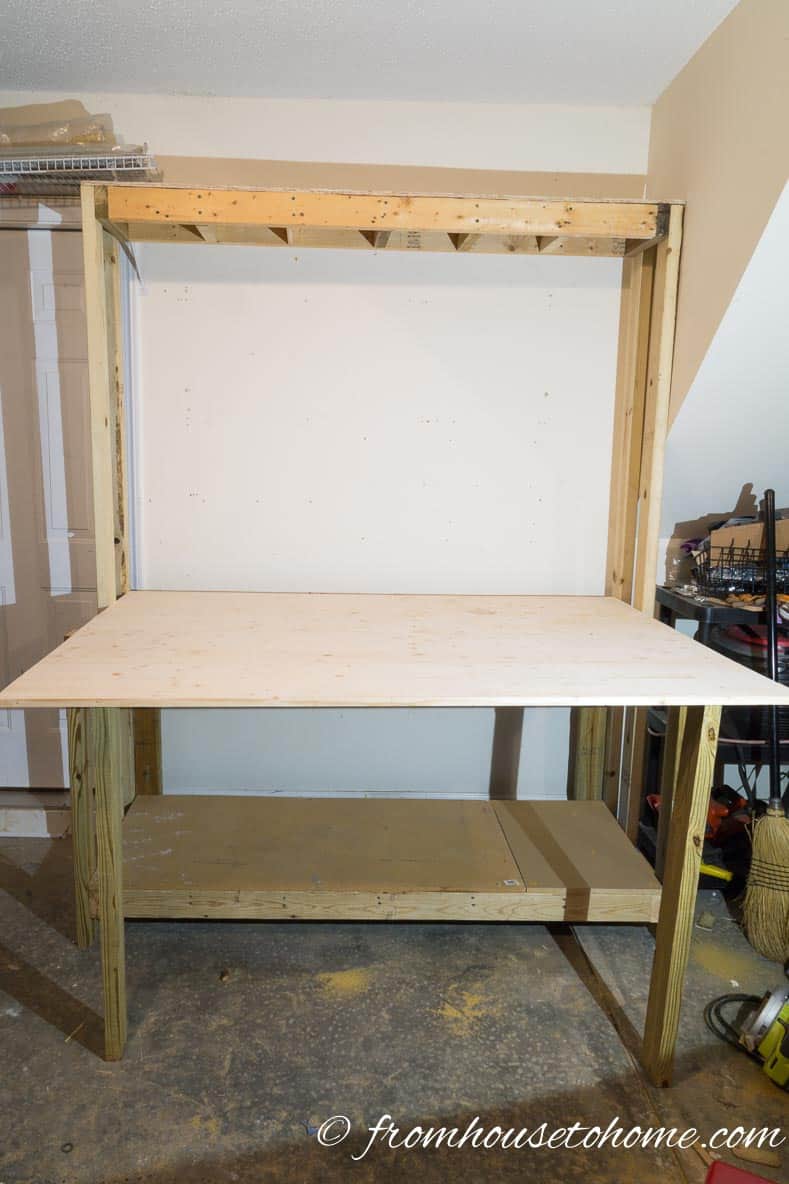
And here it is with the top folded up. It definitely provides the work area that I was looking for!
At this stage it looks a little “plain jane” since I haven’t added all of the organizational bells and whistles yet…I would never call a workbench completed if it didn’t have some pegboard storage somewhere!
Click here to see all of the organizational projects I added.
What You Need
- 15 – 2″ x 4″ x 8′ boards
- 1 – ¾” x 4′ x 8′ plywood board
- 1 – ½” x 4′ x 8′ plywood board
- 6 – 3½” hinges with screws
- 2 strong cabinet magnets with strikes
- 1 pound box of 2½” screws or nails* (I prefer screws)
Cut the Plywood for the Workbench Top

These cuts are of the workbench top and need to be at least ¾” thick in order to be sturdy enough to fold.
If you prefer, you could also use boards that are 24″ wide.
1. Cut the 3/4″ x 4′ x 8′ plywood board in half length-wise.
2. Cut each half to 65″ in length.
3. There is a fairly large piece of plywood left over that you can use for another project.
Cut the Plywood For the Shelves
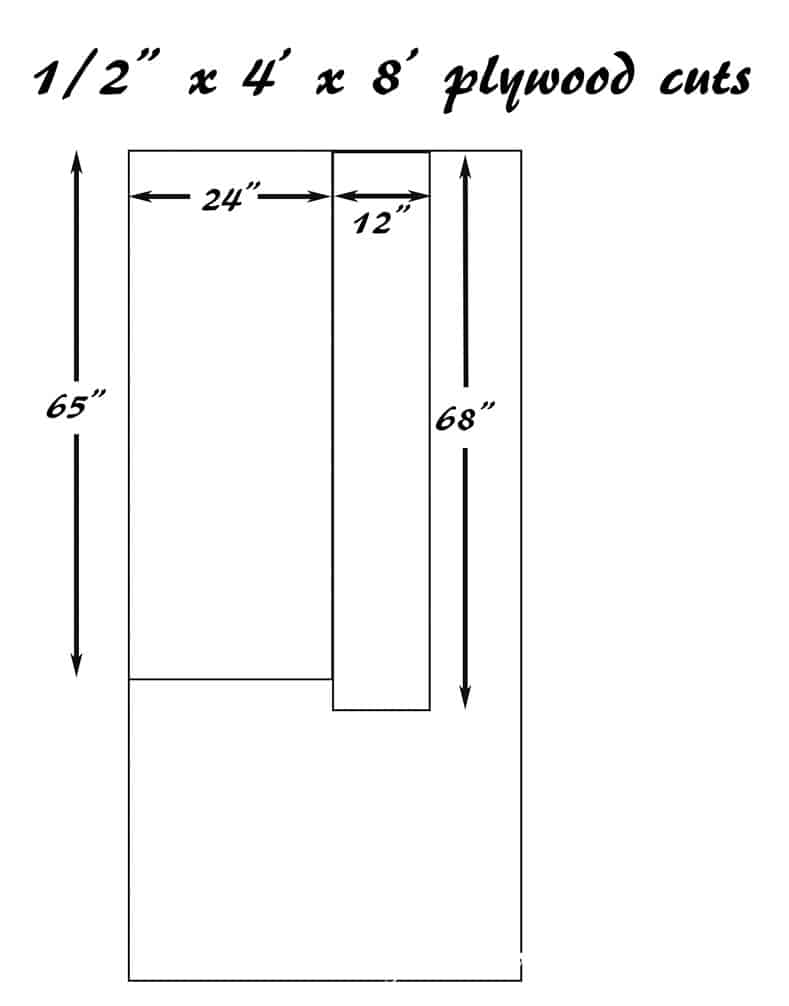
Since the shelves will be attached and have a fairly substantial support system, ½” plywood or MDF will be more than strong enough to carry the load. If you have pieces lying around from other projects (like I did), you can also piece these shelves rather than using one large board.
1. Cut the ½” x 4′ x 8′ plywood in half, lengthwise, so that you have 2 pieces that are 2′ x 8′.
2. Cut one of the halves to 65″ in length…the resulting board should be 65″ long x 2′ wide.
3. Cut a 12″ x 68″ piece out of the other half.
There will be some of this plywood left over as well. We will be able to use some of it for the tool organizers in the next post.
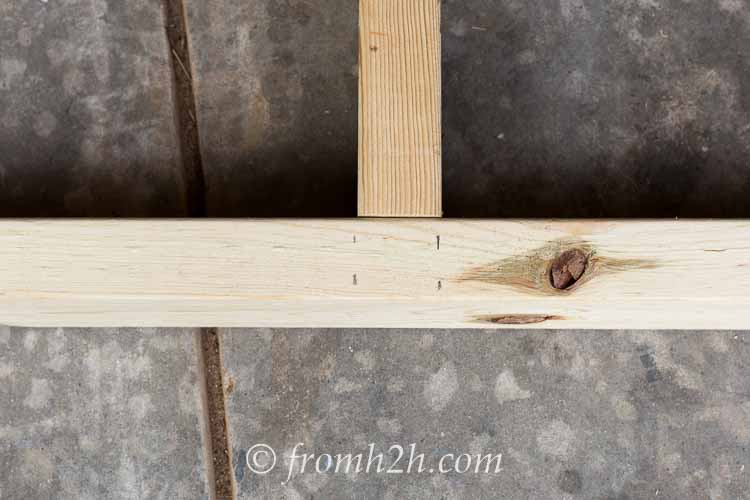
Cut the 2″ x 4″ Lumber
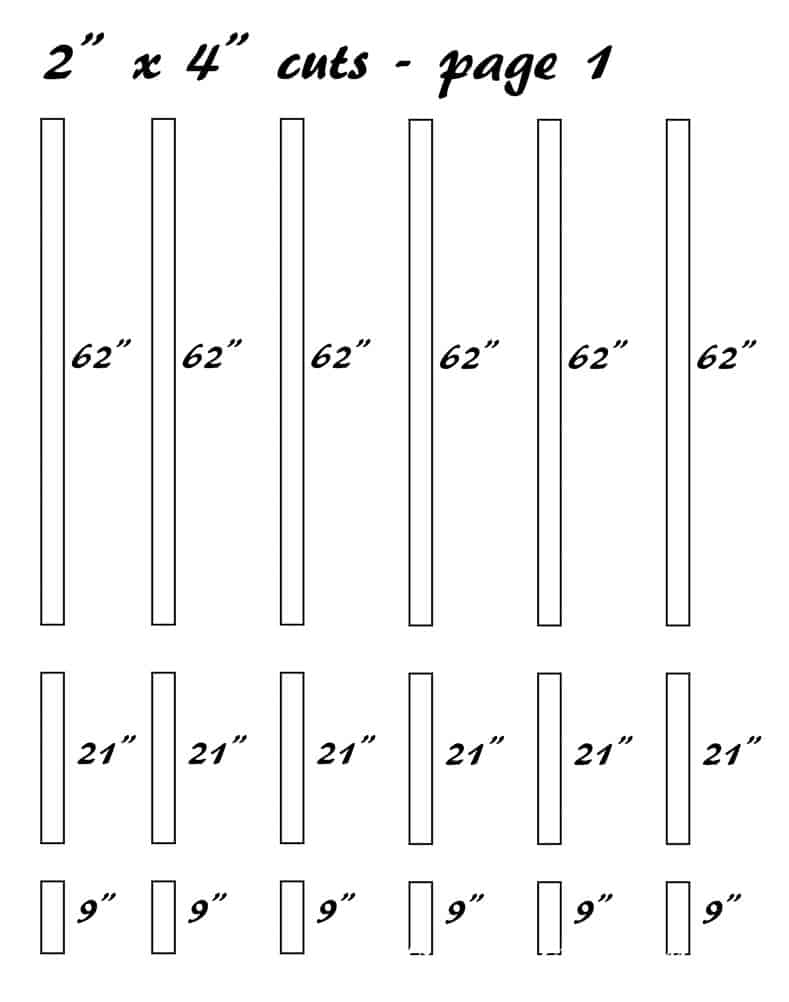
1. Cut the first 6 of the 2″ x 4″ x 8′ boards into a 62″, 21″ and 9″ length. There will be a 4″ piece of wood left for each of those boards.
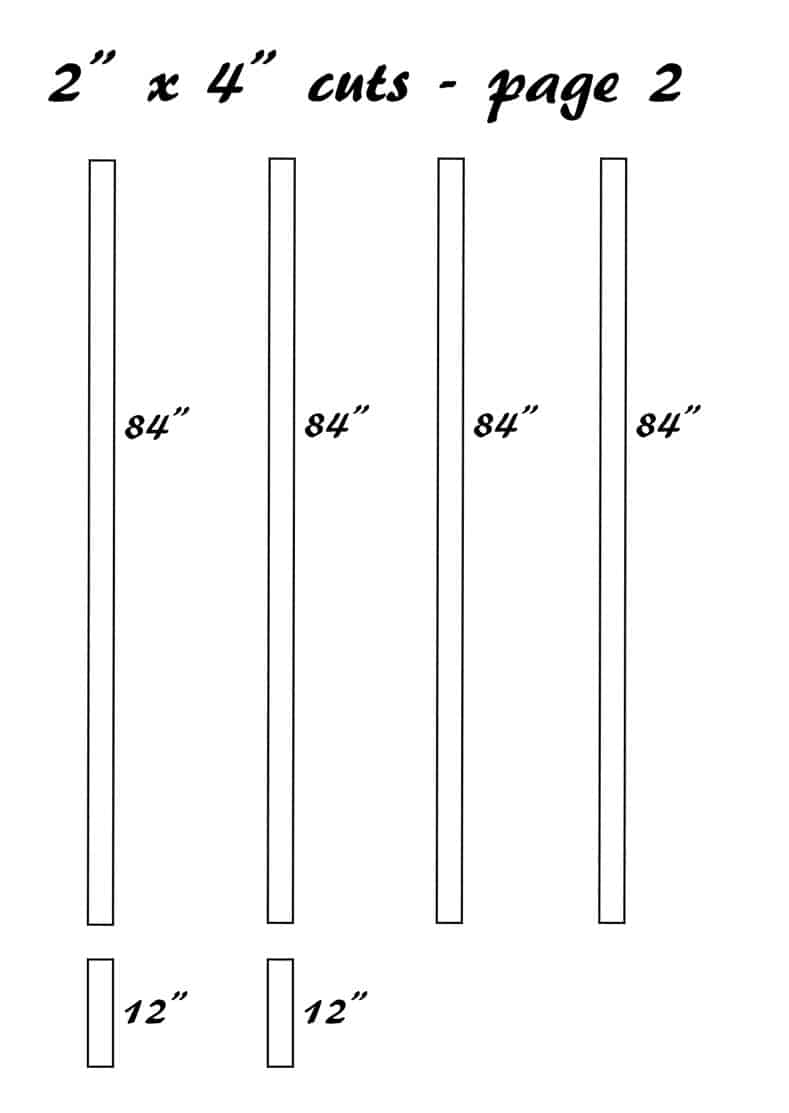
2. Then cut 4 of the boards into an 84″ length. We will also use 2 of the 12″ pieces that are left. There will be 2 12″ pieces of board left over.
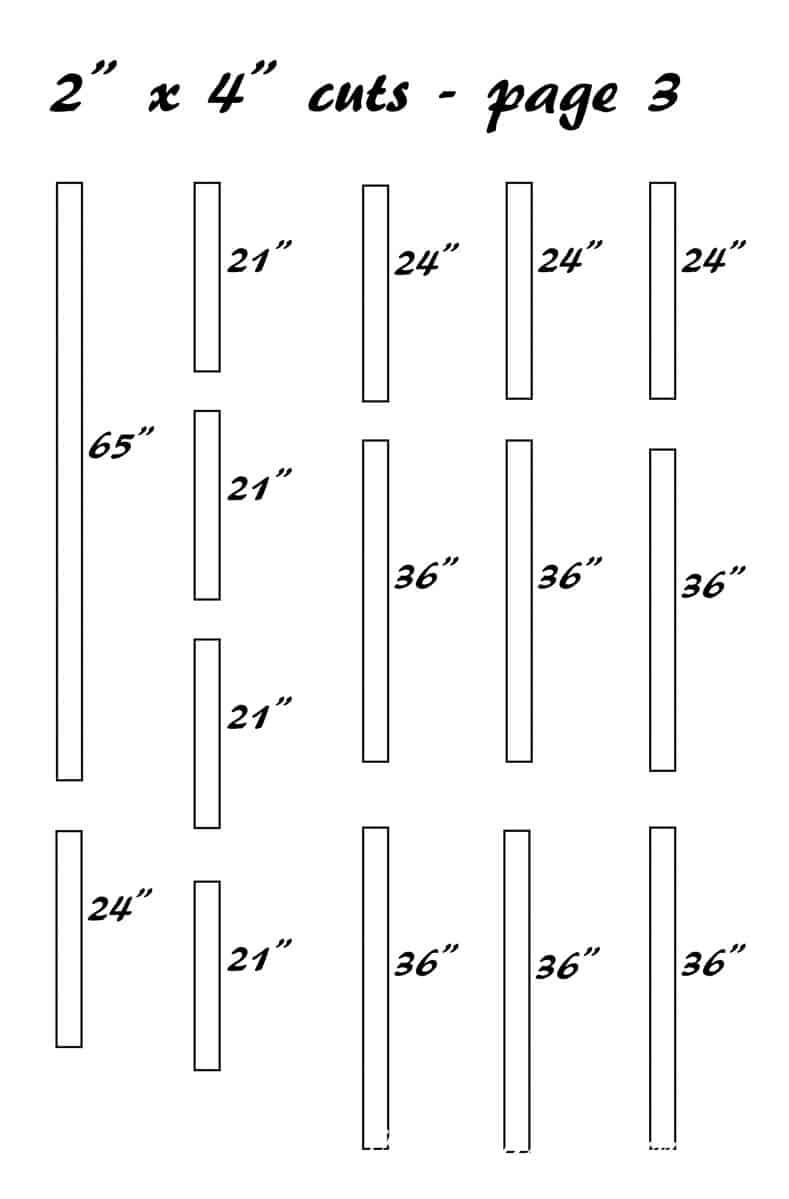
3. Cut one board into a 65″ and a 24″ length. There will be a 7″ piece of board left over.
4. Cut one board into 4 21″ lengths. There will be a 12″ piece left over.
5. Cut the remaining three boards into a 24″ length and 2 36″ lengths.
Build the Workbench Top Frame
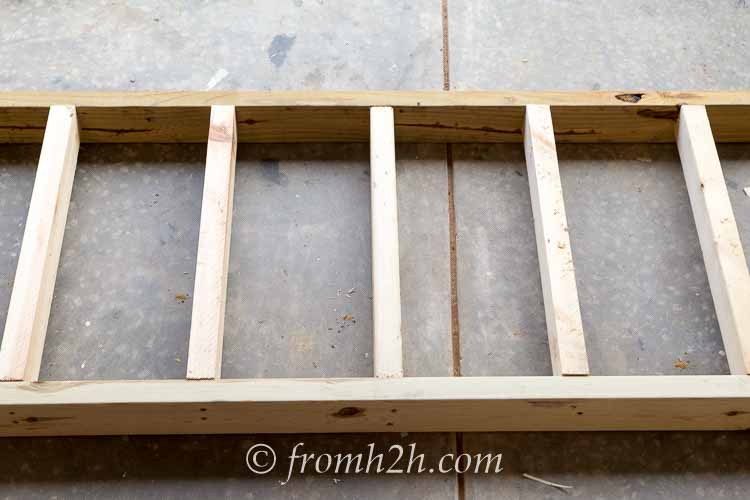
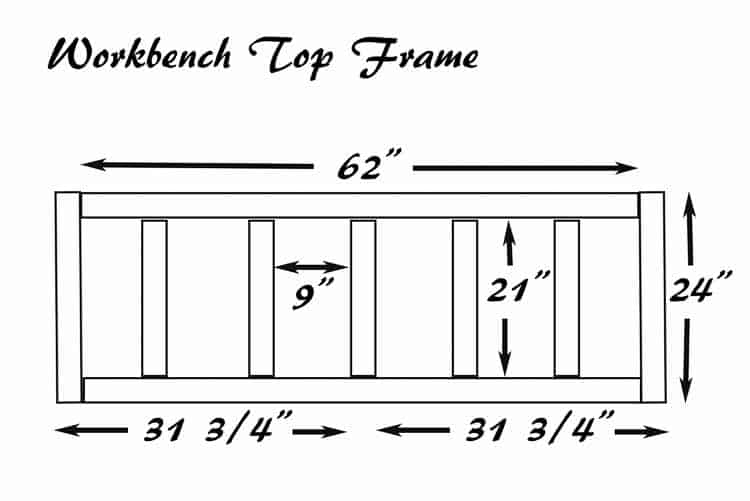
1. For the workbench top, you will need 2 of the 62″ boards, 5 21″ boards and 2 24″ boards.
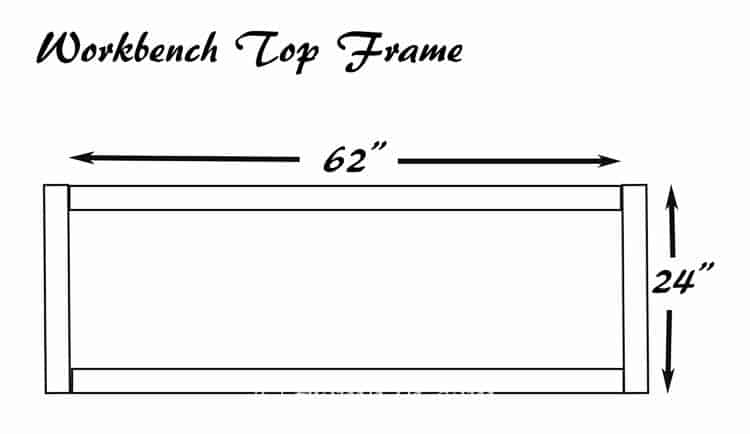
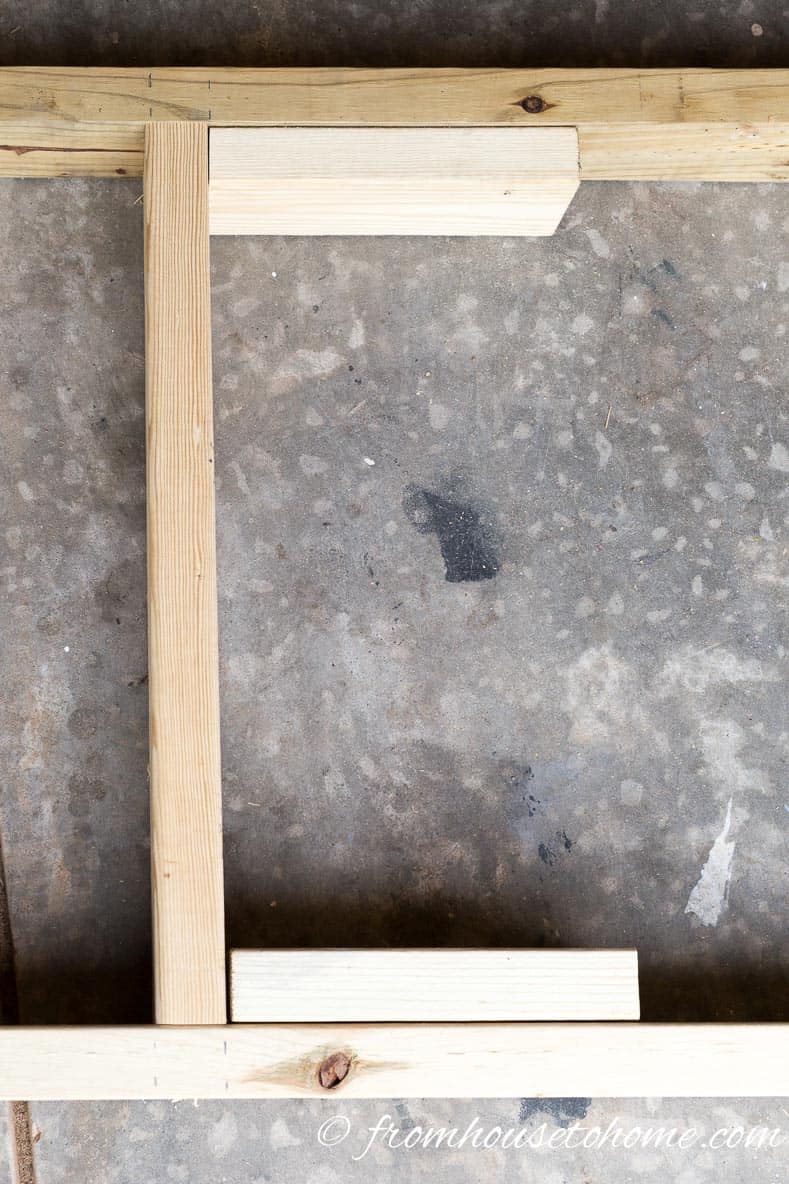
2. Use 2 2½” nails or screws at each end of the 62″ board to attach the 24″ boards. I like to use screws…mostly because if (or should I say when?) I make a mistake, they are easier to remove and re-do. Make sure that the ends form a 90° angle by checking the alignment with a construction square.
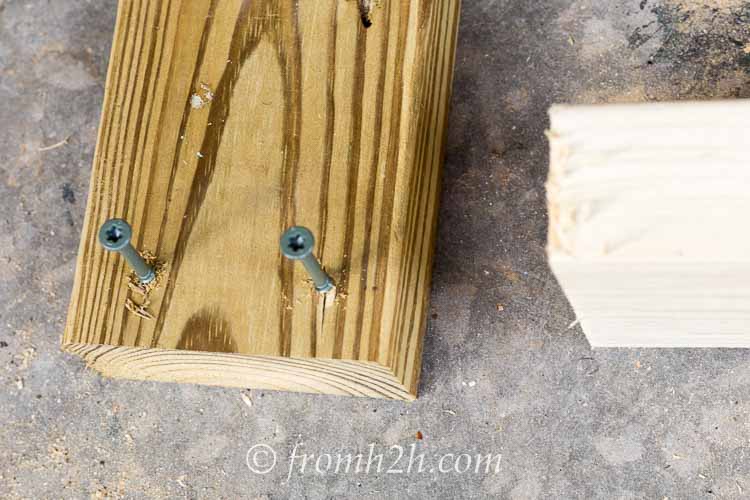
I find it easier to get the screws to go in straight if I start them with the 24″ board lying flat.

Then I turn the board sideways to attach it to the long board.
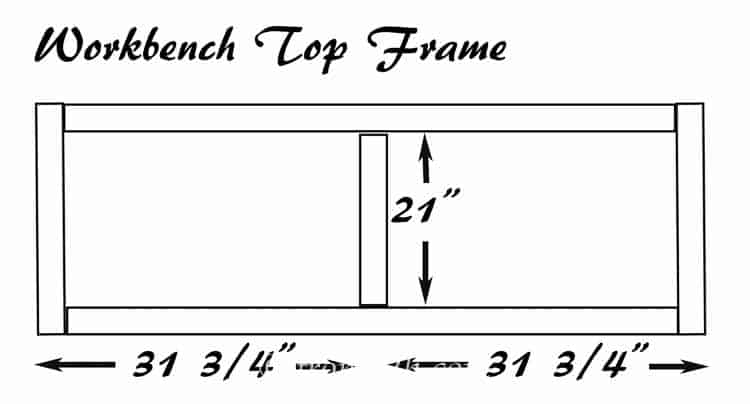
3. Measure 31 ¾” from the end of the frame and mark the position with a pencil. Measure the same distance from the other end of the 62″ board and mark it.
4. Repeat on the other side of the frame.
5. Install one of the 21″ boards so that it is centered between the pencil marks you just drew on the boards (using 2 nails or screws on each end). If the board doesn’t seem to match up with the lines, double-check all of your measurements and cuts, since this is probably a sign that something is wrong
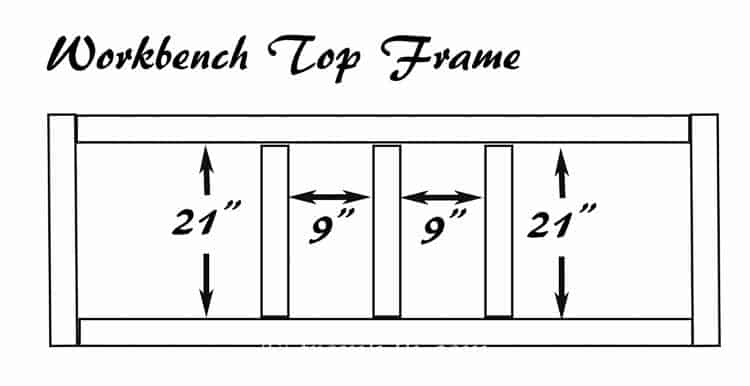
6. Install 2 21″ supports, one on each side of the center board, again using 2 nails or screws on each end.
Use the 9″ boards you have cut above as spacers to line up where these boards should be installed.
7. Add 2 more of the 21″ supports, 9″ from the last supports you added. Again, use the 9″ boards as spacers and attach with 2 2½” nails or screws.
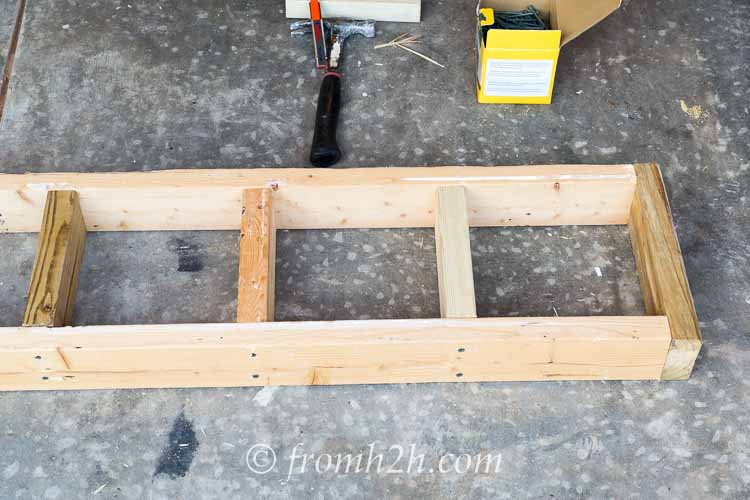
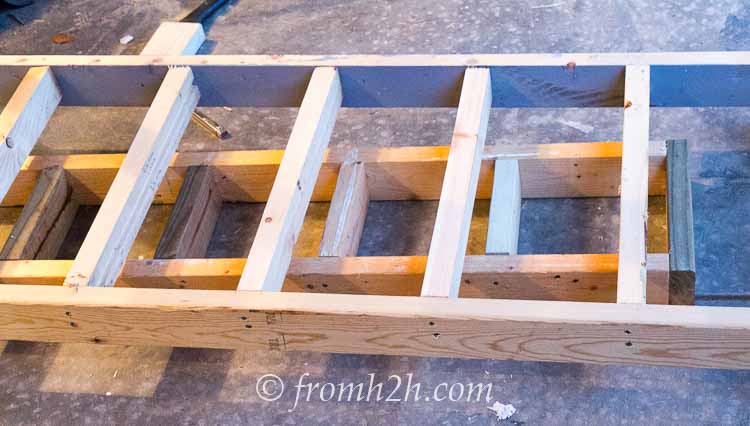
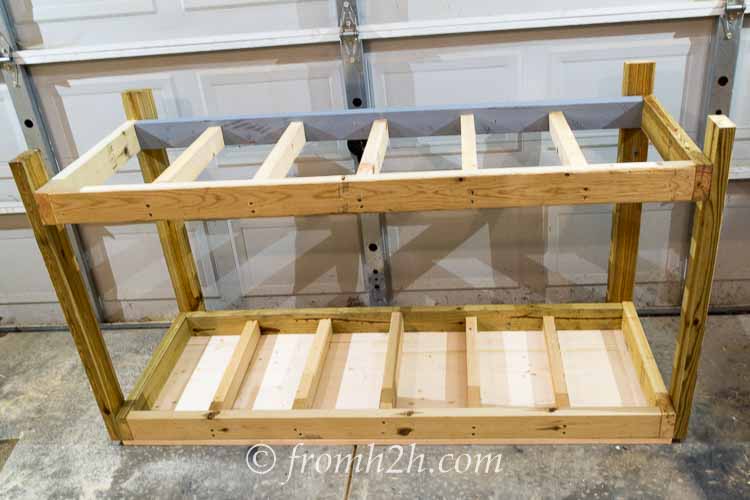
Build the Bottom Shelf Frame
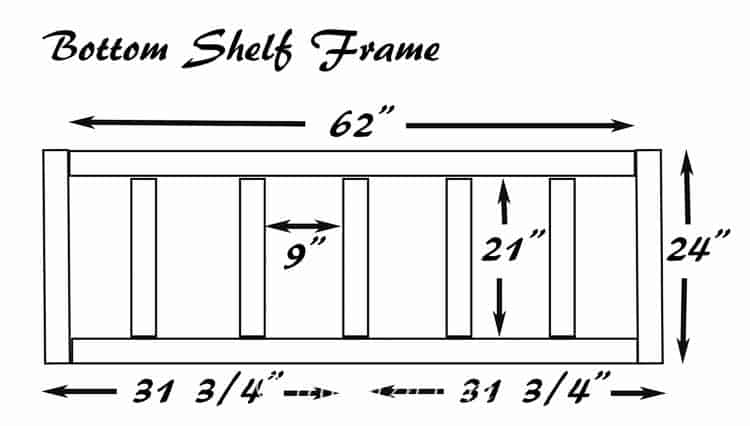
1. For the bottom shelf, you will need 2 62″ boards, 5 21″ boards and 2 24″ boards.
2. Use the same steps from the workbench top frame to make the bottom shelf frame.
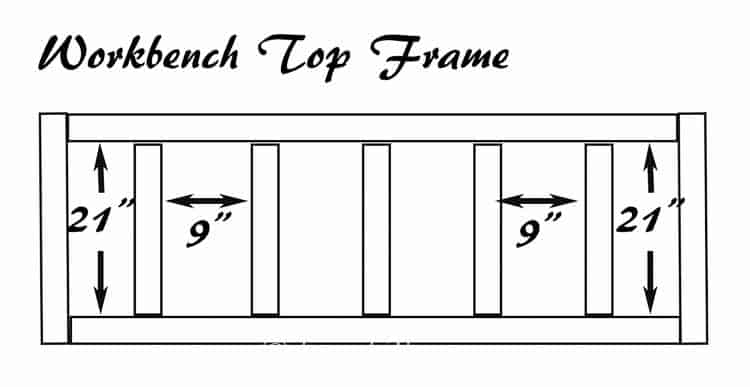
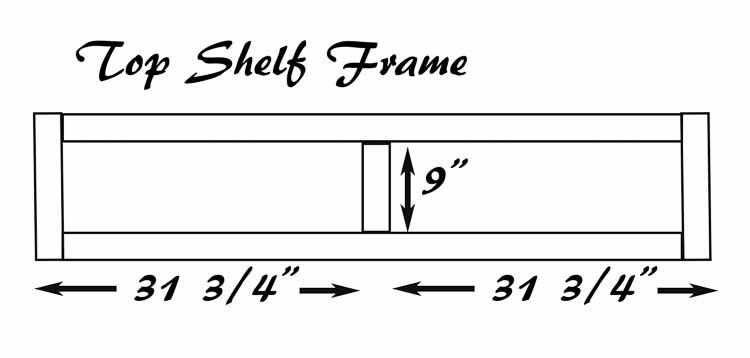
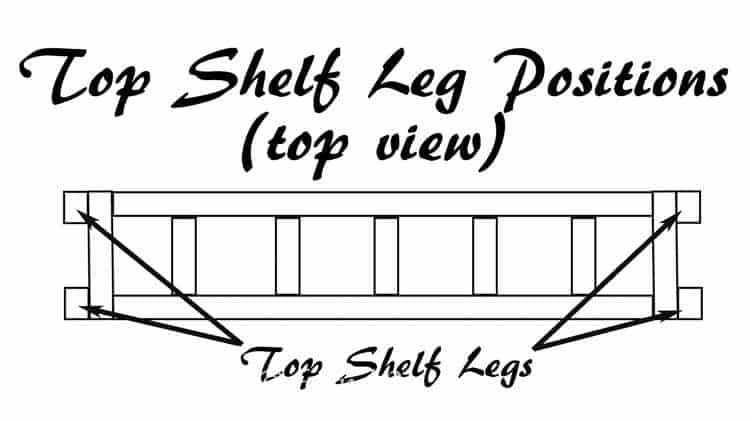
Build the Top Shelf Frame
1. For the top shelf frame, you will 2 62″ boards, 5 9″ boards and 2 12″ boards.
2. The steps for putting the top shelf together are pretty much the same as for the workbench top, except you will use 12″ boards for the ends and 9″ boards for the center supports.

3. Use 2 2½” nails or screws at each end of the 62″ board to attach the 12″ boards. Make sure that the ends form a 90° angle by checking the alignment with a construction square.
4. Measure 31 ¾” from the end of the frame and mark the position with a pencil. Measure the same distance from the other end of the 62″ board and mark it.
5. Repeat on the other side of the frame.
6. Install one of the 9″ boards (with 2 nails at each end) so that it is centered between the pencil marks you just drew on the boards. If the board doesn’t seem to match up with the lines, double-check all of your measurements and cuts, since this is probably a sign that something is wrong.
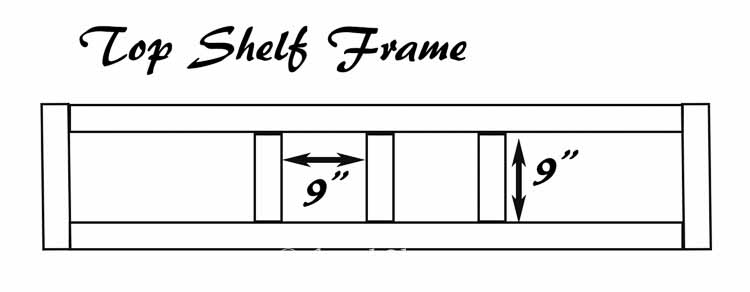
7. Install 2 9″ supports, one on each side of the center board, again using 2 nails or screws at each end. Use the 9″ boards you have cut above as spacers to line up where these boards should be installed.
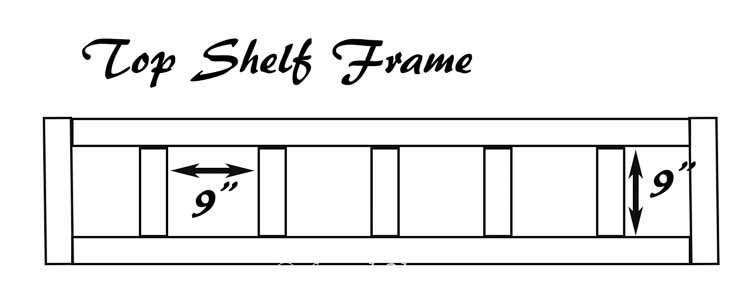
8. Add the last 2 of the 9″ supports, 9″ from the last supports you added, again using the 9″ boards as spacers. For the last board, you will only have 1 spacer left but usually by that point, the board lines up pretty straight any how. Also, note that this last spacer is an extra board, so don’t be worried that you have missed one somewhere.
Add The Legs To The Bench
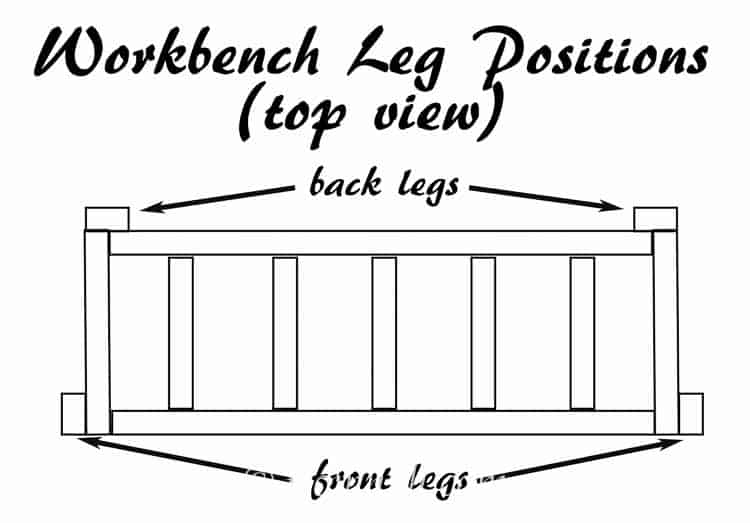
1. You will need the 4 36″ boards for this step.
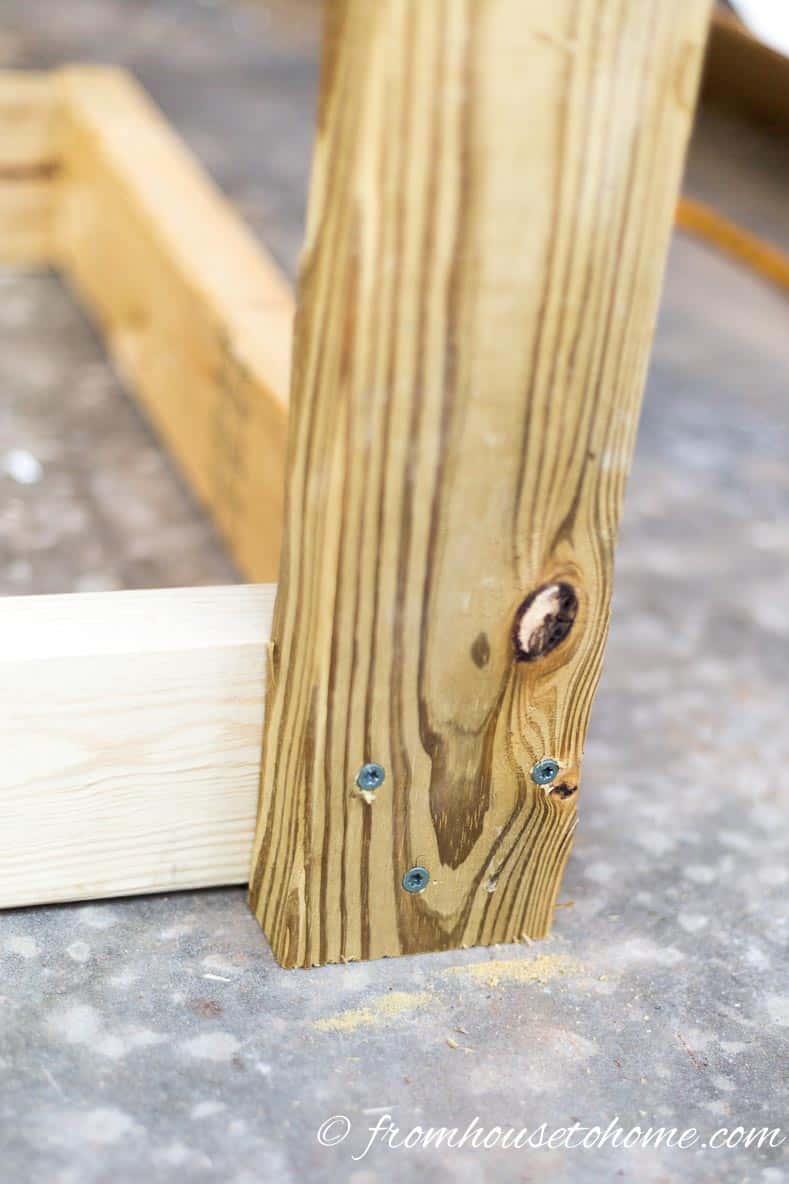
2. Attach the 2 back legs in the corners of the workbench frame, on the long board side of the frame. Use 3 nails or screws to secure the legs to the back of the frame.
3. Attach the 2 front legs at the corners of the workbench frame, on the short board side of the frame. They should be at a 90º angle from the back legs. This will allow the fold-down portion of the workbench to work properly.
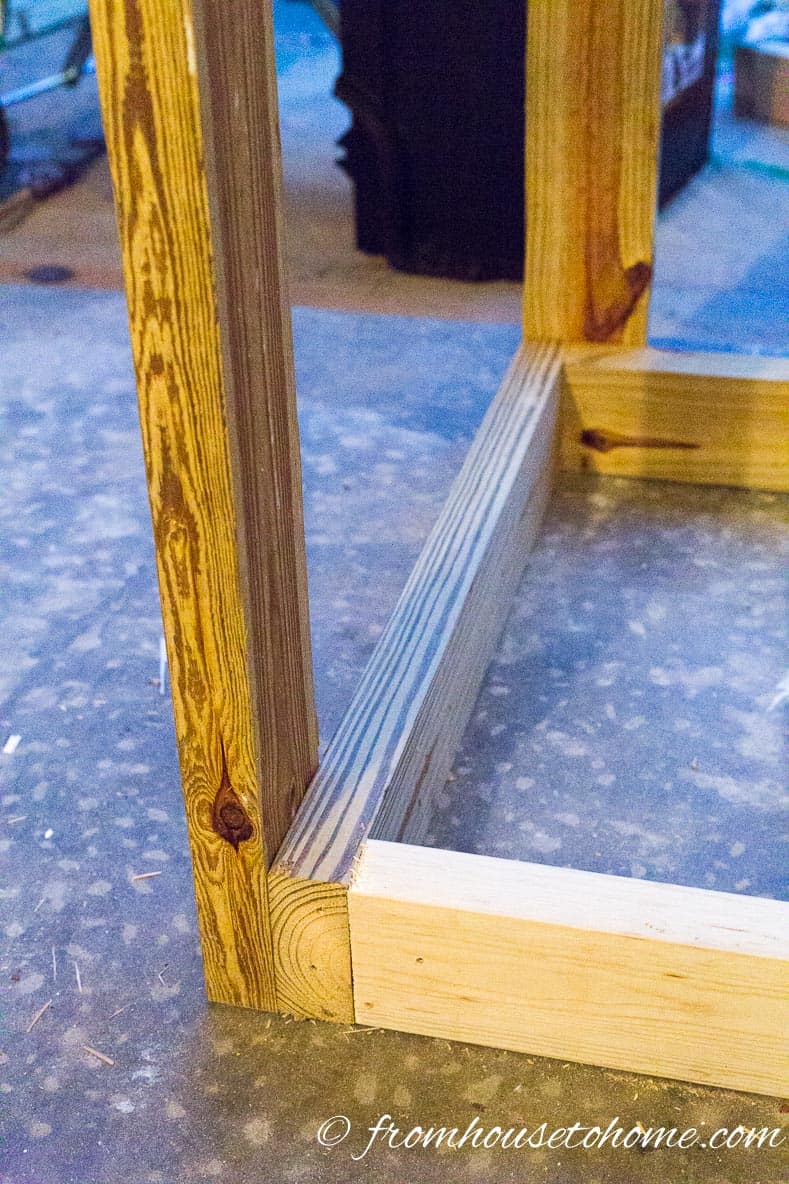
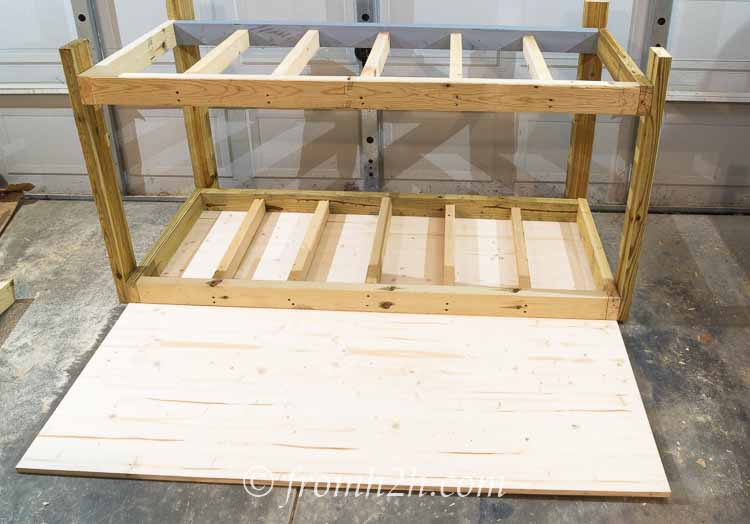
Install the Bottom Shelf Frame
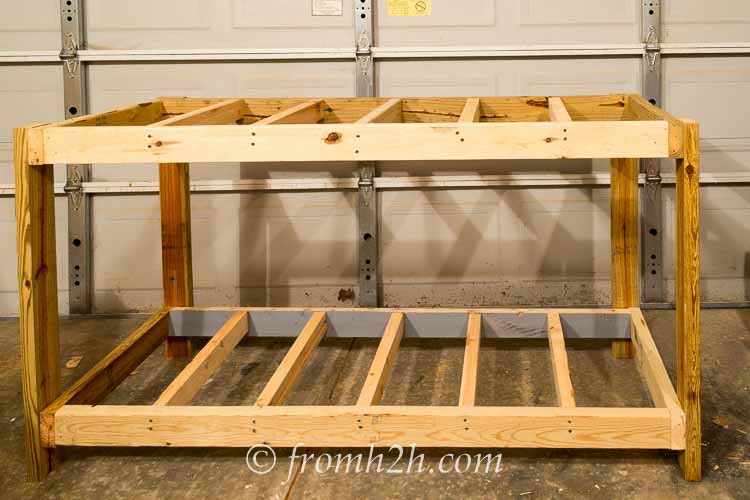
1. Turn the workbench over so that it is standing on its legs.
2. Slide the top shelf frame onto the floor between the legs of the work bench. This will hold up the bottom shelf while it is being installed.
3. Slide the bottom shelf frame on top of the top shelf frame. Line it up so that it is directly underneath the workbench top.
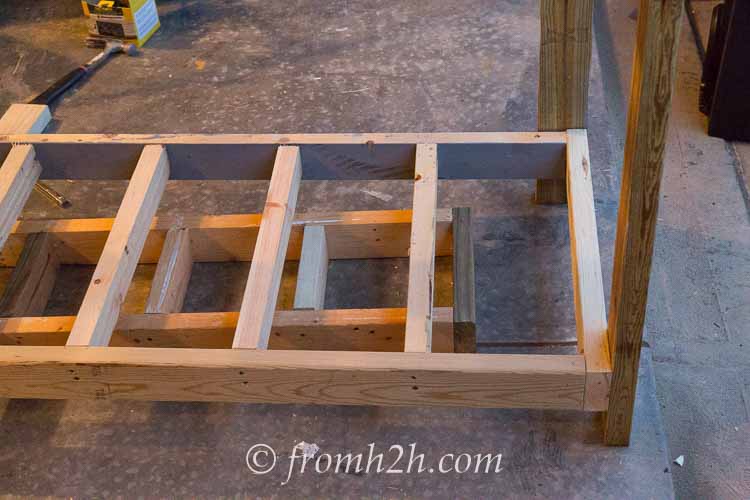
4. Use 3 nails or screws to attach the bottom shelf to the legs, in the same manner that the workbench top was installed.
Install the Workbench Top
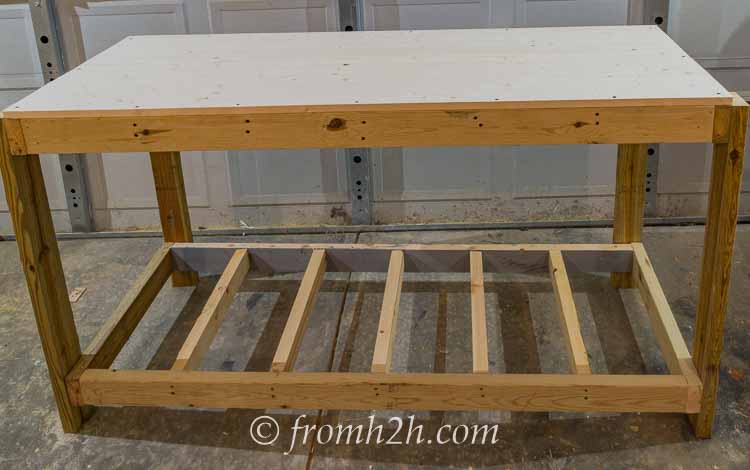
1. Center one of the 24″ x 65″ plywood pieces on the top of the workbench. It will go inside the legs that you have attached to the frame.
2. Attach it to the workbench top frame using nails or screws at the corners and every 12″ around the outside of the frame. If you are using screws, pre-drilling the holes makes it a little easier to install without splitting the wood.
3. Turn the workbench over.
4. Lay the second of the 24″ x 65″ plywood pieces on the ground as close to the front edge of the workbench as possible. This will be the fold-down portion of the workbench.
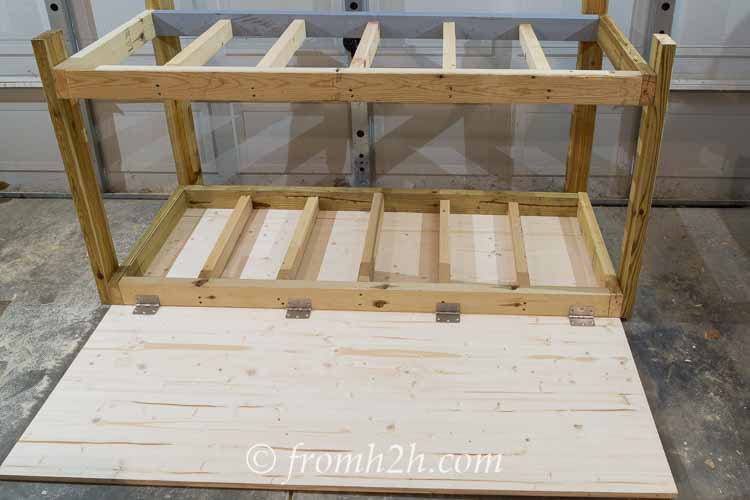
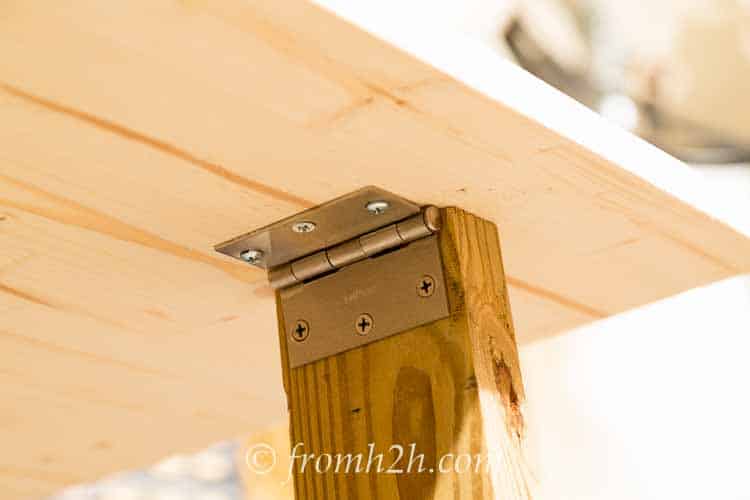
5. Attach the hinges to both the plywood on the ground and the side of the workbench using ¾” screws.
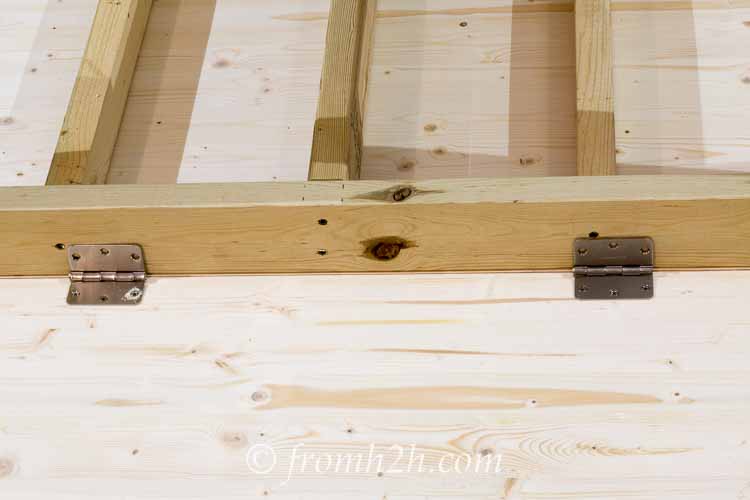
Make sure to keep the top pressed to the side of the workbench and on the floor so that the top will be smooth and straight when it is folded up.
Install The Top Shelf
1. You will need the 12″ x 65″ piece of plywood and 4 84″ boards for the shelf legs.

2. Attach the 4 legs in the corners of the top shelf frame, all on the short board sides of the shelf. Similar to the legs for the workbench, use 3 nails or screws to attach each leg. Since these legs are much longer, this step is much easier if you have help to hold the boards up!
3. Turn the shelf on its side.
4. Center the 12″ x 68″ plywood over the top of the top shelf frame. Screw or nail it in place at the corners and about ever 12″ around the frame. It will cover the tops of the legs.
5. Turn the shelf over so that it is standing on the legs. Note: this will not be very stable until it is attached to the workbench so be careful that it doesn’t fall over onto someone or something.
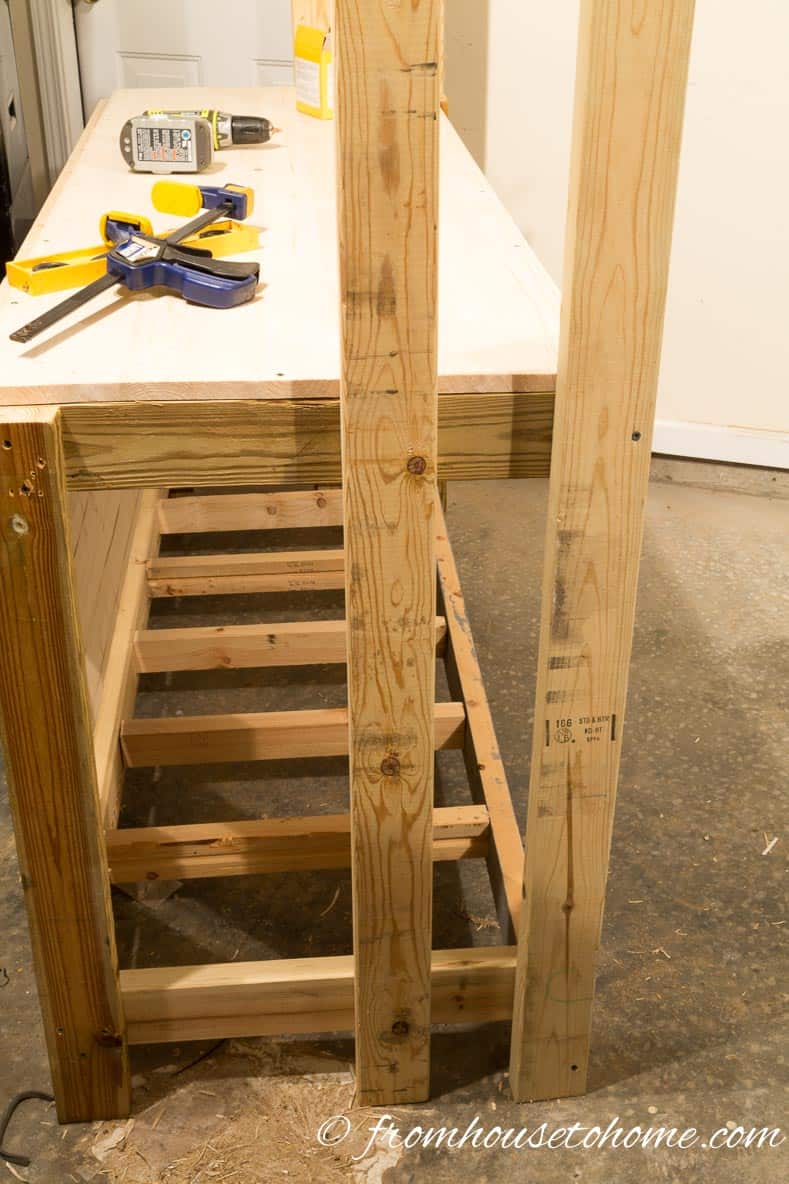
6. Position the shelf so that the legs are on either side of the workbench and the back of the shelf lines up over the back of the workbench.

7. Attach each of the legs to the workbench top and bottom shelves, making sure that there is about 5 inches of space between the two legs. Also add a couple of screws or nails joining the back shelf leg to the back workbench leg (this will add extra stability).
The desk and top shelf should now be very stable.
Add the Fold-Down Workbench Legs
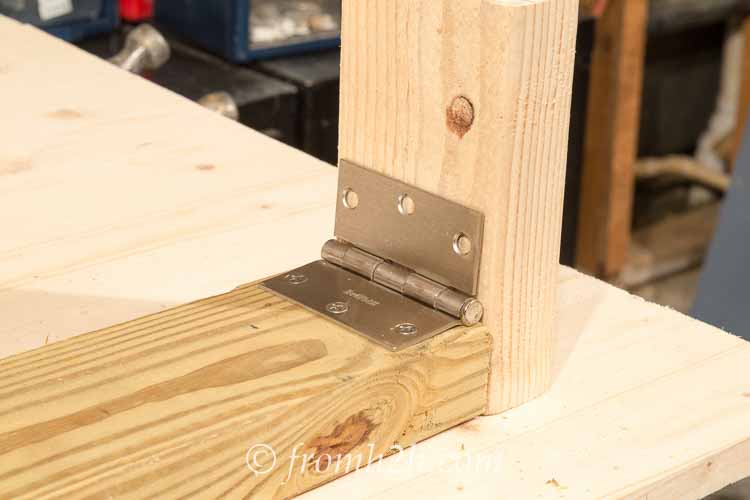
1. Add hinges to the ends of the remaining 2 36″ boards. Use a scrap piece of board to make sure that the hinges are installed level with the ends…just be sure not to attach the hinges to the scrap board 🙂
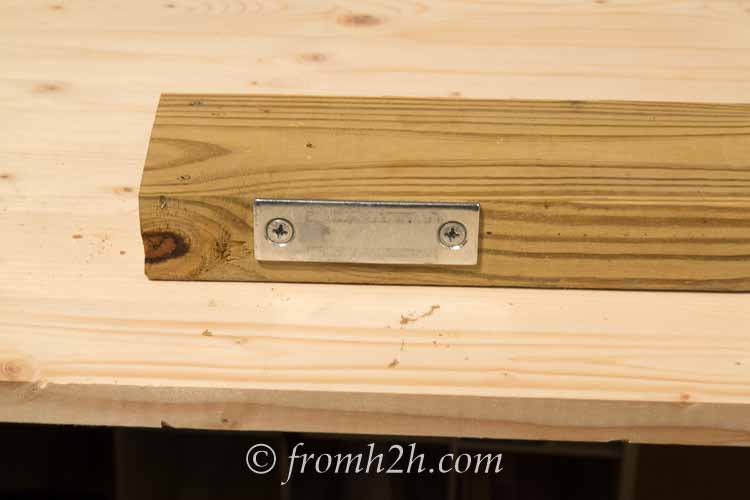
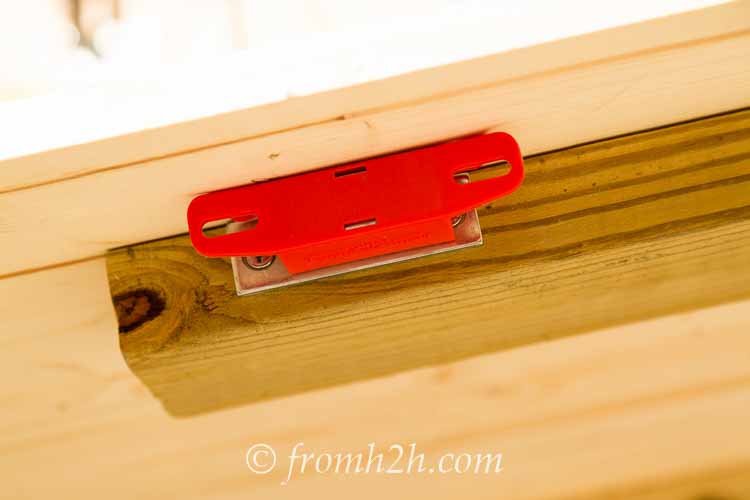
2. On the side of the board, at the other end from the hinge, attach the magnet strike plate. Repeat for the other board.
3. Lift the move-able portion of the workbench top and position the legs at either end of the top close to the front. The top should be resting on these legs.
4. Move one of the legs to be 2″ from the front of the fold-down top and 6″ from the right side of the top. Make sure that the hinge side is facing sideways toward the left side of the workbench…it should not be facing towards the front, back or closest side of the workbench or the leg will not fold up properly when closed.
5. Attach the other side of the hinge underneath the fold-down top.
6. Move the second leg to be 6″ from the front of the fold-down top and 6″ from the left side of the fold-down top. Staggering the legs like this will allow them both to close completely against the top.
7. Again make sure that the hinge is facing towards the other side of the workbench. Then attach it to the underside of the fold-down top.
8. With one leg supporting the workbench top, fold the other leg up until it reaches the underside of the top. Use a pencil to mark where the strike on the leg hits the underside of the top.
9. Lower the leg so that it is supporting the top again.

10. Then attach the larger magnet where you made the pencil mark on the underside of the board. Make sure that the magnet is installed with the magnet facing towards the strike plate.
11. Fold the leg up and make sure the magnet and the strike plate meet, and that the leg is held in position. If the leg won’t stay up, you will need to get a stronger magnet.
12. Repeat steps 7 – 10 to install the magnet for the other leg.
The Finished Project
The basic workbench project is now finished! You should be able to fold the legs under the fold-down top and attach with the magnets to keep them in place when the top is down.
Then just lift the top up and unfold the legs to fully extend the top.
Have comments or questions on How to Build a Fold Down Workbench? Tell us in the section below.
This post was originally published on January 4, 2016 but was updated with new content on July 7, 2023.
I think someone should let you know (hopefully I’m not the first) that you’re giving some very bad woodworking instructions in this article. You can clearly see in a lot of your photos that the wood is already splitting from the screws that don’t appear to have pilot holes drilled first. You have folding joints without any corner braces, struts or anything – they’re set up to fold like a house of cards! Also, driving screws directly into the direction of the grain tends to split wood and gives a weak hold. Anyone who builds a table this way is going up end up with something unstable and weak. If a lot of weight is put on it it could even be dangerous. At the very least you should include a disclaimer that it’s an amateur attempt and you don’t have knowledge of sound woodworking practices.
Hi Vanessa…this isn’t intended to be a professional woodworking project. It’s a workbench made with 2x4s, not 3/4″ plywood. I have built decks, arbors, pergolas and fences in my backyard using 2″ lumber and screws with no pilot holes. After 20 years of exposure to the weather and the occasional tropical storm, all of those structures are still going strong. As for the workbench, it is designed so that most of the weight is held up by the 2×4 legs. The screws are just holding everything together (not structurally). Piano hinges are rated to hold more weight than normal hinges. And the other end of the fold-up board is held up by the 2x4s that are braced against the floor This is much stronger than a brace coming from the side of the frame would be. In no way is this bench “weak and unstable”. I regularly store hundreds of pounds of tools on it, have used it every day for almost 7 years to complete hundreds of projects and it is just as sturdy as the day I built it. In my books, actual experience with a product beats theoretical knowledge every time.
Thank you for sharing. I have a work area that needs to be organized. I’m tired of the handy man going to buy stuff I already have simply because I can’t find it. Great tips and tricks. I will certainly being using them.
Thanks again
Thanks, Mona! My workbench and tool organizing projects have definitely made finding stuff easier! Hopefully they’ll be helpful for you, too 🙂
Good job! Precise instructions. You are going to enjoy having this wonderful large and sturdy work surface and future projects will take less time to complete.
Thanks! I am looking forward to using it for my next project!