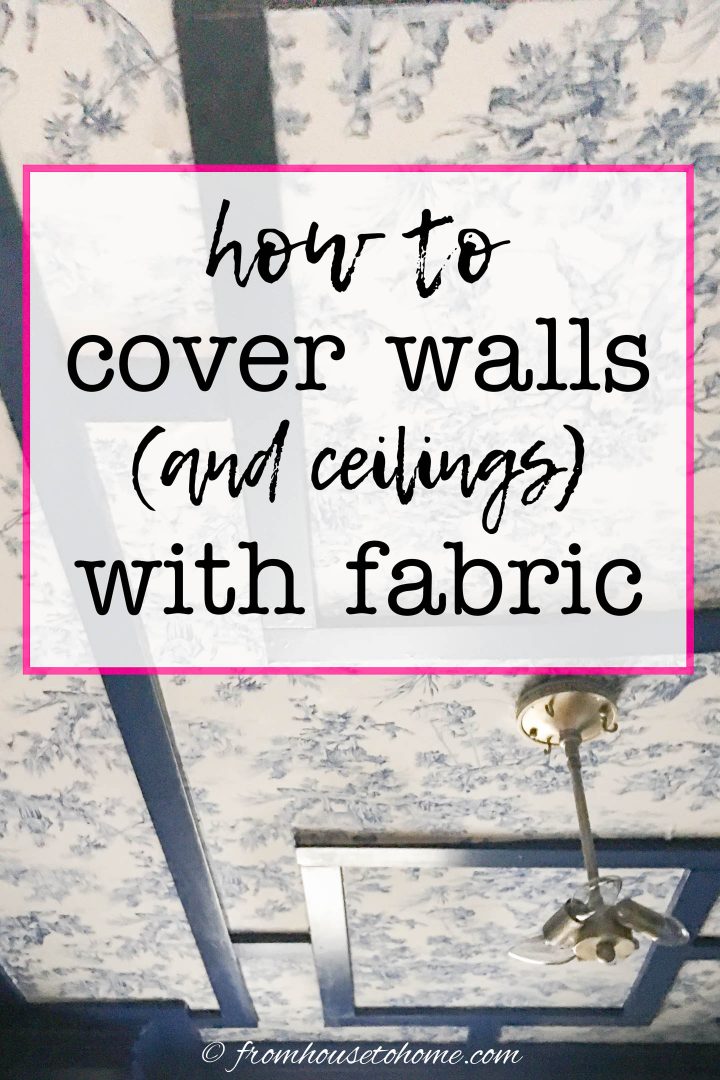
How To Cover Walls With Fabric – 3 Ways
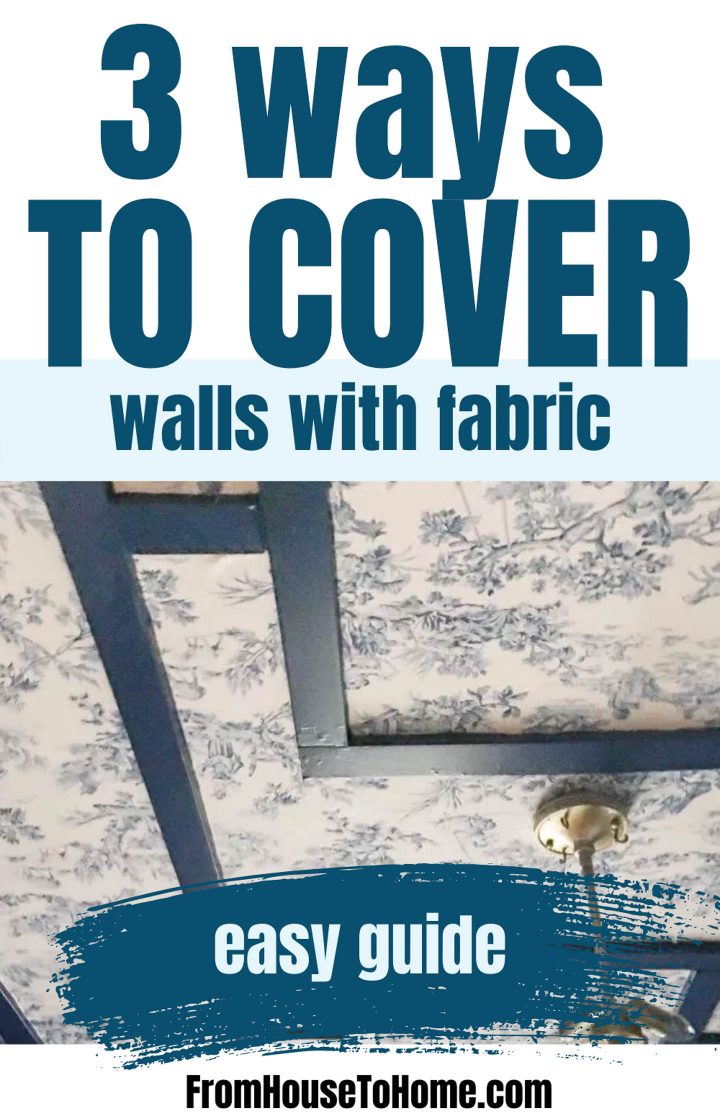
Fabric is a great way to add warmth and texture to a room. So it’s a wonderful option if you’re looking for a wall treatment that’s a little different. And depending on how much effort you want to put in, where you are installing it and how permanent you want it to be, there are three different ways you can attach it. We’ll be showing you how to cover walls (and ceilings) with fabric using all three methods so you can choose the one that works best for your situation.
Recently, I’ve been working on updating my den (stay tuned for the full reveal!).
I really wanted to put wallpaper up on the walls and ceiling, and use a matching fabric for the curtains. But I couldn’t find anything in the pattern and color I wanted at a price point I could afford.
However, I was able to find some reasonably priced fabric that I loved! So it became apparent that the easiest, most economical solution was to use the fabric as wallpaper.
I know that the quickest way to put fabric up is to staple it (kind of like upholstering the wall). That way it’s really easy to take down if you decide you don’t want it later (or if you only want to put it up temporarily).
My only dilemma?
Some of the walls in that room are plaster over cement cinder blocks and the ceiling is plaster over lathe. Staples don’t stick to either of those very well!
So I decided to use the staples for the walls that are drywalled and fabric starch for everything else.
But as I found out, starch doesn’t work very well for applying fabric to the ceiling. The fabric keeps falling down and the starch drips everywhere! So I ended up using a third method: wallpaper paste.
Here’s how to cover the walls (and ceiling) with fabric – all three ways.
If you want to skip straight to a specific section, click the links below
How much fabric will you need?

For all methods, you need to figure out how much fabric you’re going to need.
For this you’ll need a measuring tape.
1 | Measure the length
First, measure the height of the walls (or space) you are covering (in inches).
If you are covering a ceiling, measure the length of the ceiling.
Add 2 inches to this measurement. This will be the length of each of your pieces of fabric.
For an 8′ tall ceiling, this would come out to 96″ + 2″ = 98″.
2 | Measure the width
Then measure the width of each of the walls you are covering and add their measurements together to get a total (in inches).
So you might end up with measurements such as: 123″, 180″, 123″ and 180″, which means the total would be 606″
If you are covering a ceiling, you just need to measure the width of the ceiling.
3 | Calculate how much fabric you will need
Determine the number of fabric panels you need
When you find the fabric you are going to use, find out how wide it is.
Then divide the total measurement from step 2 above by the width of the fabric and round up. This will tell you how many strips of fabric you need to cover the wall.
Using our examples from above with a piece of fabric that is 54″ wide, we would have 606″ / 54″ = 11.222 rounded up would be 12 strips of fabric.
To be on the safe side don’t try to remove pieces for openings such as windows and doors unless you are really confident that you can do the calculations properly.
Determine the length of each strip
Use the length you measured in step 1 above to calculate how long each strip will be.
For fabrics that don’t need to be matched (eg. vertical stripes, all over patterns and solid colors), use the number exactly as calculated above. In our example that would be 98″.
For fabrics with a pattern that does need to be matched, you’ll need to do a little more math:
- First, find out how large the pattern repeat is. If you’re ordering online, they usually tell you. Otherwise, you’ll have to measure it (or get the store clerk to help you). We’ll use a 26″ pattern repeat measurement as an example.
- Next, divide your length measurement by the repeat measurement and round up to find the number of repeats you need. For our example, we would need 4 repeats (98″ / 26″ = 3.769 which rounds up to 4)
- Finally, multiply the repeat measurement by the number of repeats to find out the length of each strip. In our example, the length of each strip would be 104″ (4 x 26″)
Calculate the final yardage
To calculate the final yardage, multiply the number of strips by the length of each strip. In our examples:
- for unmatched fabric, this would be 12 X 98″ = 1176″
- for matched fabric, this would be 12 X 104″ = 1248″
Then divide by 36″ to convert to yards and round up. In our examples:
- for unmatched fabric, this would be 33 yards (1176″ / 36″ = 32.667 rounded up to 33)
- for matched fabric this would be 35 yards (1248″ / 36″ = 34.667 rounded up to 35)
Finally, you might want to add a yard to cover any minor mistakes. Which would make our examples 34 yards and 36 yards respectively.
The prep work
Regardless of which method you are using, you’ll need to do a few things before you start.
Supplies
- screw driver
- (optional) measuring tape
- (optional) paint that is the same color as the background of your fabric
- cutting wheel*
- (optional) scissors
Preparation Steps
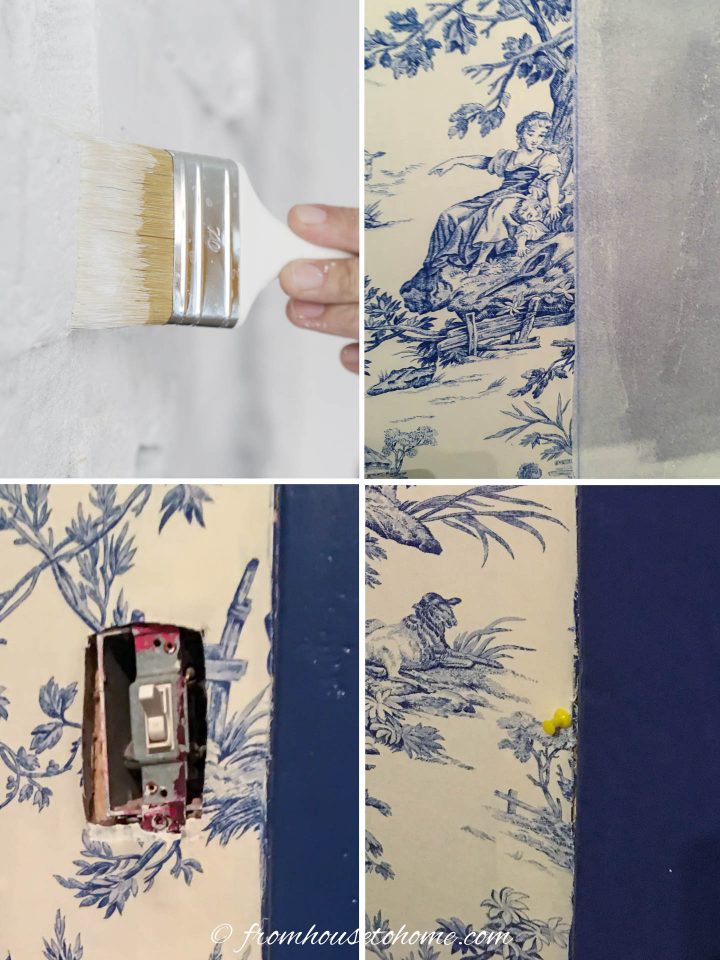
- Wash the walls to get rid of any dust.
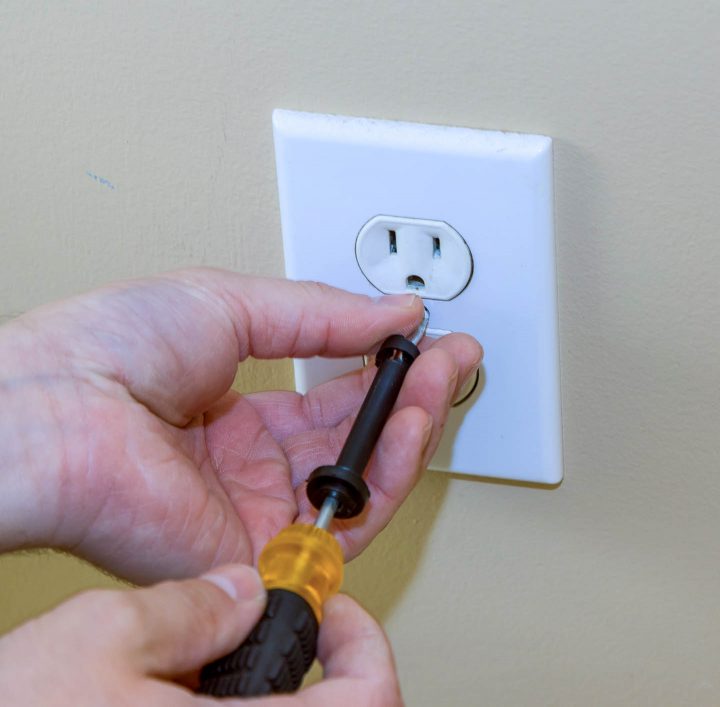
- Use a screwdriver to remove any light switch covers, electrical outlet covers, light fixtures and vents.
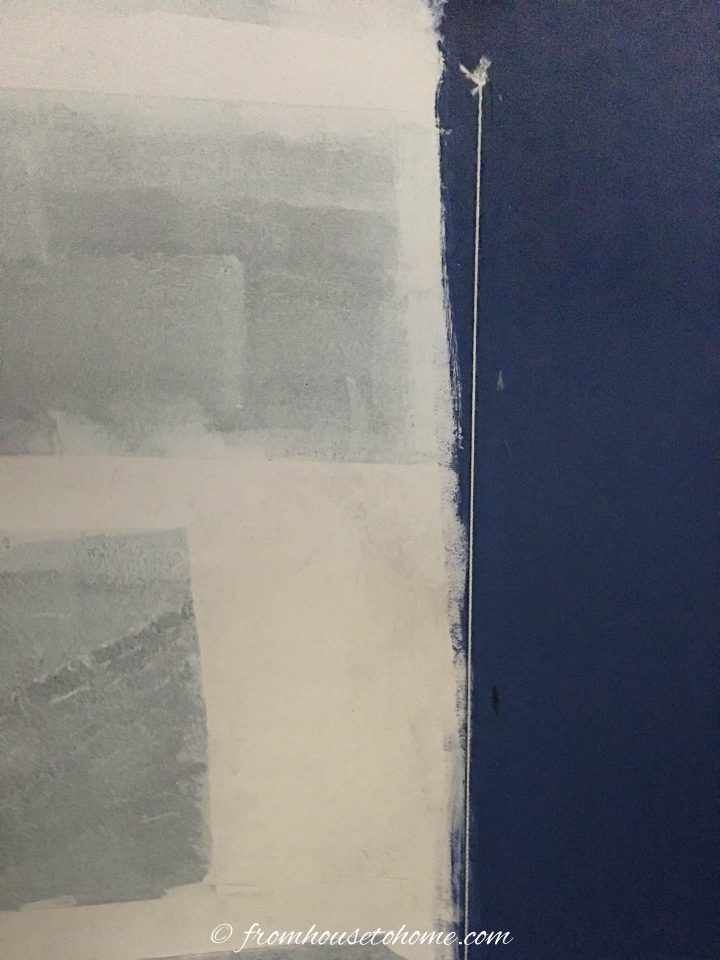
- If you are not covering the entire height of the wall, draw a horizontal line along the wall where you want the fabric to stop. Measure from the ceiling down to create this line. e.g. I put my fabric behind board and batten trim with the fabric about 2/3rds of the way up the wall from the baseboards.
- (Optional) If you are putting up fabric over a wall that is a totally different color, it’s a good idea to give the wall one coat of paint in a color that is similar to the background of the fabric. This helps to hide any small gaps in the seams.
Cut the fabric
Cutting the fabric to size is the next step, and it also uses the same process regardless of how you are applying the fabric to the wall (or ceiling).
Supplies
- fabric
- measuring tape
- cutting wheel*
- (optional) scissors
Steps
- Cut off the selvage edge of the fabric. That’s the white strip on each edge that doesn’t match the pattern. Try to make the cut as straight as possible. Using a cutting wheel* (rather than scissors) to do this makes a clean edge that doesn’t fray as much.
- Using scissors or the cutting wheel, cut fabric strips to the length from measuring step 1 above. If you are matching a pattern, make sure that you cut the fabric so that the patterns line up.
How to cut fabric to fit between moldings
If you are fitting the fabric between moldings rather than covering a whole wall, it helps to make a pattern of the space(s) you need to cut.
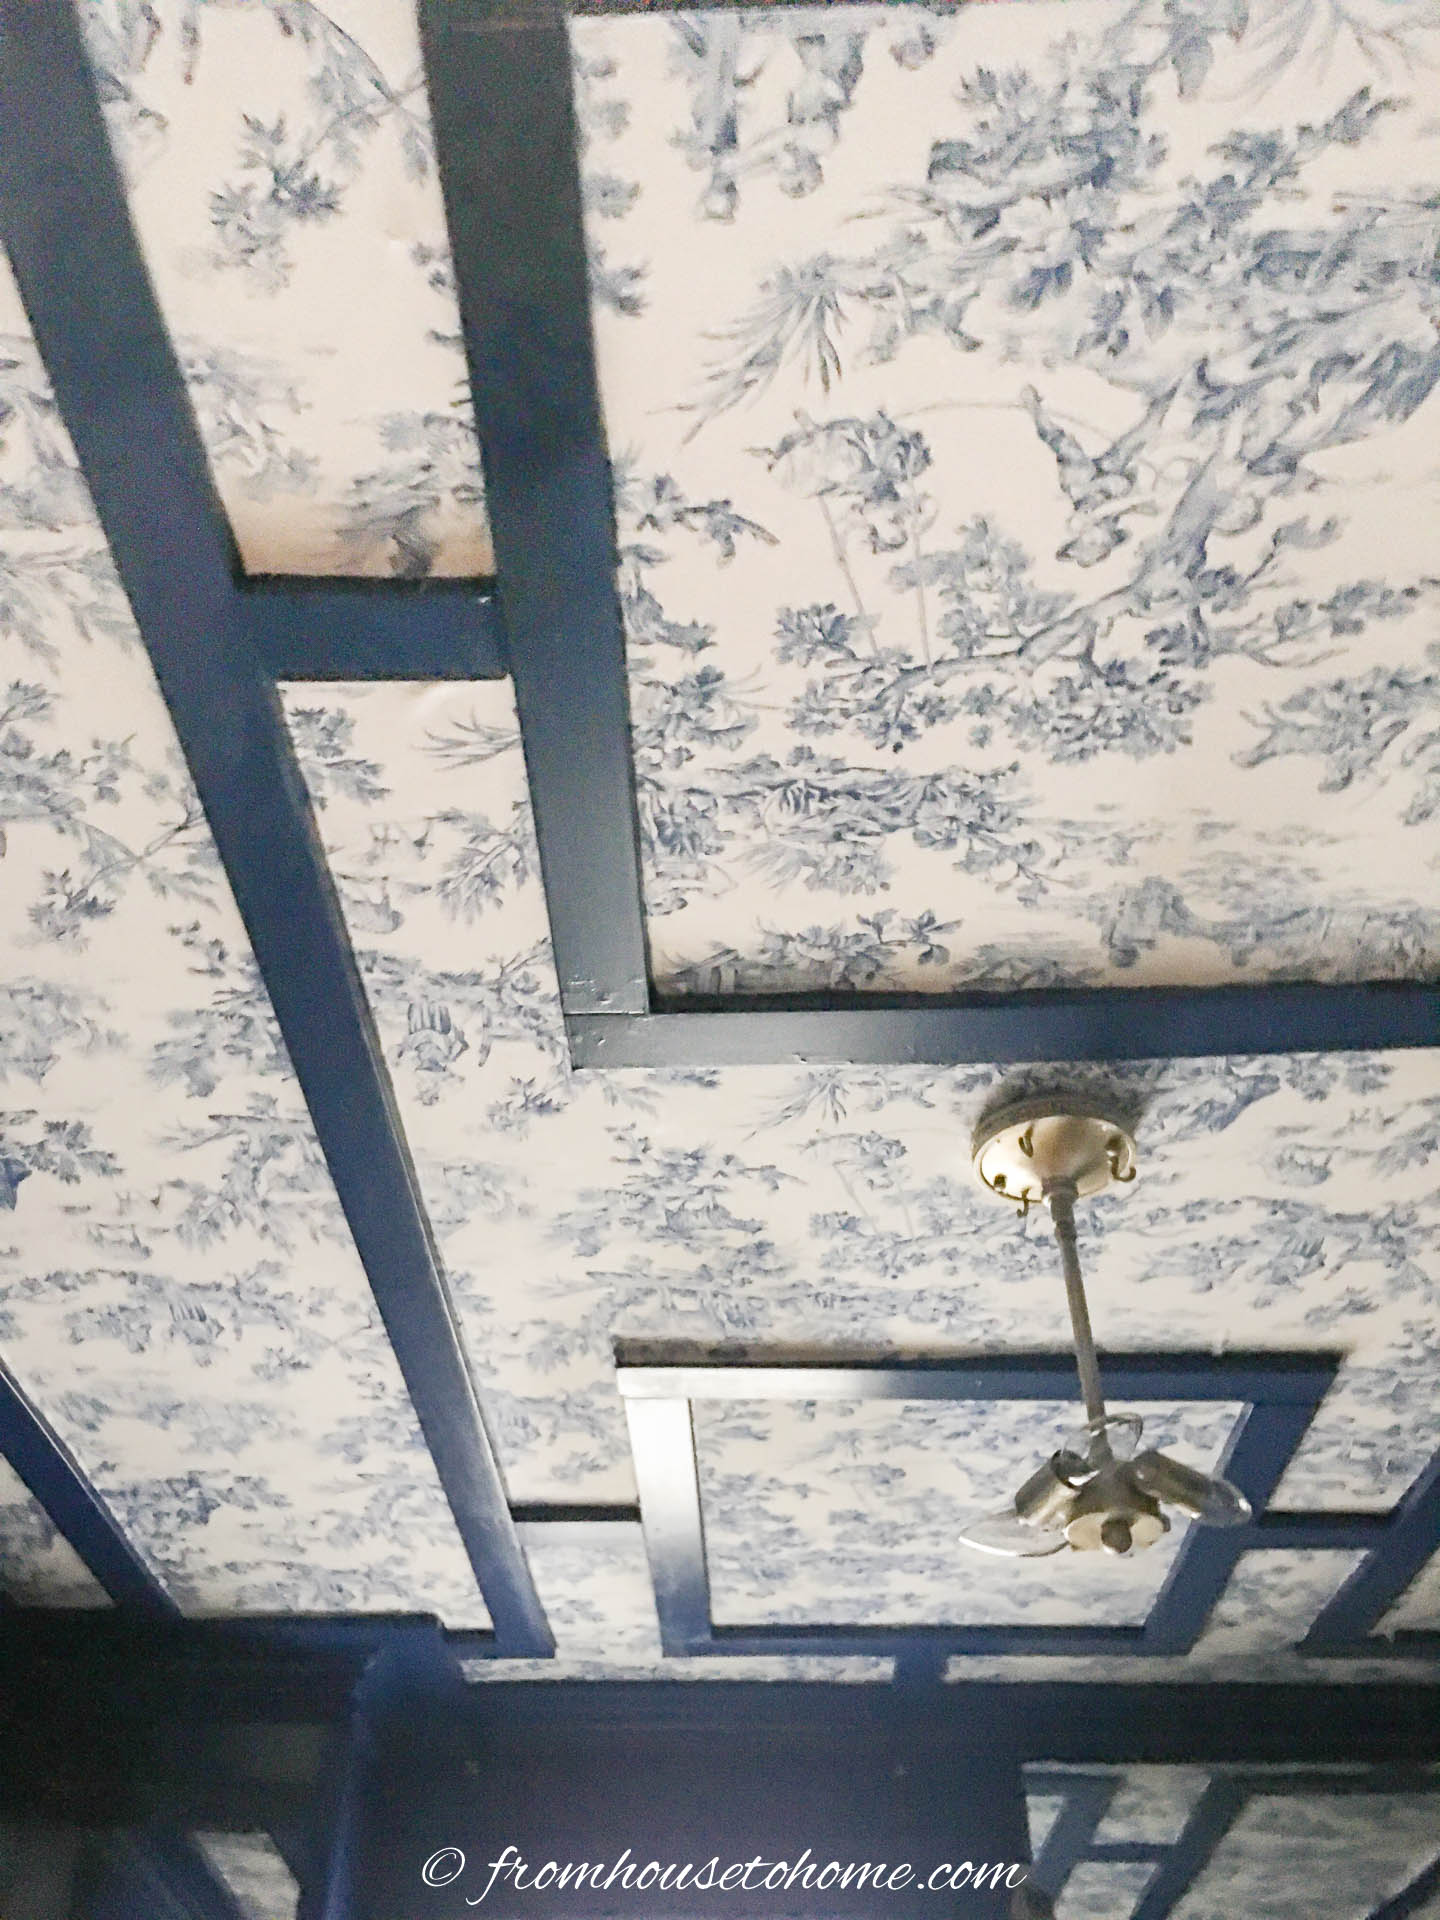
This is what I did to fit the fabric between the moldings on my ceiling.
Measure the size of the space(s) between the moldings.
Then cut a pattern out of paper. You may need to tape many pieces of paper together to make one piece that’s large enough.
Then lay the fabric out on a large flat surface and pin the patterns onto it in the sequence they would appear on the wall (or ceiling).
Cut out the shapes. If you have many different sizes (like I did on my ceiling), you may want to number them in pencil on the back so you know which ones go where.
How to hang the first strip straight
Regardless of which method you use to attach your fabric, the most important step is the first one: Making sure you get the first piece on straight.
If you don’t do this right, the whole room will be crooked.
So these are the steps for marking the line where the edge of the first piece of fabric will be lined up.
Supplies
- pencil
- (optional) small nail or tack
- chalk line*
How to mark a straight line for walls
Start in a corner and measure out the width of the fabric.
If your material has a repeated pattern, it’s important to work from left to right since that’s the direction the pattern will match in. (To keep it simple in the steps below, I’m going to assume that we’re all working in this direction.)
Mark this spot with a pencil.
Then drop a vertical plumb line from the top of the wall (that’s a long piece of string with a weight on the end). You can either have a helper hold it up or tack it to the wall with a small nail.
Mark the line on the wall.
I used a chalk line* for this. You can use it as the plumb line. Then pull the string down at the bottom so its tight, and snap it against the wall so the chalk draws the line.
One more tip
My last tip on making sure everything is straight, is to do each wall separately. It’s almost impossible to keep the fabric straight after wrapping it around a corner.
When you get to a corner, use a utility knife or cutting wheel to cut the fabric off.
Then use the piece of fabric you cut off as the first strip on the next wall, repeating the process with the plumb line to make sure you get it straight.
How to mark a straight line for ceilings
Start in one corner of the ceiling and measure out the width of the fabric at the edge of one wall.
If your material has a repeated pattern, it’s important to work from left to right since that’s the direction the pattern will match in. (To keep it simple in the steps below, I’m going to assume that we’re all working in this direction.)
Mark this spot with a pencil.
Then repeat on the opposite side of the ceiling.
Put the loose end of the chalk line on a small nail or tack in the ceiling where you marked it (this is only required on one end). Or you can have someone hold it.
Then pull the chalk line across to the other side of the ceiling.
Hold the string up to where your mark is pulling it tight, and snap it.
This will make a straight chalk line that is parallel to the wall across the ceiling.
1 | Upholstering walls (or ceiling) with fabric
I have used staples to apply fabric to walls and a ceiling that are dry-walled.
It is the quickest and easiest way to do the job.
As you can see from the ceiling pictured above, and contrary to what one might think, the staples are not really visible once everything is installed.
This method also worked exceedingly well for me on the den walls because the staples were later covered by board and baton strips.
If you don’t have molding to cover the seams, you might want to consider using ribbon or some other kind of trim to hide the joins. Since the seams are not held down all along the edges like they would be with fabric starch or wallpaper paste, it isn’t as smooth of a finish.
Supplies

- measuring tape
- upholstery stapler
- very sharp utility knife or cutting wheel*
- long metal ruler or straight edge
Prep supplies
These are repeated from above so you have them all in one place.
- screw driver
- measuring tape
- (optional) paint the same color as the background of your fabric
- cutting wheel*
- (optional) scissors
- pencil
- (optional) small nail or tack
- chalk line* or plumb line
How to staple up fabric
Make sure you have followed all of the steps above for preparing the walls, cutting the fabric and making a straight line before starting these steps.
1. With the the fabric pattern going in the correct direction, align the right outer edge of the fabric strip along the vertical line you drew and staple into place.
2. Staple the top, bottom, and left edge making sure the fabric is pulled tight. You do not want any bumps or wrinkles in the fabric after it is attached to the wall.
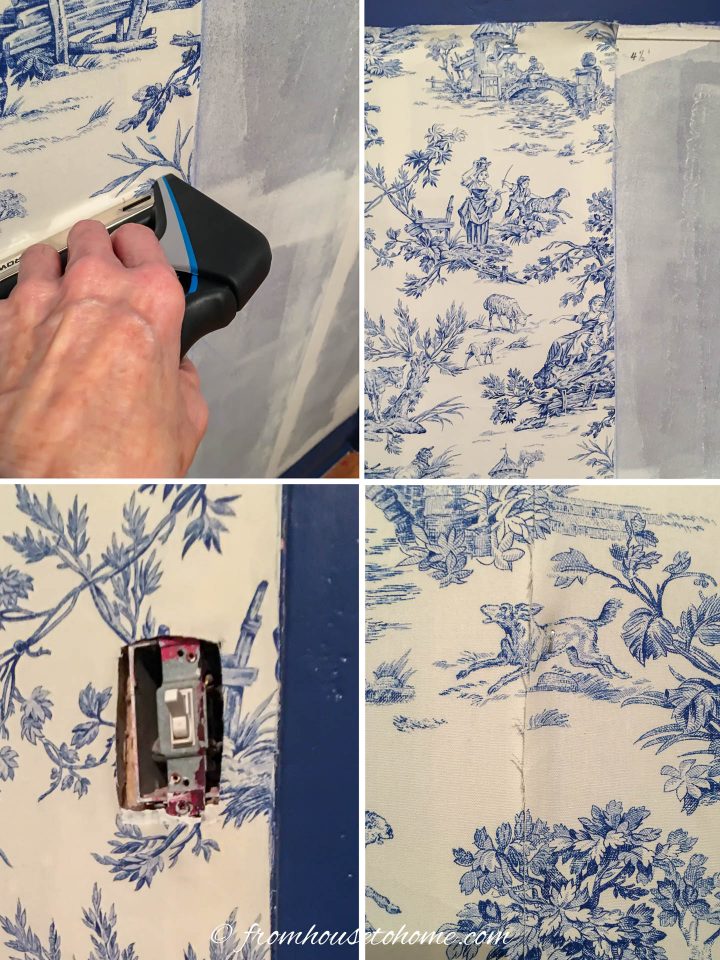
3. If there are any vents, electrical outlets or switches, use a sharp utility knife or the cutting wheel to trim the fabric around them. Staple the edges around the hole.
4. Align the left edge of the next piece of fabric along the piece you just hung, matching the pattern and abutting the edges. Staple in place along the left edge. Then pull the fabric smooth, attach the top, bottom and right side, and make any necessary cut outs.
5. Repeat these steps as many times as required to cover the wall (or ceiling).
6. Using the straight edged ruler and a sharp utility knife or the cutting wheel, cut off any excess fabric at the bottom and top.
7. Replace all of the electrical outlet covers, switch plate covers and vent covers.
The finished wall
This is the finished upholstered wall that is put up with the staples.
You’ll notice that you can’t see the staples, but you can see the seam (on the very left side of the picture).
I put molding up on the walls which covered them so it wasn’t an issue for me.
But this is why I recommend putting something over the seams (like molding or ribbon). Or use this method for spaces that are narrower than one width of fabric, like filling in panels or on the back of bookshelves.
2 | How to cover walls with fabric and starch
I found using starch was the best method for applying fabric over walls that you can’t staple into…either because they’re too hard (like my cement-based walls) or because you want to put up the fabric without damaging the wall.
As I mentioned above, it does not work well for ceilings. The liquid starch isn’t sticky enough to keep the fabric up and it drips everywhere!
Supplies
- paint tray and roller
- liquid starch*
- paint brush
- plastic smoothing tool*
- damp cloth
- long metal ruler or straight edge
- utility knife or cutting wheel*
Prep supplies
These are repeated from the steps above so you have them all in one place.
- screw driver
- measuring tape
- (optional) paint the same color as the background of your fabric
- cutting wheel*
- (optional) scissors
- pencil
- (optional) small nail or tack
- chalk line* or plumb line
How to apply liquid starch
Make sure you have followed all of the steps above for preparing the walls, cutting the fabric and making a straight line before starting these steps.
1. Roll the starch on the section of the wall you are working with, using the paint roller. Paint paint starch along the corners with the paint brush.
2. Working quickly before the starch dries, align the fabric along the vertical line and smooth it out towards the left edge, top and bottom. You may need to lift up the fabric and apply more starch if it gets too dry before you finish.
3. Use a sharp utility knife or the cutting wheel to trim the fabric around any vents, electrical outlets and switches.
Caution: Be very careful with the liquid starch when working around electric fixtures and outlets. Do not let any moisture drip into those areas due to the risk of electrical shock.
4. Smooth out any wrinkles and bumps with the plastic smoothing tool.
5. Roll on a top coat of starch and paint a top coat around the edges with the paint brush as well.
6. Now apply fabric starch to the next section of the wall. Align the left side of the second piece of fabric along the edge of the first installed section. Be sure to match the pattern if necessary.
7. Repeat steps 3 to 6 until you have covered the wall.
8. Keep repeating with additional strips of fabric until your wall is done.
9. Wash off any leaked and dripped starch from baseboards with warm water and a damp cloth.
10. Let the starch dry completely.
11. Then trim off any excess fabric with a firmly held straight edge and the utility knife or cutting wheel.
12. Replace the electrical covers, light fixtures and vents.
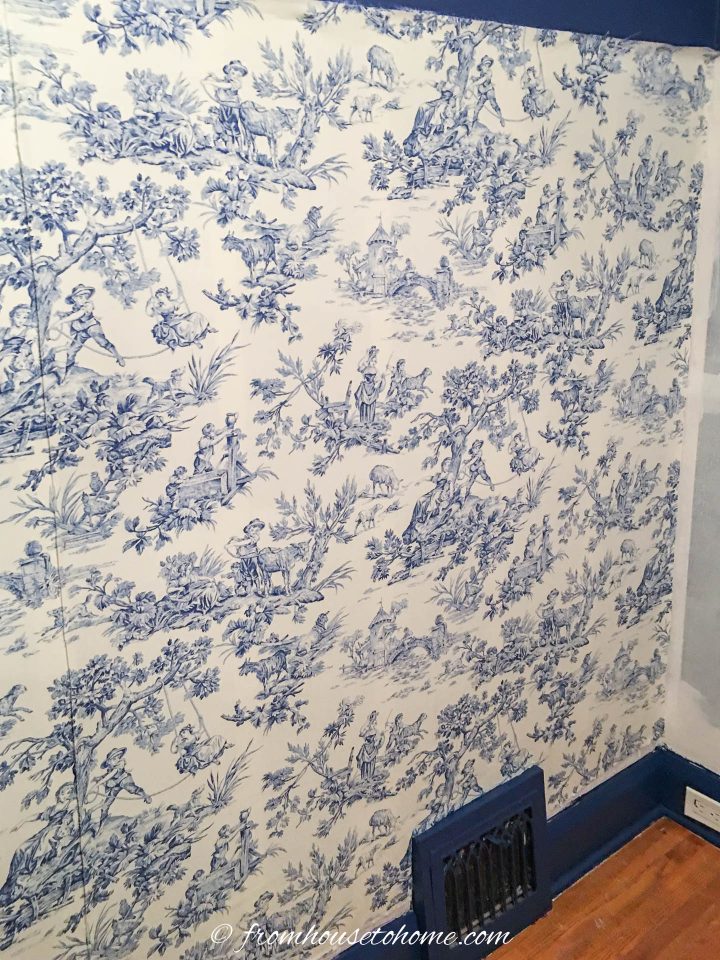
The finished wall
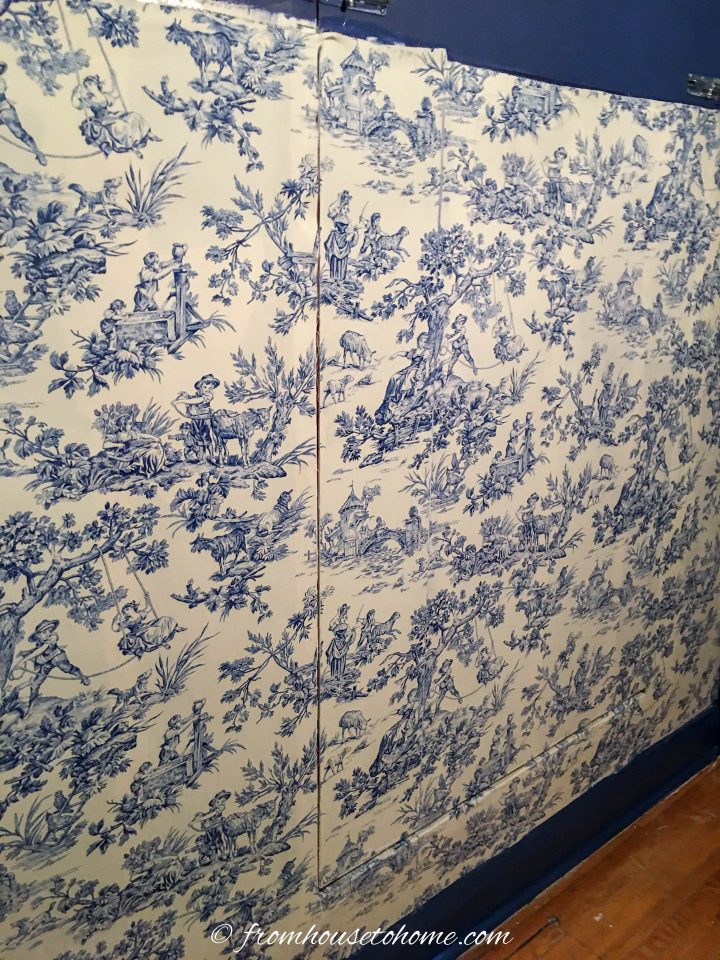
This is the finished wall with the fabric put up with liquid starch.
It goes on very smoothly and the seams aren’t noticeable like they were with the stapled finish. (The line you see is not a seam…that’s actually where the frame for my murphy bed is.)
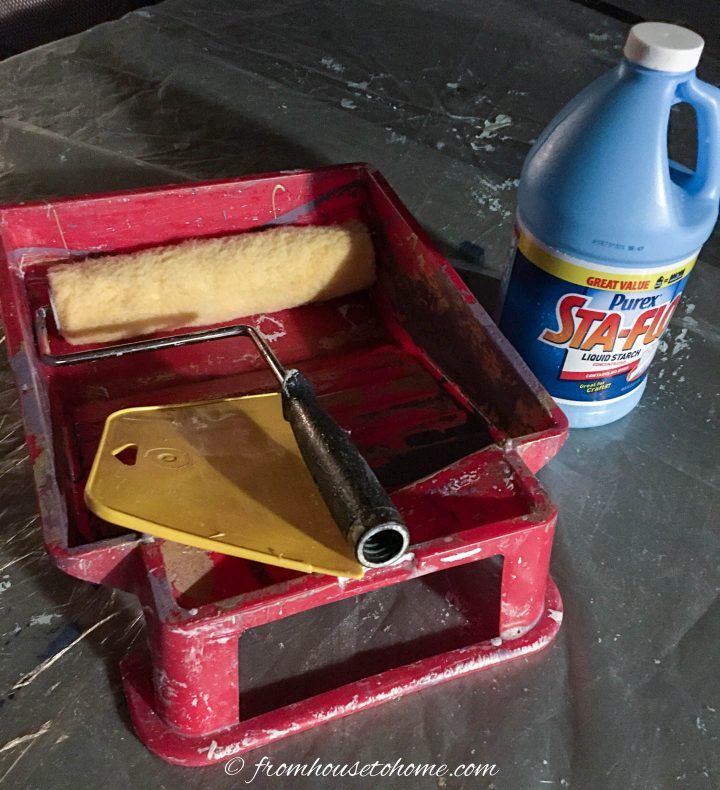
3 | Gluing fabric with wallpaper paste
I used wallpaper paste to attach the fabric to the ceiling, however it would also work for gluing it onto the walls.
Fabric paste is a little more work to remove than starch so this method is most appropriate if you plan on leaving the fabric up there for a while.
If you are doing a ceiling, it is easier if you have help since large pieces of fabric can be hard to work with on your own.
Supplies
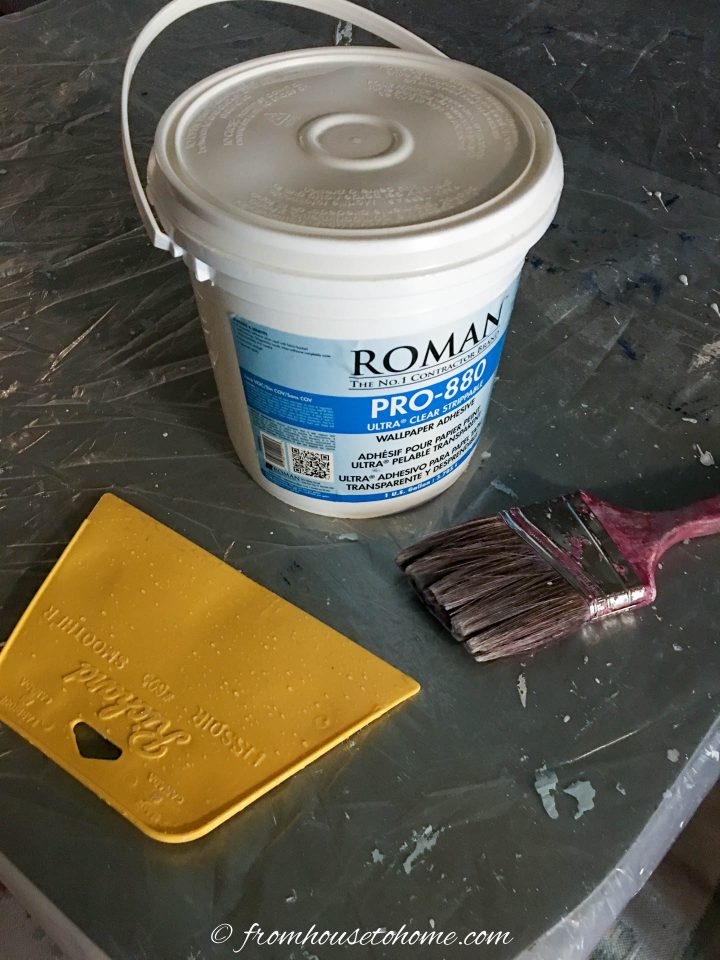
- wallpaper paste*
- wide paint brush or wallpaper paste brush*
- plastic smoothing tool*
- damp cloth
- utility knife or cutting wheel*
- straight edge or long metal ruler
- push pins*
Prep supplies
These are repeated from above so you have them all in one place.
- screw driver
- measuring tape
- (optional) paint the same color as the background of your fabric
- cutting wheel*
- (optional) scissors
- pencil
- (optional) small nail or tack
- chalk line* or plumb line
How to attach fabric with wallpaper paste
Make sure you have followed all of the steps above for preparing the walls, cutting the fabric and making a straight line before starting these steps.
1. Use the wallpaper brush to apply wallpaper paste to the wall (or ceiling) where you are going to glue the first piece of fabric.
2. Align the right side of first piece of fabric along the vertical line. Then quickly press the fabric onto the glue with your hands, starting in one corner and working outward.
3. Use a sharp utility knife or the cutting wheel to trim the fabric around any vents, electrical outlets and switches.
4. Smooth the fabric out with the smoothing tool making sure it is straight and wrinkle-free.
5. Wipe off any excess paste from around the edges with a damp cloth.
6. Insert a few push pins in the corners and along the edges to hold the fabric in place until the paste dries.
7. Now apply wallpaper paste to the next section of the wall. Align the left side of the second piece of fabric along the edge of the first installed section. Abut the edges rather than overlap them and be sure to match the pattern if necessary.
8. Repeat steps 3 to 7 for the remaining wall (or ceiling) space.
9. After the paste is completely dry, hold the metal ruler firmly along the edge and carefully cut off any protruding fabric with a sharp utility knife or cutting wheel. Cut off any frayed threads.
10. Remove the push-pins.
11. Replace the electrical covers, light fixtures and vents.
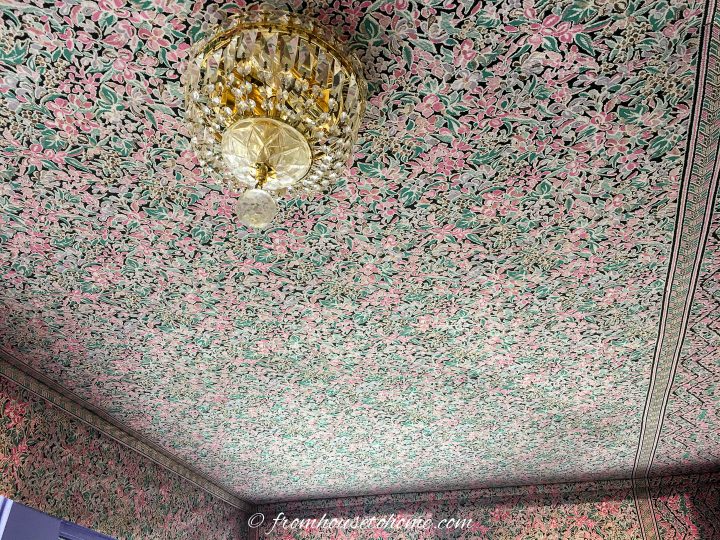
The finished ceiling
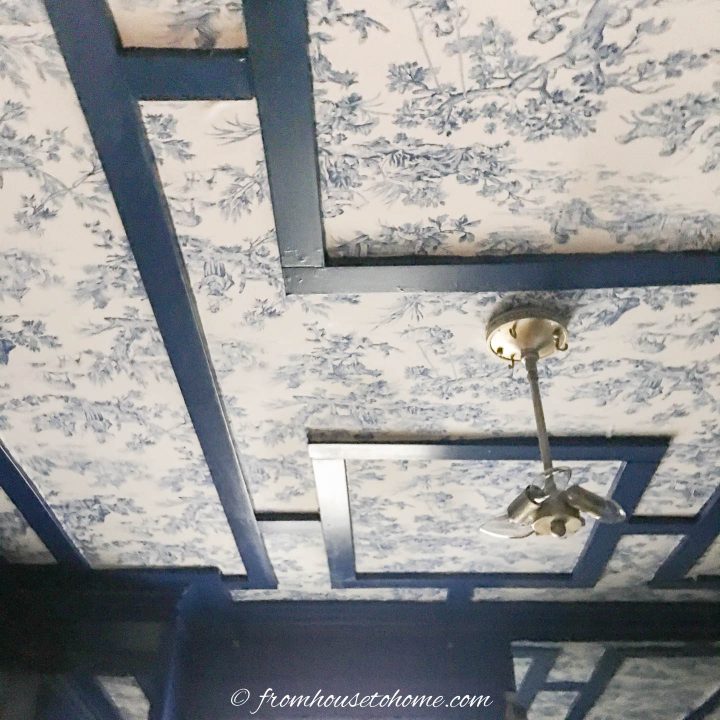
This is my finished ceiling that has fabric glued up with wallpaper paste.
I think it does the best job of sticking the fabric to the surface and creating a smooth finish.
Now that you know all three ways, you can pick out the one that works best for you!
Other Wall Decor Ideas You Might Like
- Creative ways to paint your walls
- How to add architectural interest to a room
- How to choose the right paint color
Have comments or questions on how to cover walls (or ceilings) with fabric? Tell us in the section below.
This post was originally published on March 18, 2021 but was updated with new content on January 11, 2022.
Where is the US do you live? I’m asking purely to know if it is humid, arid, etc. I had wondered if a humid area, like the Midwest, would not benefit from using fabric starch and wallpaper adhesive would be the best option.
Hi Christine…My mother did this project and she lives in Toronto. So somewhat humid but not as much as the south. If you’re concerned about it, wallpaper paste will work. But it can affect the color of the fabric, so you might want to try it on a scrap piece first.
I have just be asked to hang fabric on the walls in a small room for a client. They have already purchased damask fabric. I just can’t imagine how to cut a straight enough line down the salvage edge with out it fraying and butting it up to the next piece/strip of fabric. When I hang wallpaper I double cut the two strips but I am wonder is you can even double cut damask fabric…. I do like your idea about using ribbon, in my case I think gimp would work. I had already thought on wood trim down the seams… but think gimp would work! I was afraid the glue might change the color of the fabric, but I’m sure the starch wouldn’t!!!
Does the starch option really make the fabric stick? Can it be used if you plan to leave the fabric up long term?
Yes Shawna, the starch sticks fabric as it dries. I have had mine up for 3-4 years with no signs of it loosening. I don’t see why it would.
Great instructions!
Is the starched fabric difficult to remove? Sorry if you mentioned it in the article and I missed it.
Thanks!
Hi Nancy, I have not tried to remove the starched fabric. When I do, I will thoroughly mist it with water before I try to pull it off.