How To Build Pull Out Shelves For a Blind Corner Cabinet
Tired of battling the black hole that is your blind corner cabinet every time you need something? Learn how to build custom pull out shelves that will transform it into a highly accessible and efficient storage solution for your kitchen.
Blind corner cabinets are always a challenge to organize.
There’s the easy-to-reach part of the cabinet right in front of the door.
But the bulk of the storage area is back in the corner. Which is very hard to get at.
I was looking for a solution and had researched buying a ready-made pull-out cabinet organizer.
But none of them would fit the 13″ door opening in my cabinet.
And they were all pretty expensive!
So I decided to make my own.
I took a 2-phased approach to solving this problem.
The first is to build sliding shelves for the back of the cabinet.
These roll from the blind corner to the part that is right in front of the door so you can reach the things that are stored on the shelf.
The second part is to build a pull out shelf unit that will roll out of the easy-to-reach area so that you can easily access what is on it.
And make room to reach the sliding shelves behind it.
Continue reading to find out how to build pull out shelves for a blind corner cabinet.
Supplies
Materials for the sliding shelves (part 1)
- ½” plywood – Usually, 1 sheet of 4′ x 8′ plywood will do for the whole project. But do the measurements for both parts to make sure it’s enough for your cabinet.
- 2 sets of bottom mount drawer slides* – To figure out what size you need, see the section in Part 1 on determining the length of the slides.
- 1″ #6 wood screws
- paint (optional)
Materials for the pull-out shelf unit (part 2)
- ¼” plywood – a 2′ x 2′ piece should be enough for this project.
- ½” plywood – See the measuring and cutting sections of Part 2 to figure out exactly how much you will need. But you should be able to use the same 4′ x 8′ sheet as above.
- 2″ x 2″ piece of wood – This is for the corner supports on the front. You’ll need about a 20″ piece.
- 4 – 1″ casters
- 1 set of 100-pound capacity side-mount drawer slides*, likely 12″ or 14″ long. See page 6 for more information on how to determine the length.
- ¾” #6 wood screws
- 1″ #6 wood screws*
- 3 – 12″ cabinet or piano hinges* (these ones come 2 in a package, so you’ll need 2 packages)
- paint (optional)
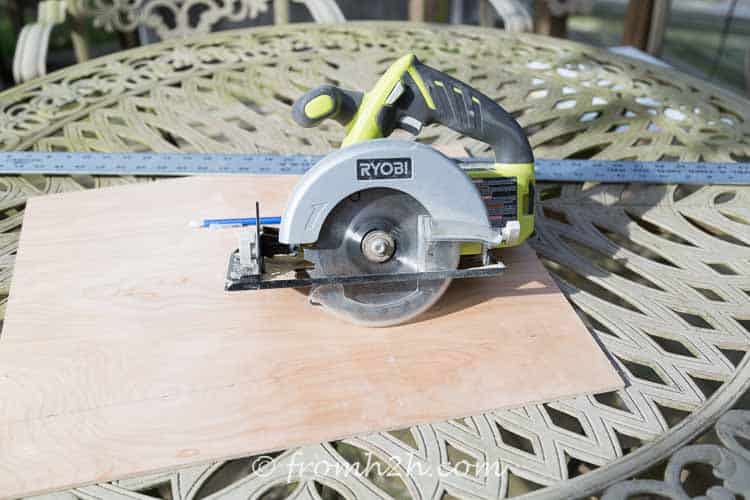
Tools
- Circular saw
- Cordless drill
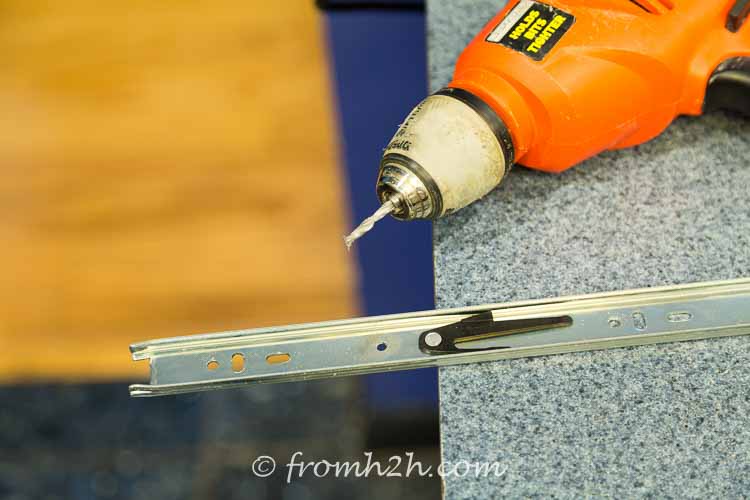
- Corded drill (optional) – may be necessary if you need to drill additional holes in the drawer slides and your cordless drill doesn’t have enough power.
- small metal drill bit – this will be used to drill an additional hole in the side-mount drawer slides, if necessary. So it needs to be big enough for the screws to fit in, but not so big that they slide all the way through.
- pliers
Measure the cabinet

Here are the measurements you will need to take from your existing cabinet.
We’ll use the letters on the diagram when referring to the measurements in the sections below.
A. The first measurement will be the width of the door opening. In my case, this measurement was 13 1/2″.
B. The second measurement will be the height of the door opening. In my case, this was 22″.
C. Then measure from the inside of the front of the cabinet to the back (which is usually a little more than 22″). In my case this had a measurement of 22 9/16″.
D. Measure the total width of the inside of the cabinet. In my case, it was 41″ long.
E. Measure from the corner side wall to the door opening (inside the cabinet). In my case this had a measurement of 26″.
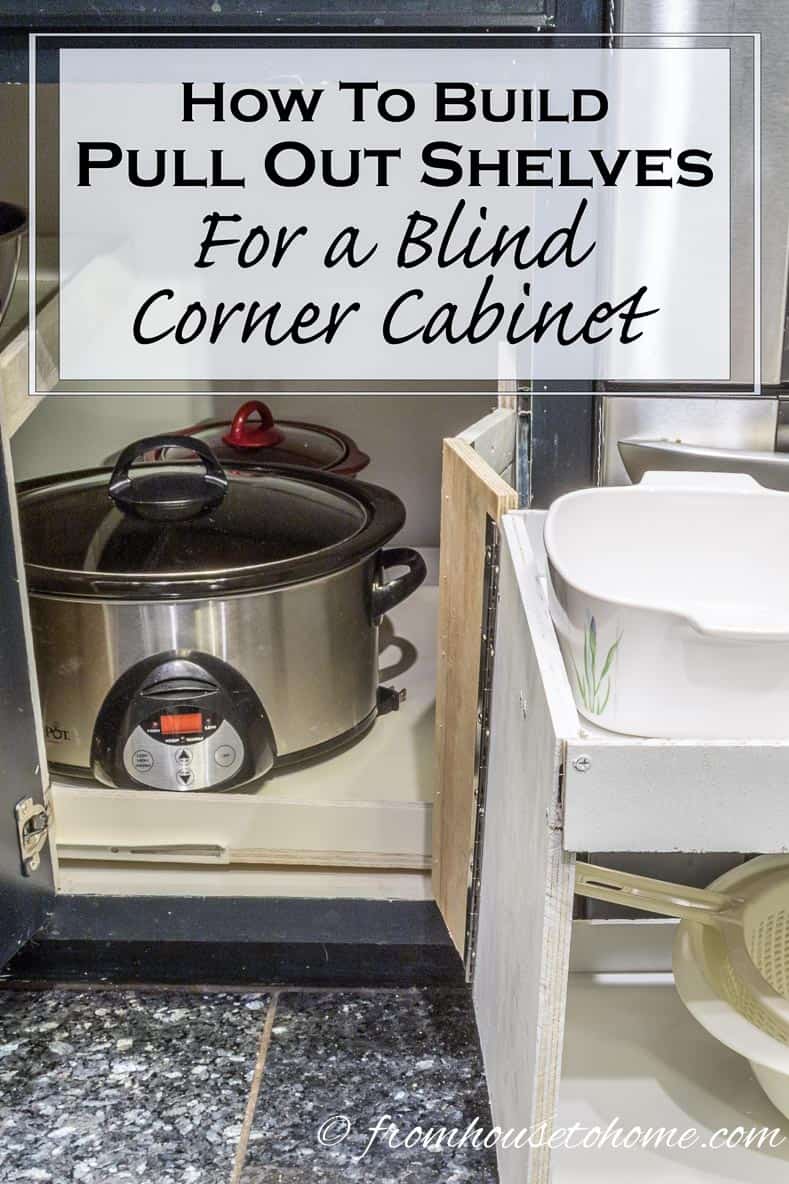
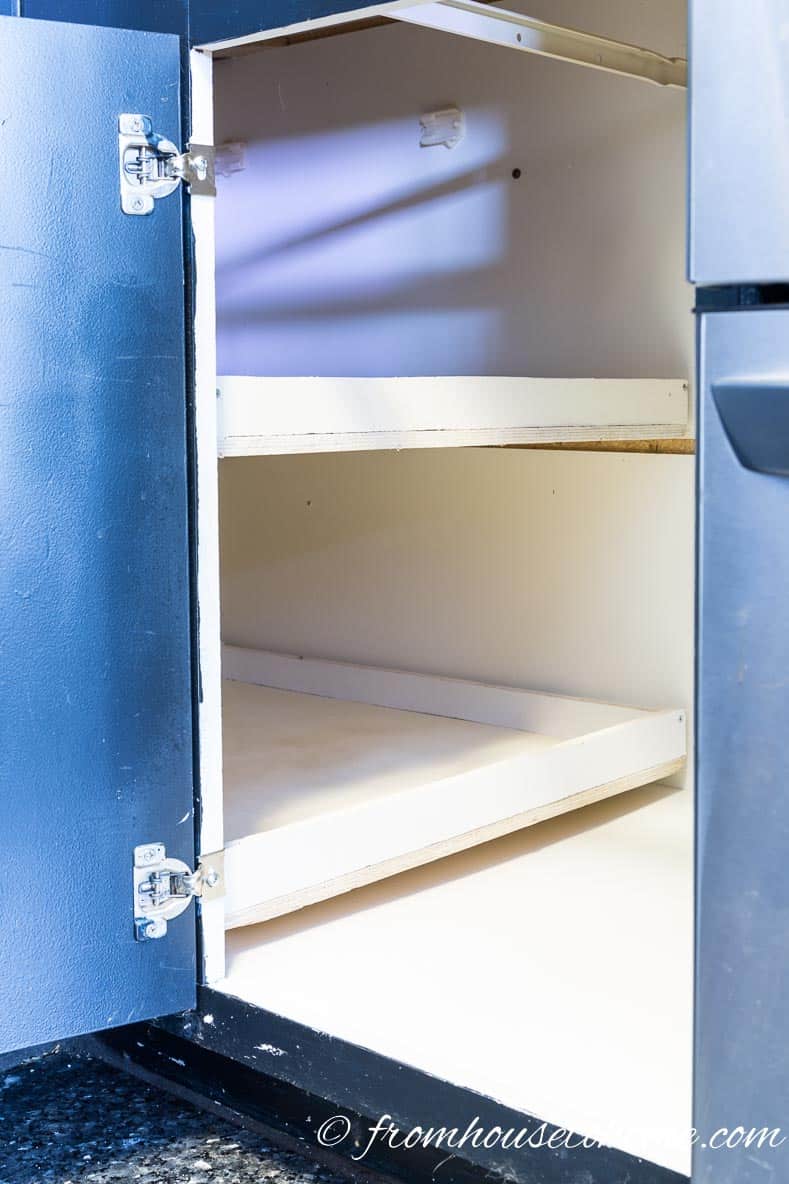
Part 1: Build the sliding shelves for the corner
The design
The idea for these sliding shelves is that they replace the static shelves usually found in the blind portion of the cabinet.
To take advantage of the full height of the cabinet, there will be 2 sliding shelves that can be pulled out separately.
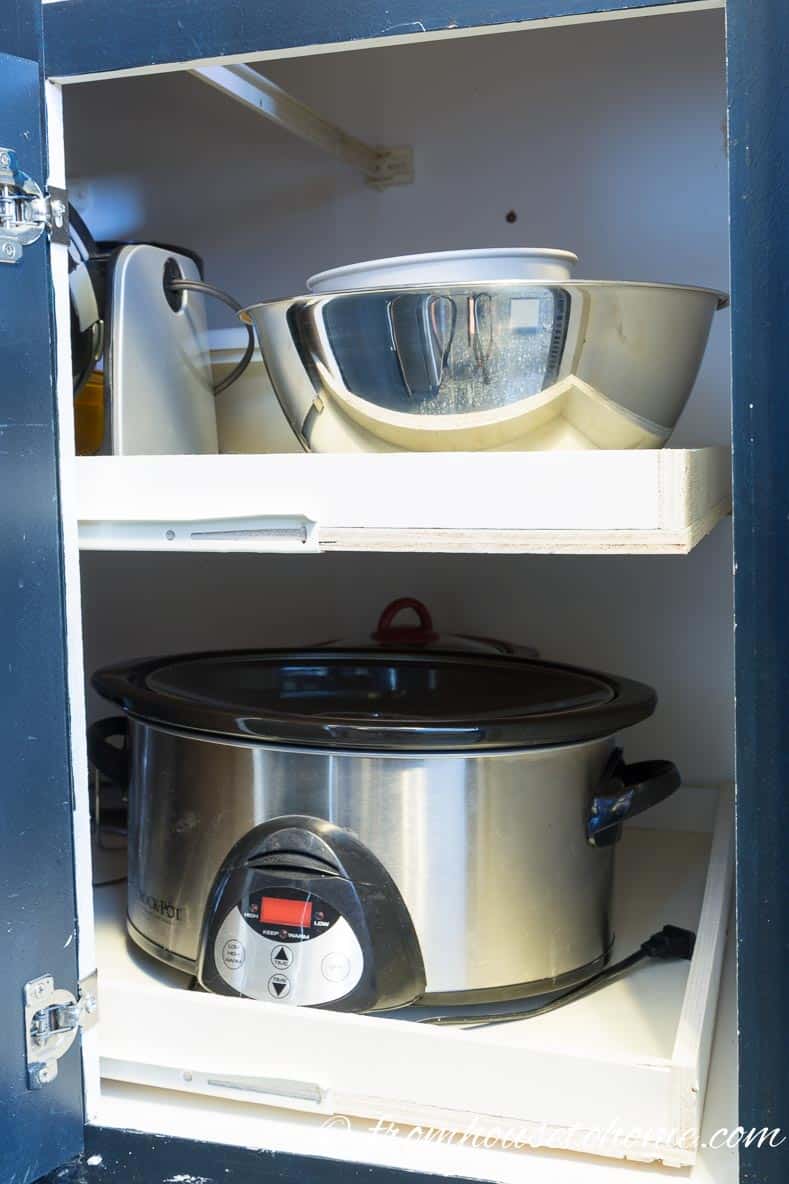
When you need to access the contents of the shelves, simply pull them over to the front of the cabinet and get at what you need.
The low sides prevent the contents of the shelf from falling off when you move them.
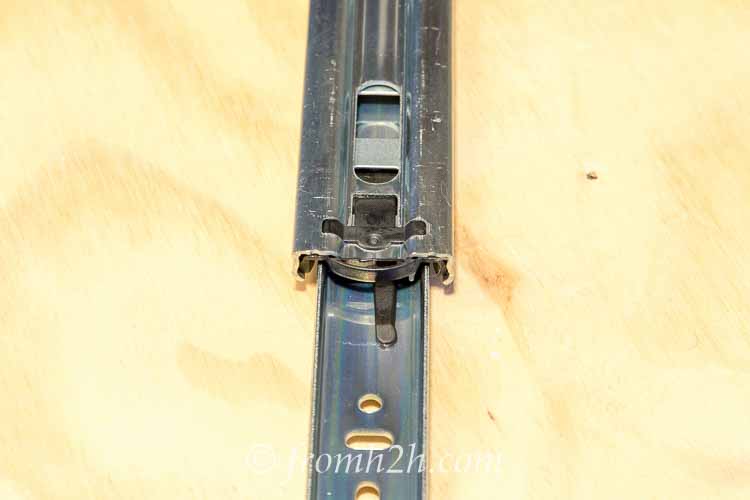
1 | Determine the length of the bottom-mount drawer slides
For the sliding shelves you will need 2 sets of bottom mount drawer slides.
Because these shelves are usually longer than half the width of the cabinet, the drawer slides need to be shorter than the length of the shelves in order to be able to install them in the existing cabinet. Otherwise, you won’t be able to fit the back end of the drawer slide extension into the front end of the drawer slide installed in the cabinet.
To determine the length of these drawer slides, subtract the length of your shelf from the total width of the cabinet. Using the measurement numbers from the diagram, calculate D – (E – 1″). In my case, the calculation was 41″ – (26″ – 1″) which came out to 16″.
If you want to be safe, buy drawer slides that are this length or shorter.
However, you may be able to get away with going up one size. But you’ll need to tilt the shelves up when you are sliding them onto the rails. (I bought 18″ drawer slides which worked fine.)
2 | Measure and cut the wood
For the blind part of the cabinet, you will be making 2 separate slide out shelves.
Use the measurements from step 1 to figure out how big the pieces of wood need to be.
Here’s what you will need for these:
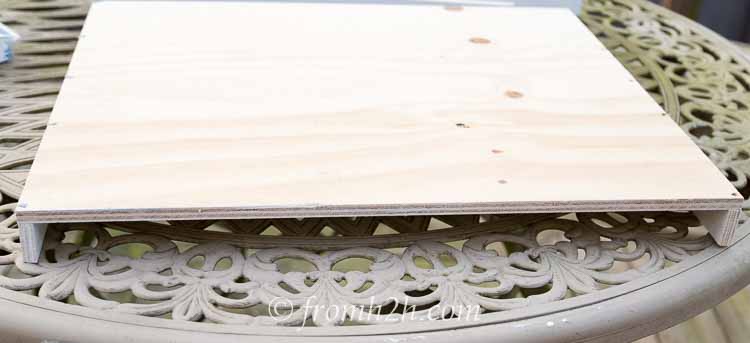
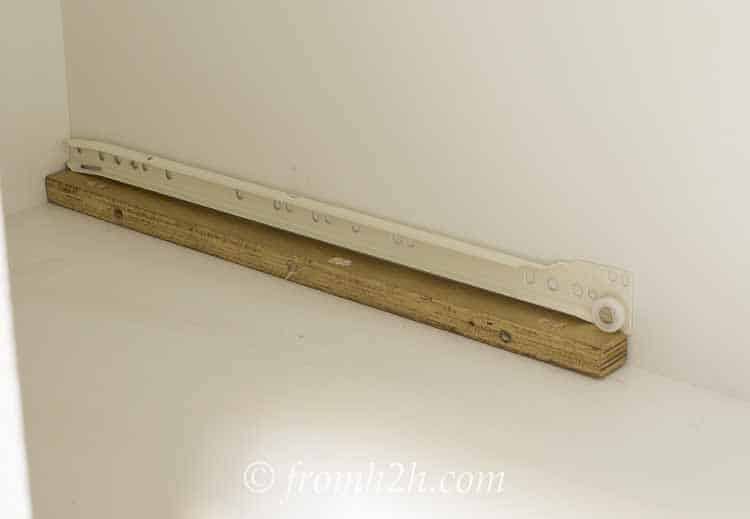
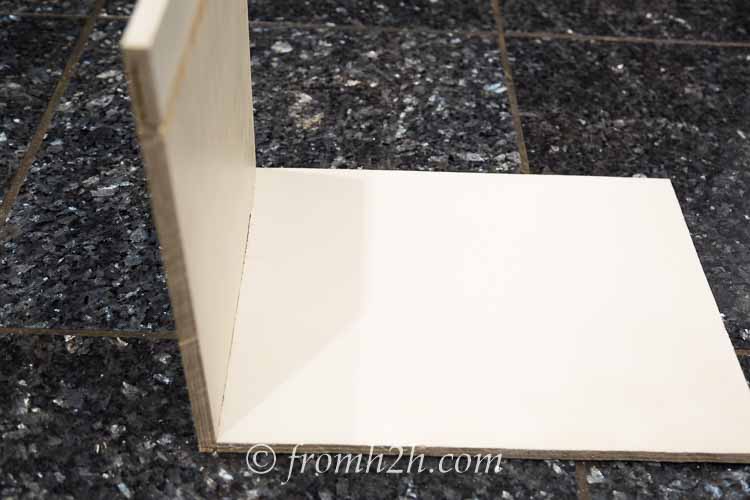
1. Two pieces of ½” plywood that are 1″ shorter than the measurements you took for E and C in the last step. In my case, these 2 shelves were 25″ x 21 9/16″. These will be the shelves.
2. Four pieces of ½” plywood that are 2″ wide and 1″ shorter than the C measurement from the last step. These will be the front and back edges of the shelves (which will keep things from sliding off the shelves when you pull them out). In my case, these were 2″ x 21 9/16″.
3. Four pieces of ½” plywood that are 2″ wide and 2″ shorter that the E measurement from the last step. These will be the sides of the shelves. In my case, these were 2″ x 24″.
3 | Build The Pull Out Shelves
Turn the shelf board upside down.
Slide the front edge board under the front edge of the shelf. Make sure the edges line up. Then attach with #6 screws or small nails through the shelf into the front shelf edge board.
Repeat the same steps to attach the back edge of the shelf.
Attach one of the side pieces between the front and back edge shelves. Again make sure all of the sides line up.
Install the other side in the same way.
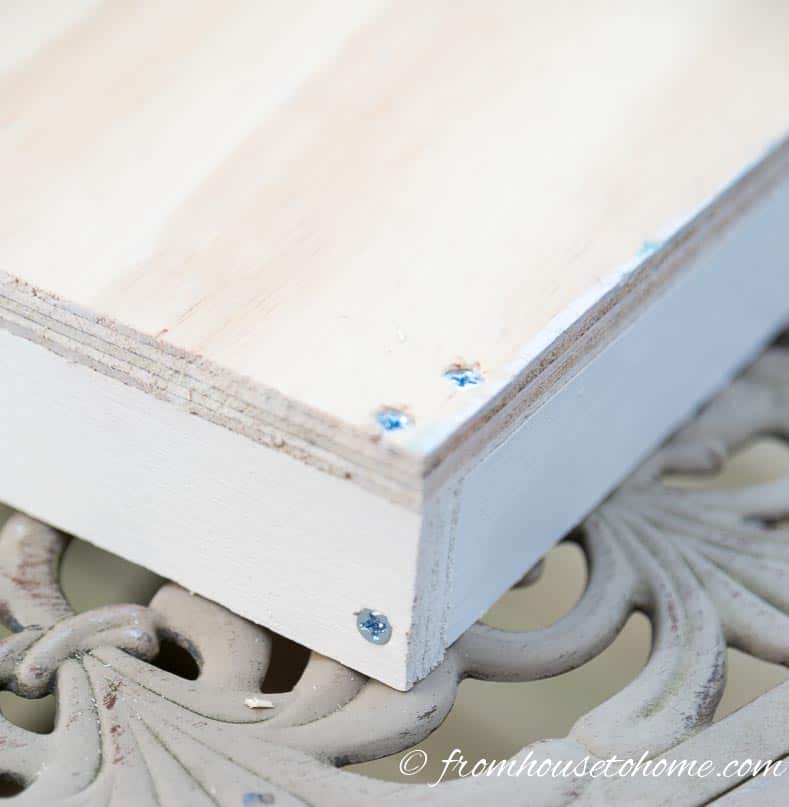
Attach the front and back boards to the side boards at the corner using a screw or nail.
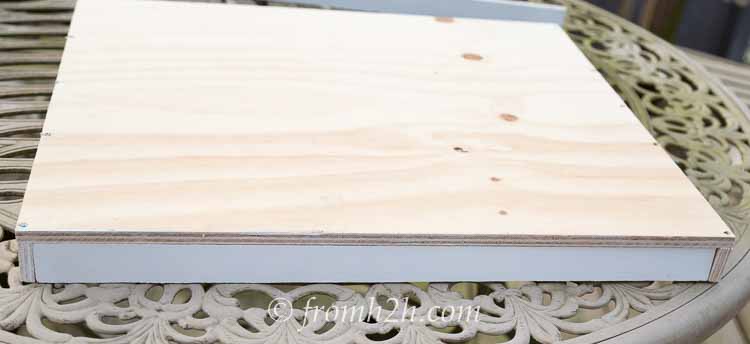
4 | Paint
If you are going to paint the wood, you might want to do it at this stage. It’s a little easier to paint the boards before you put on the drawer slides.
5 | Attach the drawer slides to the shelves
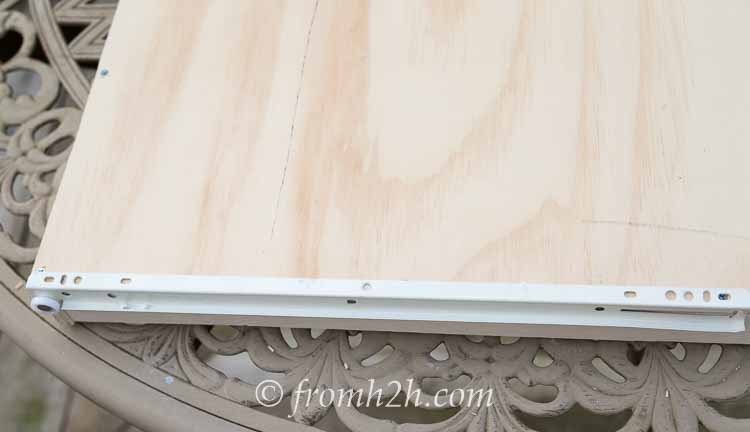
Install one of the drawer slides on the bottom of the drawer, keeping in mind:
- Make sure it is on the side of the shelf (usually the longer side).
- The wheel should be at the back of the shelf.
- The drawer slide should be lined up flush with the edge of the board or it may not fit.
- The drawer slide will not reach all the way to the front of the shelf. This is necessary in order to fit the shelf into the drawer slide in the cabinet.
Attach the other drawer slide at the other side of the shelf. The wheel should be on the same end of the shelf as the first one.
Repeat these steps to create the second drawer.
6 | Install the sliding shelves
Start by attaching the drawer slides for the bottom shelf, keeping the following in mind:
- It should be installed about 1″ from the bottom of the cabinet. You can either measure and mark the location. Or use a piece of board as a spacer (my preferred method). Either way, you want to make sure that it is level.
- The back end of the drawer slide should be at the back corner of the cabinet.
- The wheel goes towards the front….toward the cabinet door in this case.
- Install the second drawer slide on the other side of the cabinet, making sure that it is at the exact same height and installed in the same position. Otherwise your shelf will not roll smoothly.
Attach the drawer slides for the upper shelf.
This will follow the same process as the bottom shelf but at a different height.
You can choose the height based on what you want to store on the shelf. I installed mine at about 12″.
Tilt the first shelf to get it to fit into the door.
Install the bottom shelf first.
To do this, hold the shelf up at an angle and slide the drawer slide wheels on the back of the shelf over the drawer slide wheel installed in the cabinet.
Then you should be able to push the shelf all the way back into the cabinet.
Install the upper shelf the same way and you are finished with this portion of the project.
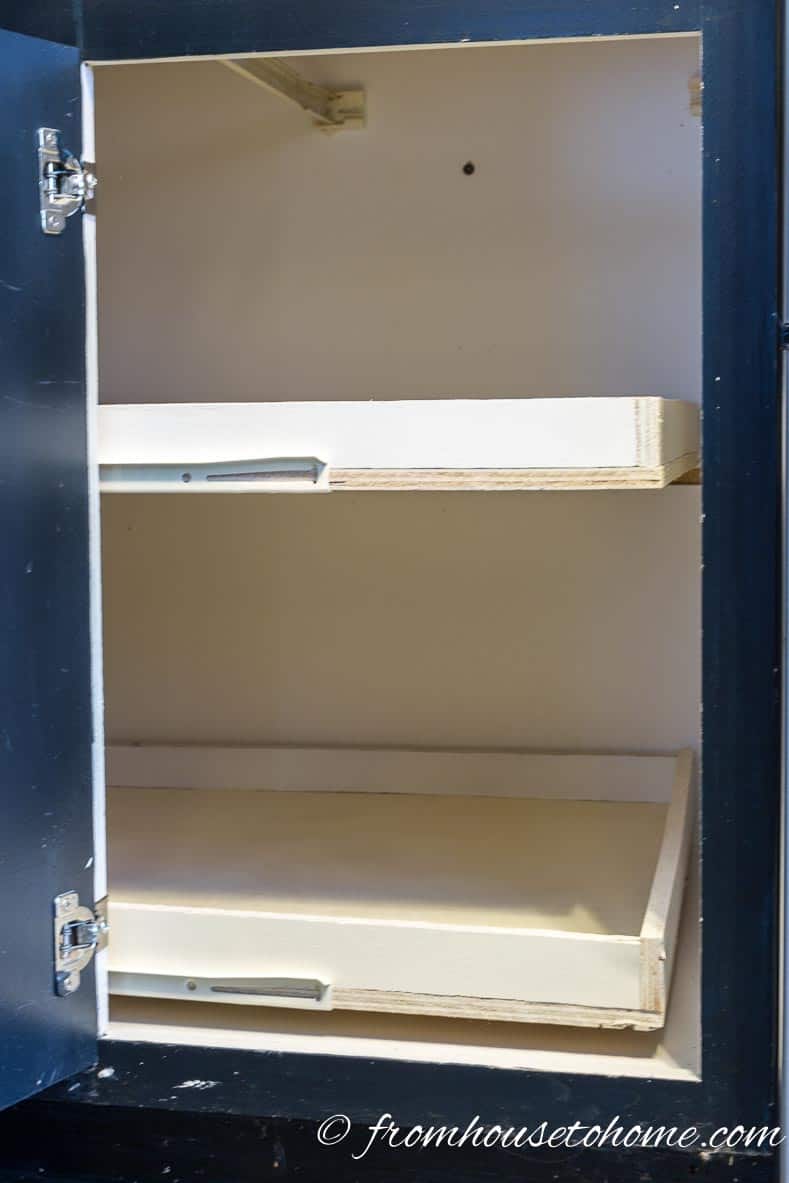
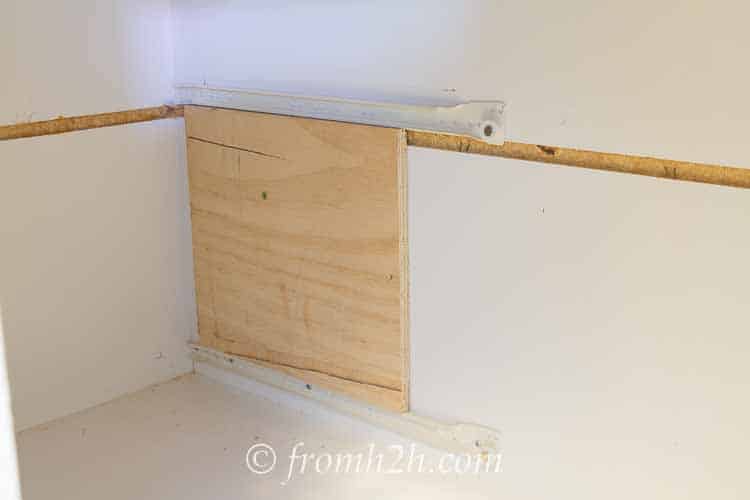
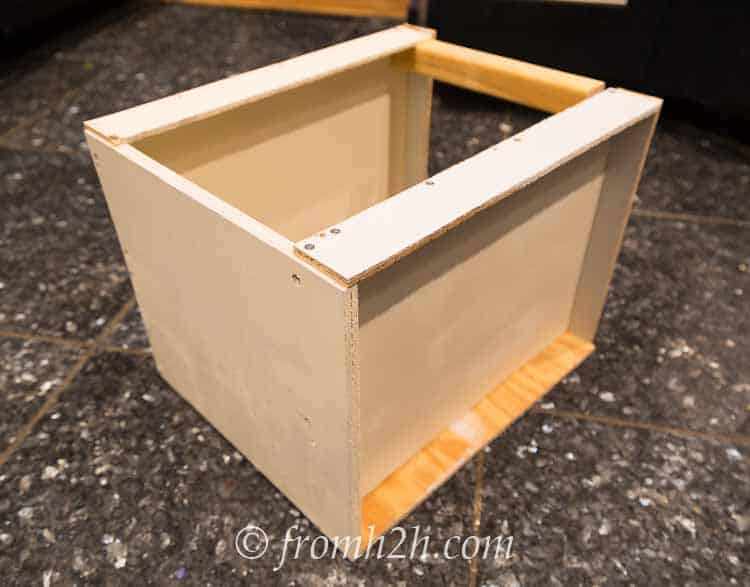
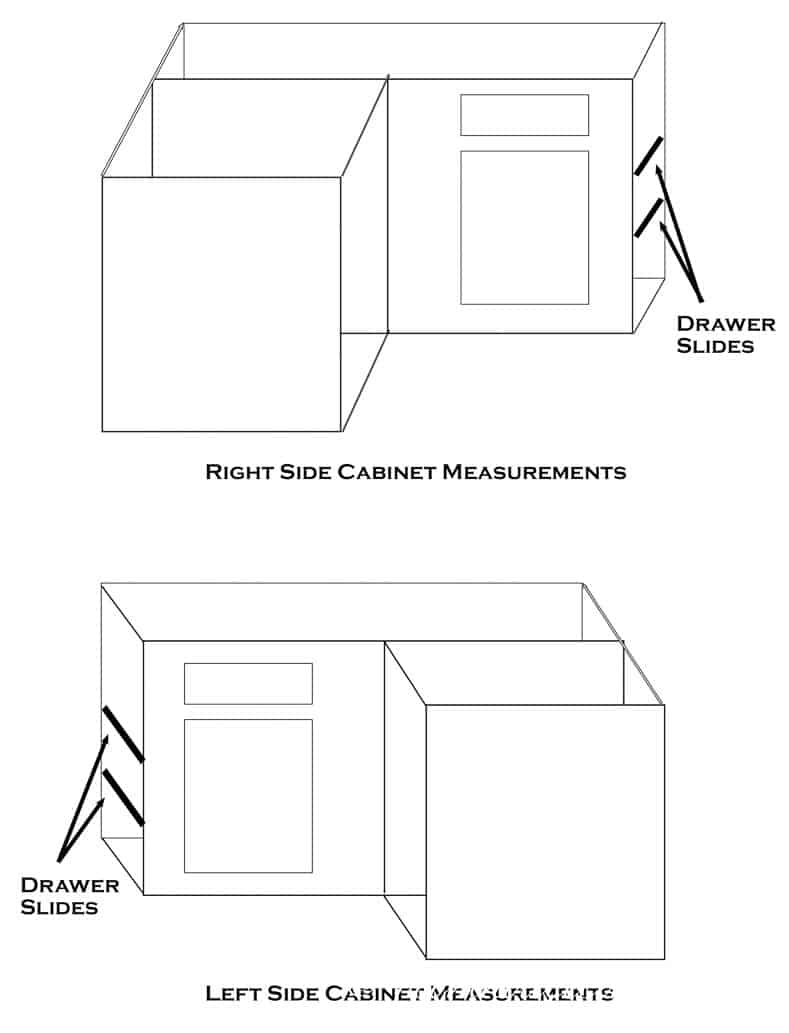
Part 2: Build the pull out shelf unit
This part of the project has a lot of steps to it. And it’s important to get the measurements right.
But the actual build part really isn’t that complicated.
The design
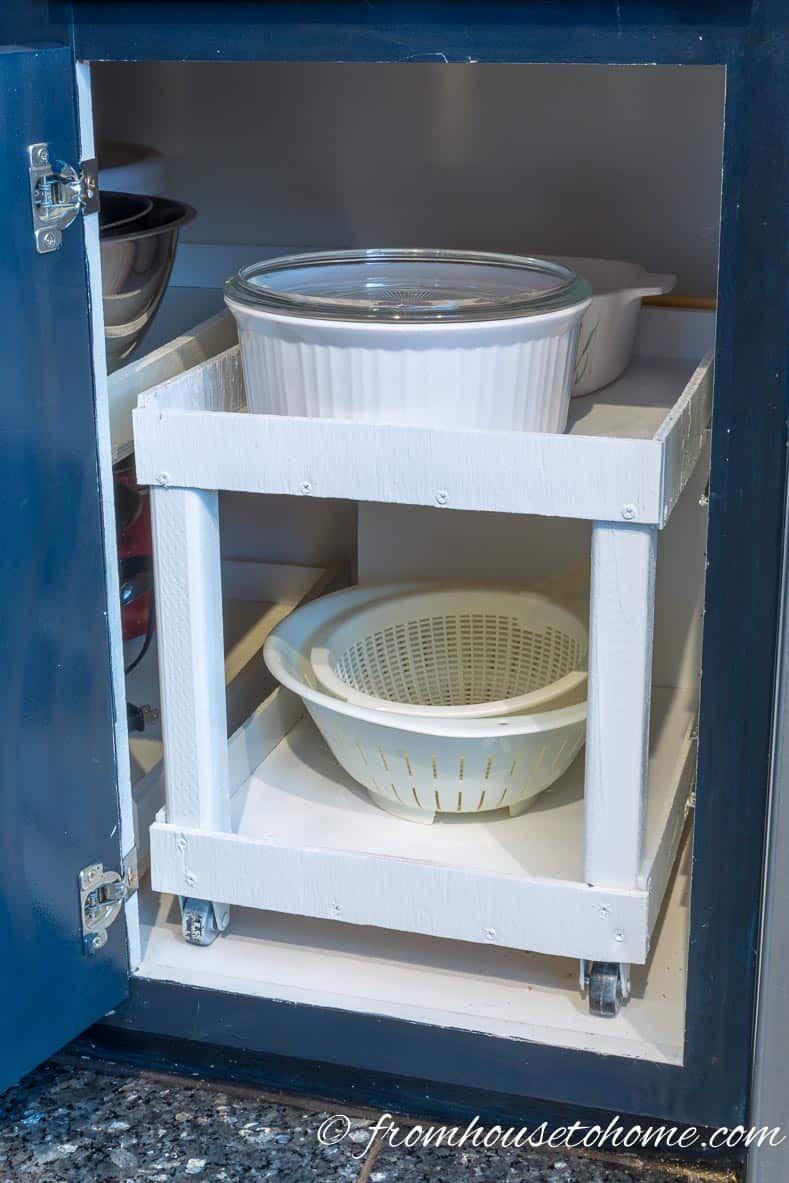
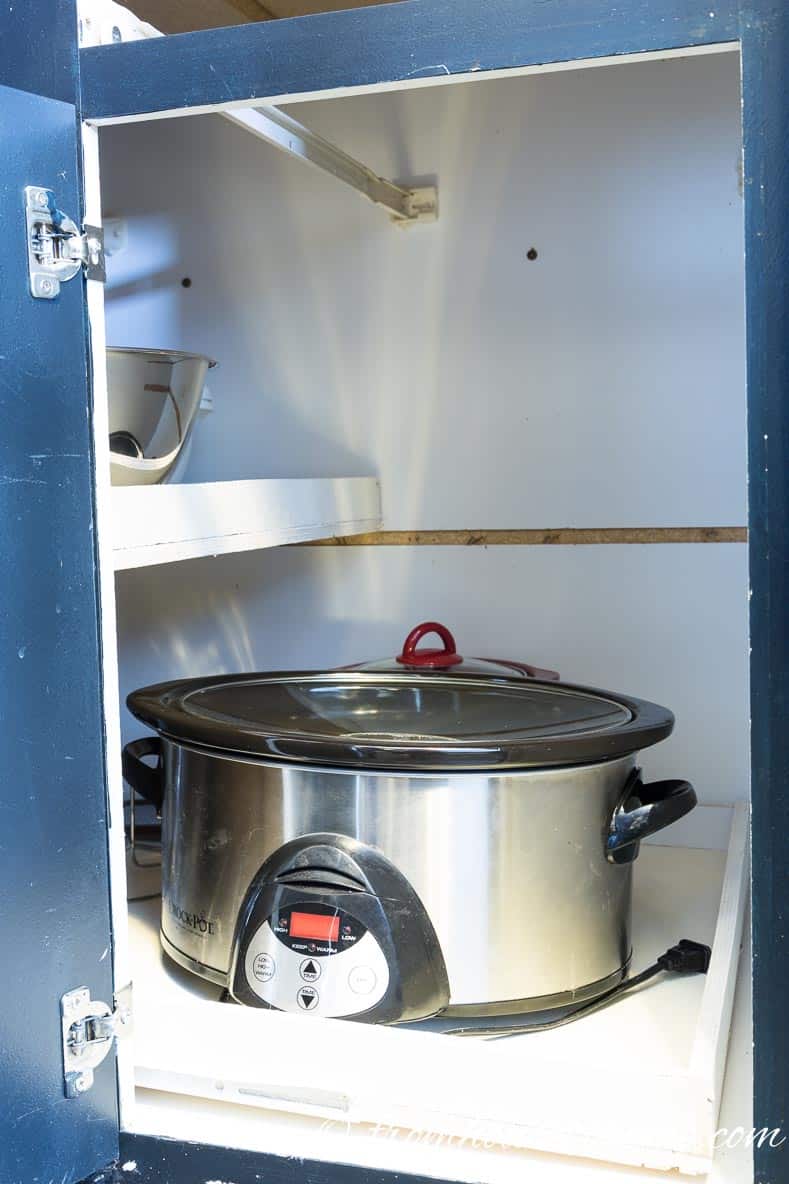
This is the shelf unit in the cabinet.
It has wheels so that it can roll in and out.
And they support the shelf unit while it is in the cabinet, so it is not relying on the hinges to hold it up.
If you need to get at the things at the back of this shelf, pull it part way out.
It is attached to the side of the cabinet with drawer slides which support it when it is not resting on the base of the cabinet.
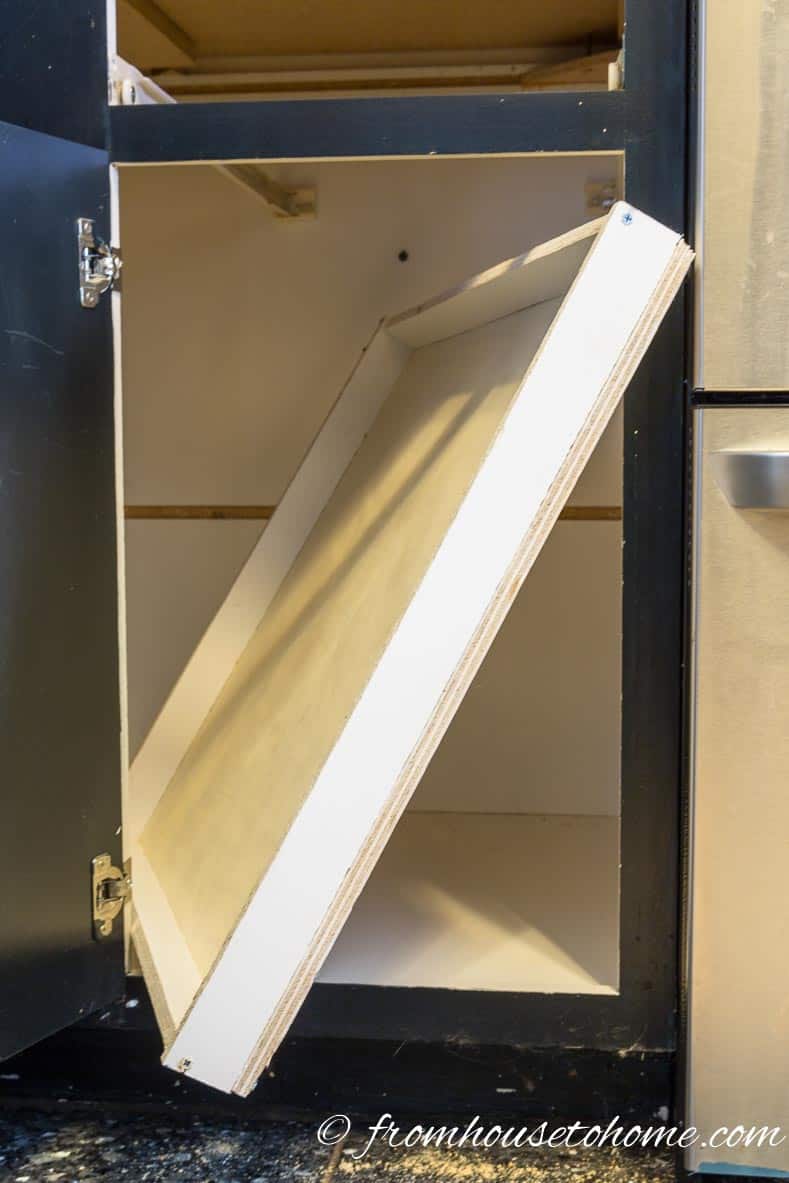
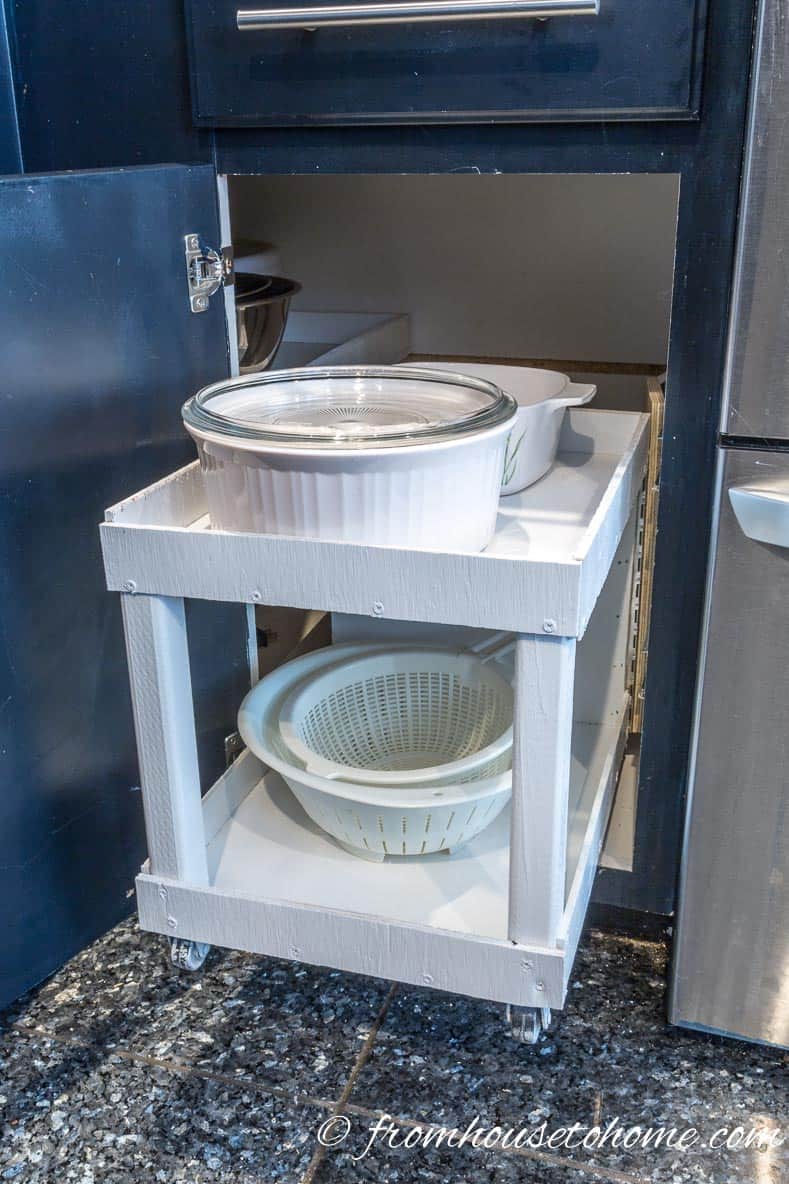
If you need to get at the shelves that are in the blind corner part of the cabinet, pull the front shelf unit all the way out, and swivel it to the side.
Cabinet hinges installed at the back corner of the shelf unit allow it to turn 90 degrees giving you the room to pull out the shelves in the cabinet.
Since the shelf unit will be held up by hinges when it is pulled out, it needs to be as light as possible but still be sturdy.
Because of this I used ½” plywood for the shelves and back, but used ¼” plywood for the sides.
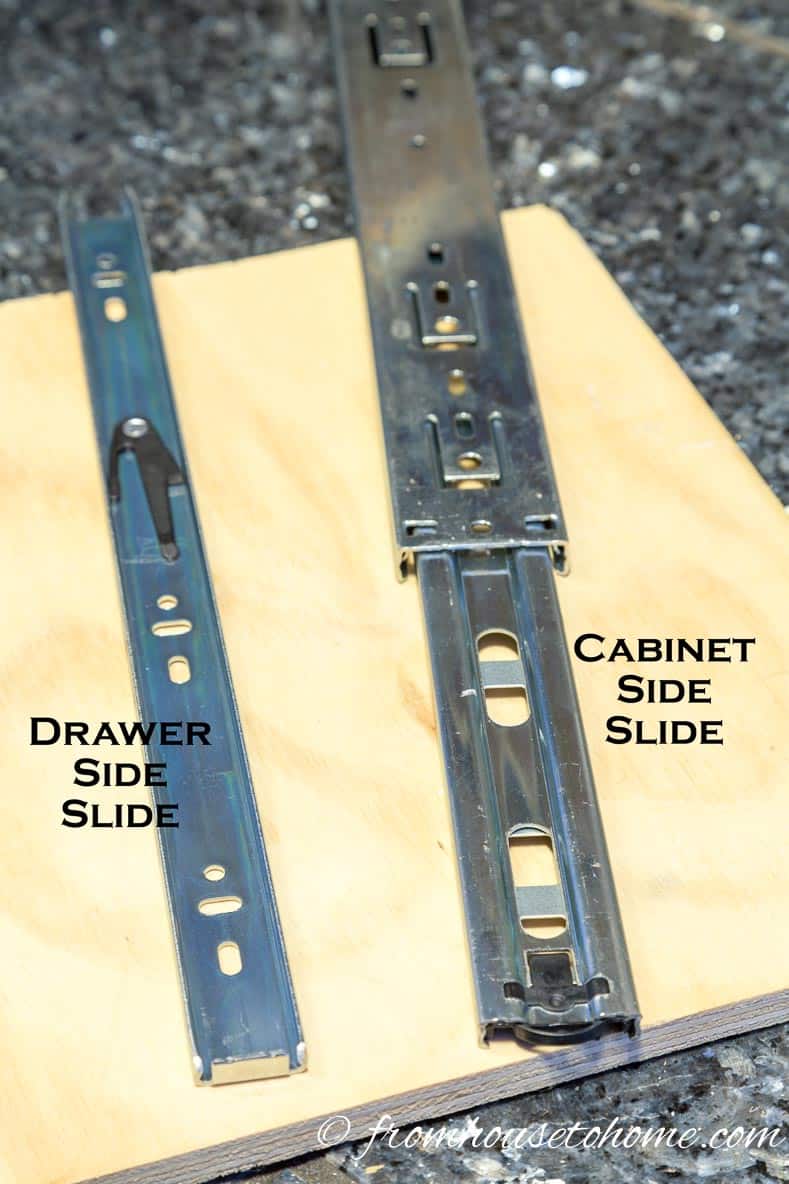
1 | Determine the length of the side-mount drawer slides
For this installation, you will need 2 full-extension, heavy duty side mount drawer slides. Since most cabinets are about 24″ deep, these will normally be 12″ or 14″ drawer slides (assuming you have a standard size cabinet).
They need to be installed 6″ from the back of the cabinet so you don’t want them to be the full depth of the cabinet.
They also need to extend at least 2″ beyond the edge of the cabinet when they are fully extended.
So to figure out the length use the calculation: (C – 6″) ÷ 2 + 2″. In my case, the calculation would be (22 9/16″ – 6″) ÷ 2 + 2″ = 10¼”. It’s okay if the slide is longer than this as long as they don’t go past the edge of the cabinet when they are installed.
I went with 14″ slides since that’s the smallest size my local hardware store had in stock.
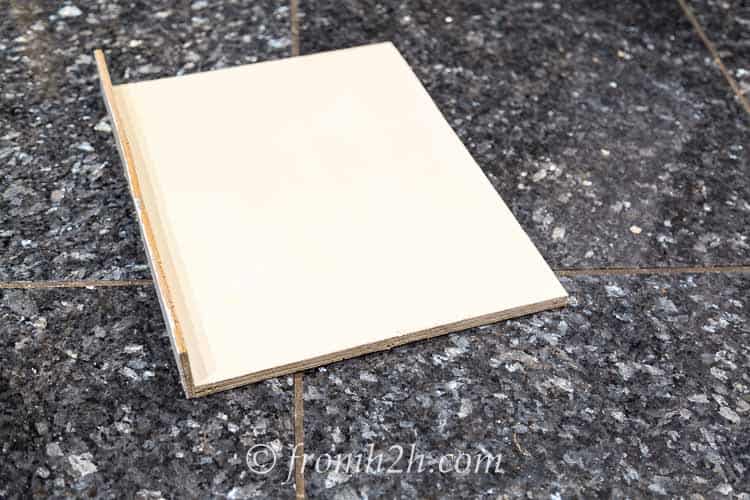
2 | Measure and cut the wood
Here are the boards that you will need to cut. I love using my cordless circular saw for doing these types of cuts…no worries about the cord getting in the way!
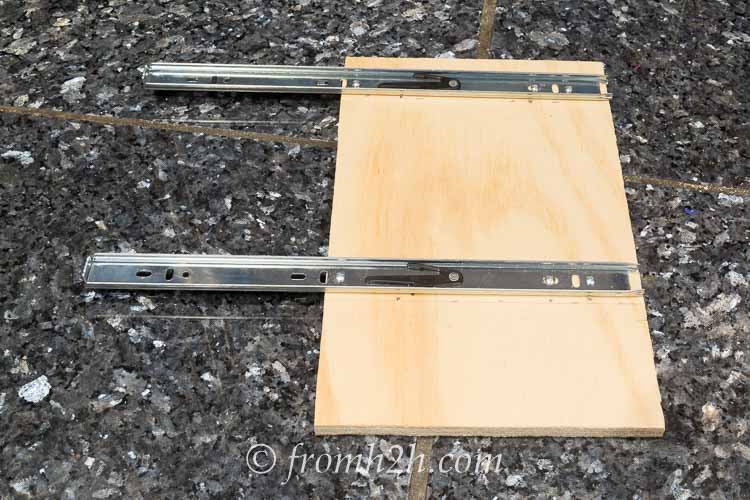
1. Two pieces of ½” plywood that are 2″ shorter than measurement A (door width), and about 7½” shorter than the C measurement (cabinet depth). These will be shelves for the door pull-out. In my case, the shelves were 11½” x 15″.
2. One piece of ½” plywood that is 2″ shorter than the A (door width) measurement, and about 10″ shorter than the B (door height) measurement for the door opening. This will be the back of the door pull-out. In my case, this was 11½” x 12″.
3. Two pieces of 2″ x 2″ board that are 9½” long. These will be the supports at the front of the pull out.
4. Four pieces of ¼” plywood that are 2″ wide and ½” longer than the length of the shelves in step 1. These will be the sides of the door pull out. In my case, these were 2″ x 15½”.
5. Two pieces of ¼” plywood that are 2″ wide and ½” longer than the width of the shelves in step 1. These will be the fronts of the shelves. In my case these were 2″ x 12″.
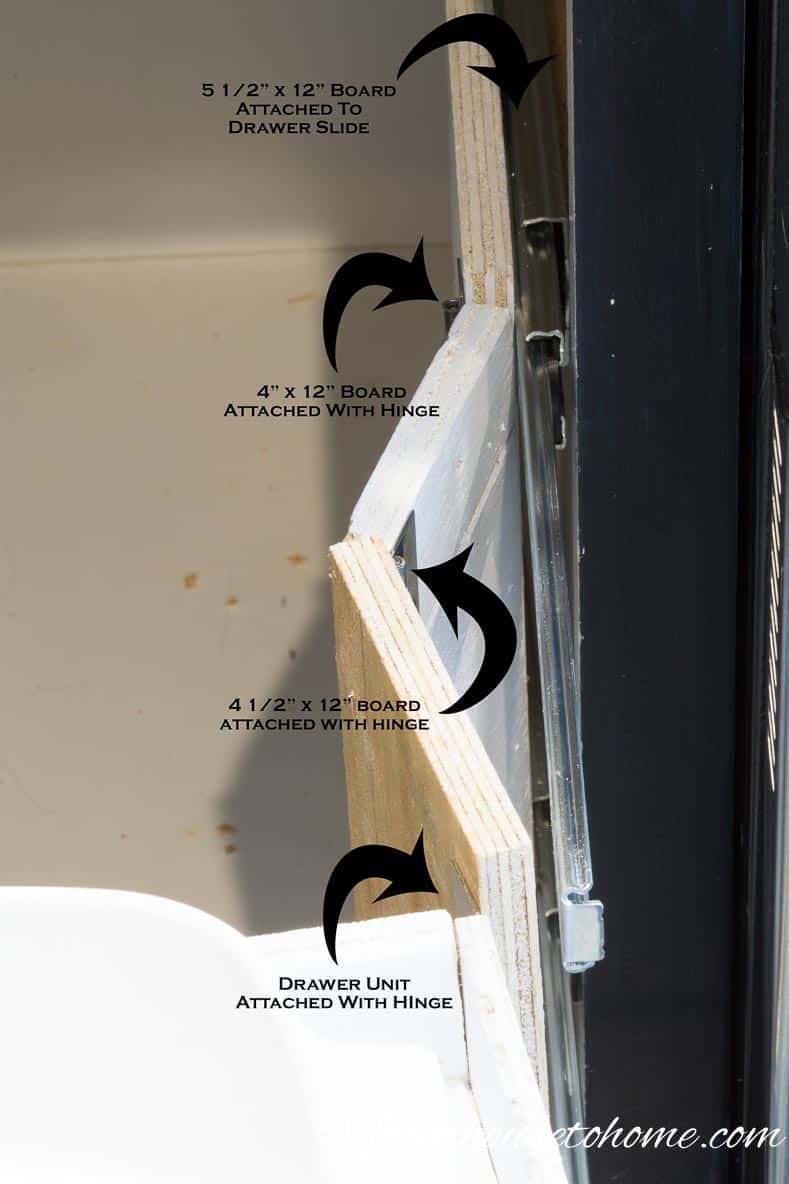
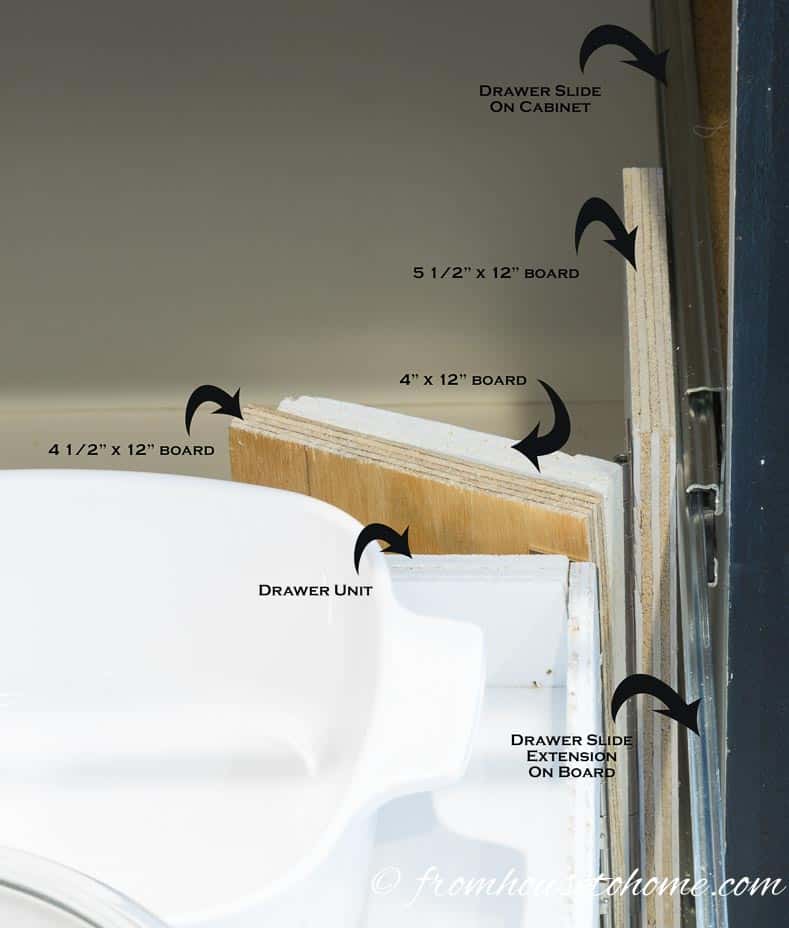
6. One piece of ½” plywood that is 5½” wide and 10″ shorter than the B (height) measurement for the door opening. This will be attached to the drawer slides and allow the unit to slide out. In my case, it was 5½” wide x 12″ long.
7. The following two boards are part of the mechanism that will allow the drawer to swivel out. If you are using a 14″ drawer slide, you can use the following measurements:
a. Cut the first piece of ½” plywood to be 4″ wide and the same length as the board in step 6 (12″ in my case).
b. Cut the second piece of ½” plywood to be 4½” wide and the same length as the board in step 6 (12″ in my case).
If you are using a different length of drawer slide, you will need to know the length of the drawer slide extension piece you are using in order to determine the board lengths. In the end, the width of these two boards plus the 5½” width of the board you just cut should equal the length of the drawer slide extension.
a. Remove the drawer slide extension by opening the slide all the way out, then pushing down on the little black lever on the back while you pull on the extension piece. It should slide right off.
b. Measure the length of the extension piece you just removed. For my 14″ drawer slide, it was 13¾”.
c. Subtract the 5½” width of the board you cut in step 6. For my 14″ drawer slide, that leaves 8¼”.
d. Divide that amount by 2. For the 14″ drawer slide, that comes out to 4 1/8″.
e. Subtract 1/8″ from that amount. Cut a piece of ½” plywood to this width, and make the length the same as the board in step 6. In my case, this board was 4″ x 12″.
d. For the second ½” plywood board, the width should be ½” wider than the first piece of board and will be the same length as the board in step 6. In my case this board was 4½” x 12″.
Note: You may want to paint the boards at this point. They are easier to paint before you put the unit together, but if you make any mistakes you may end up painting more later (learned from experience on my part).
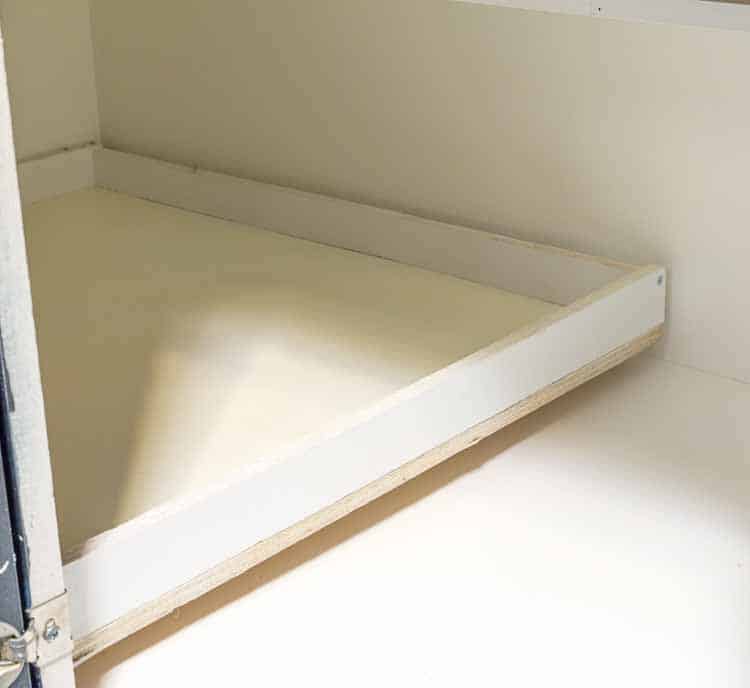
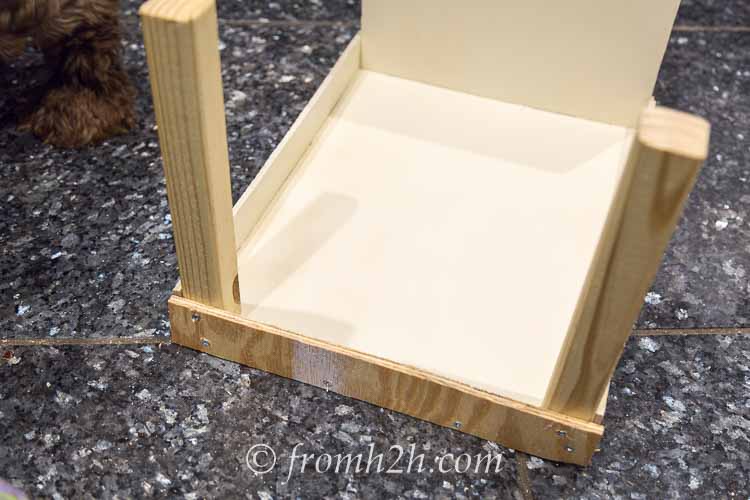
3 | Build the bottom shelf
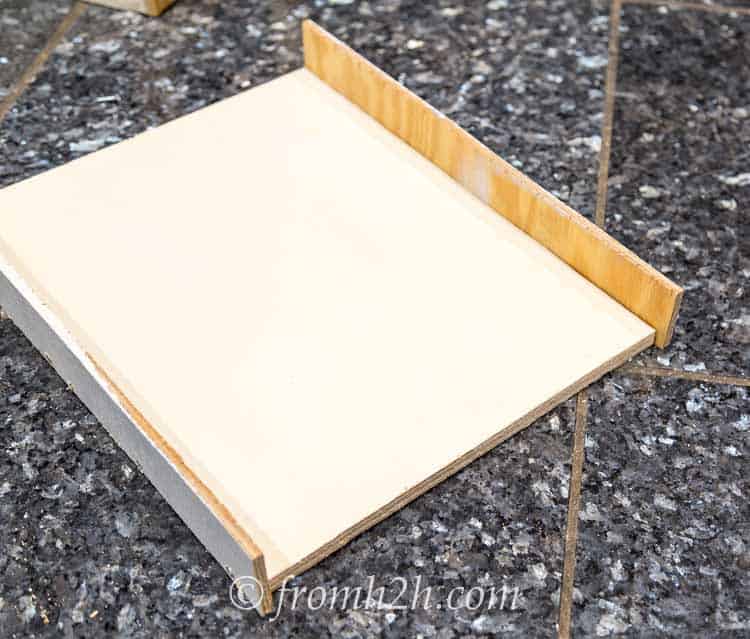
Attach the back piece to the bottom shelf along the bottom edge using nails or 1″ #6 screws, making sure that all of the edges line up.
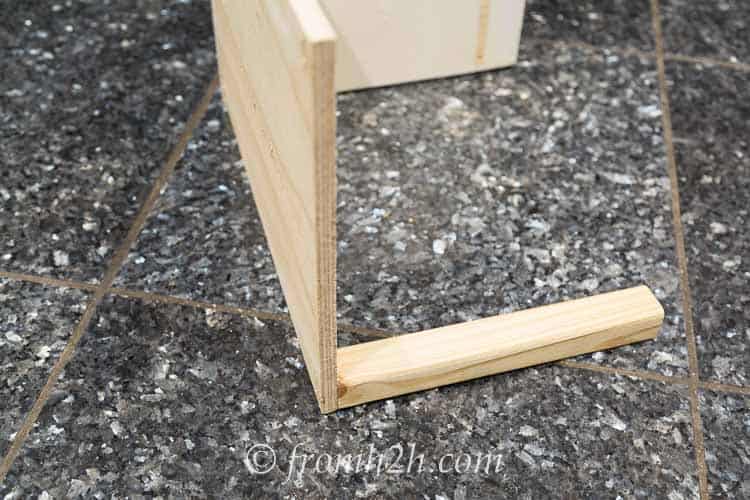
Turn the shelf on its side and attach the first of the 2″ x 2″ front supports by screwing through the bottom of the shelf with 1″ #6 screws.
Make sure it is square on the corner.
Use 2 screws to make sure that it stays in place.
Attach the support in the other front corner the same way.
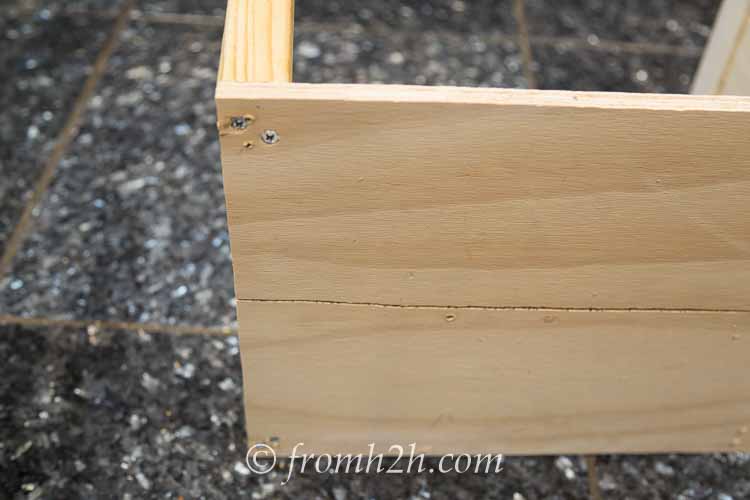
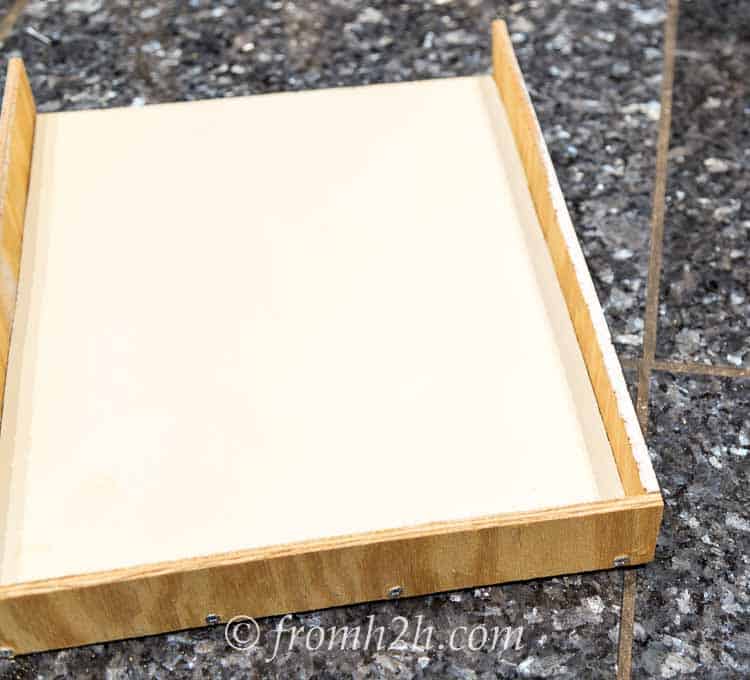
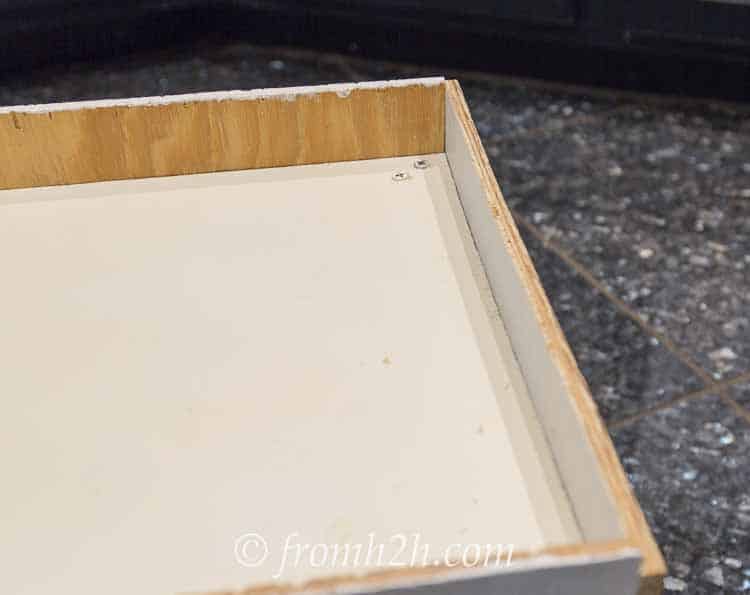
Attach the ¼” plywood sides to the front, bottom and back of the shelf using nails or ¾” #6 screws.
Make sure that the ¼” plywood is lining up with the bottom of the shelf and is even on both ends.
Attach the ¼” plywood front to the shelf using nails or ¾” #6 screws.
Make sure that it lines up with the shelf on all edges.
4 | Build the top shelf
Start the top shelf by attaching one of the sides to the side of the shelf using nails or ¾” #6 screws.
One end should be flush with the end of the shelf. The other end will stick out by ½”.
Attach the other side in the same way, making sure that it is flush against the shelf on the same end as the first side.
Attach the front to the bottom of the shelf.
It should go on the end where the sides are flush with the end of the shelf.
Make sure that the front lines up on all edges with the shelf and sides.
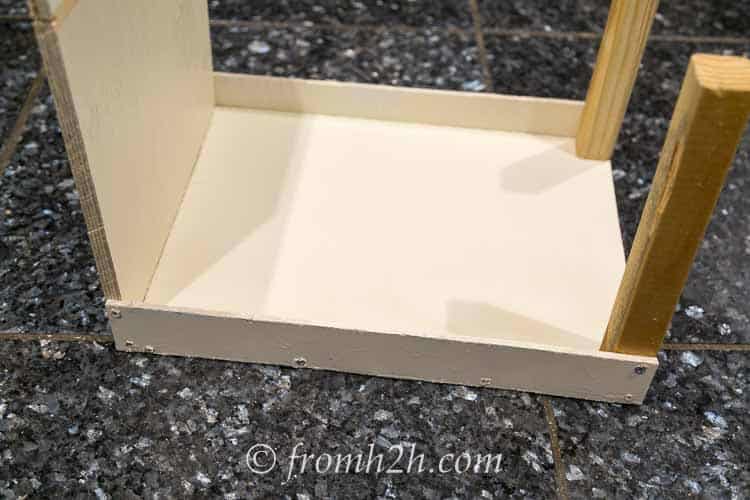
5 | Put the shelf unit together
Now you will install the top shelf onto the bottom shelf unit.
It is easiest to lie the unit on its side to do this.
Make sure that the top of the shelf is lined up with the top of the bottom unit and that the shelf is pushed right up to the back.
Then put a screw or nail through the side of the top shelf to attach it to the back board of the bottom shelf.

Do the same thing on the other side.
The shelf should now stay upright since the front of it will be resting on the top of the supports.
Make sure the supports are straight and lined up at the bottom corner of the top shelf.
Then put two screws through the top of the shelf to secure the shelf to the supports.
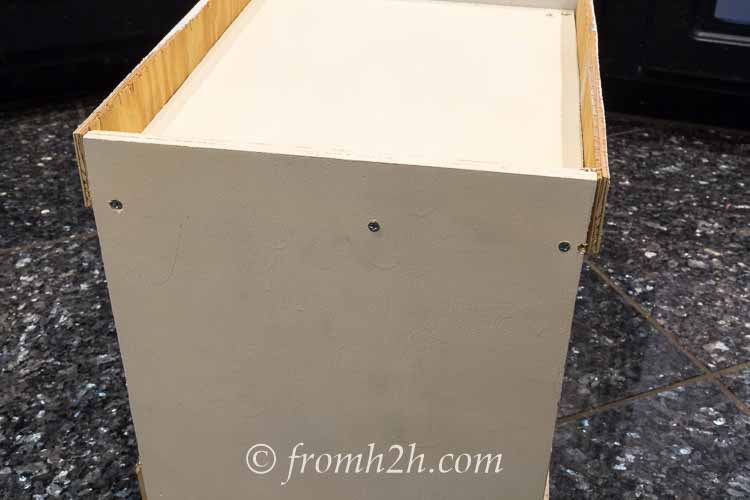
Next, put 3 or 4 screws through the back of the unit into the side of the top shelf.
You should now have a 2-shelf unit that is very sturdy.
6 | Paint
If you are going to paint your shelf unit, this is a good time to do that.
As you’ll see, I waited until after I put the wheels on, and ended up with paint on the wheels 🙂
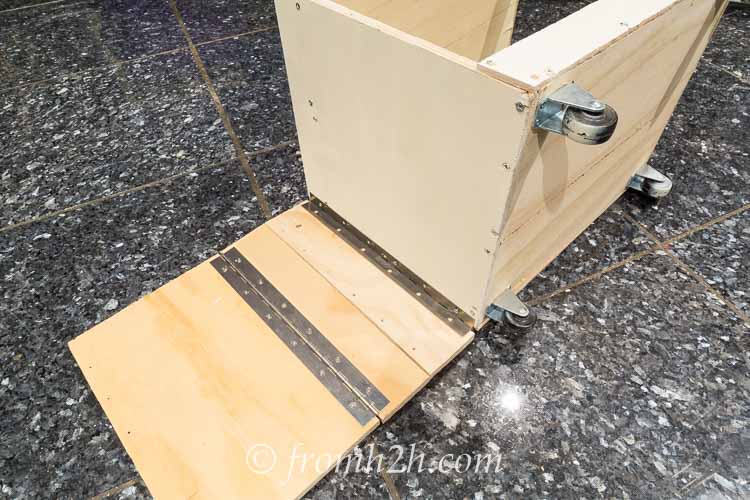
7 | Attach the casters
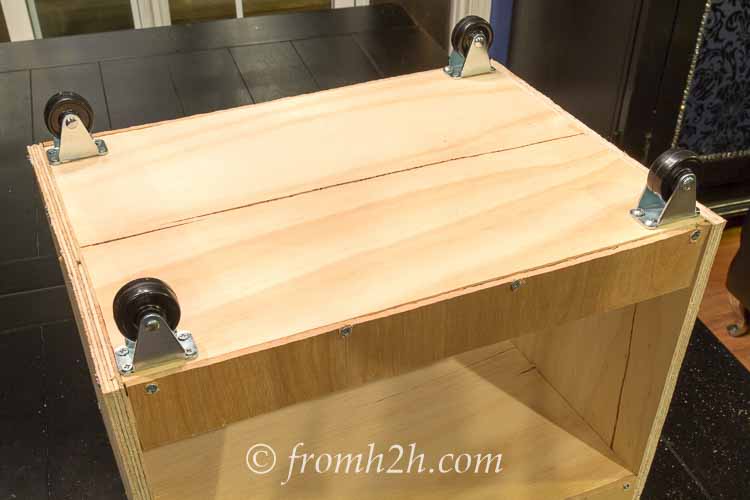
The last step for building the shelf unit is to turn the cart over and attach the casters to the bottom.
If you have the kind that don’t swivel (like mine), make sure they are position so that they will roll forwards and backwards in the cabinet.
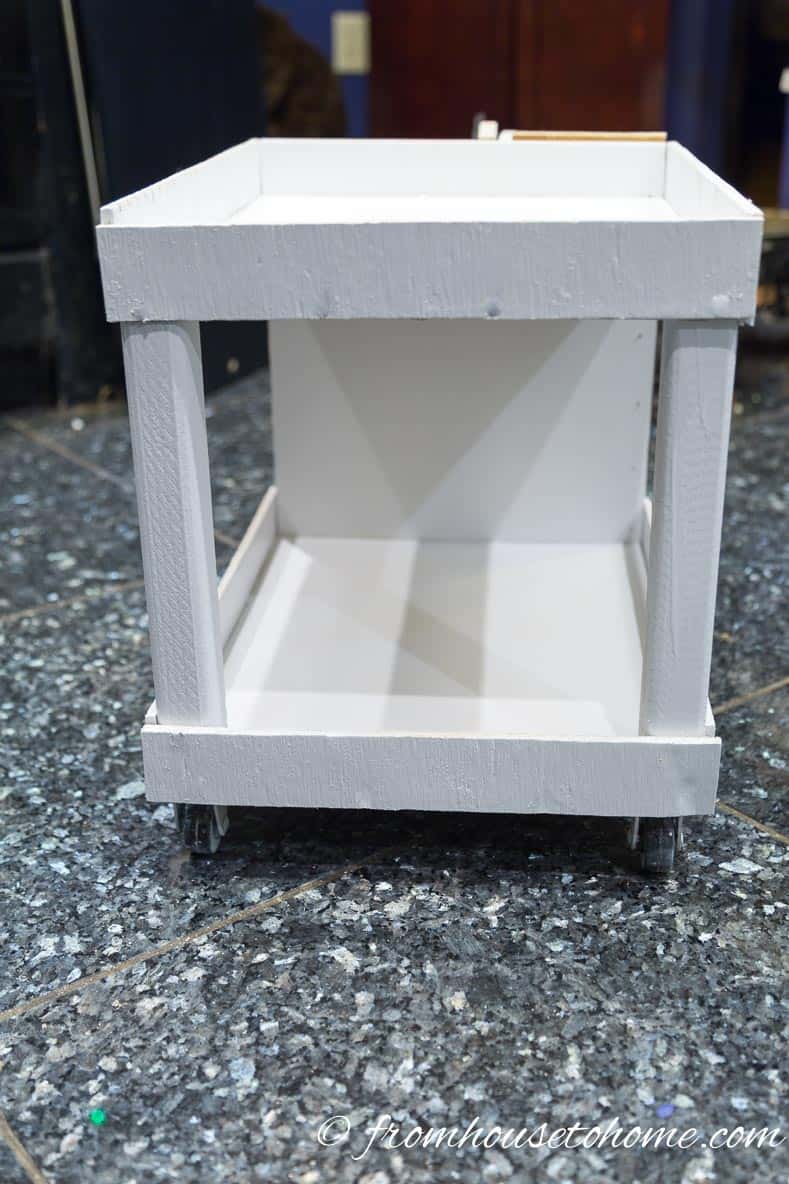
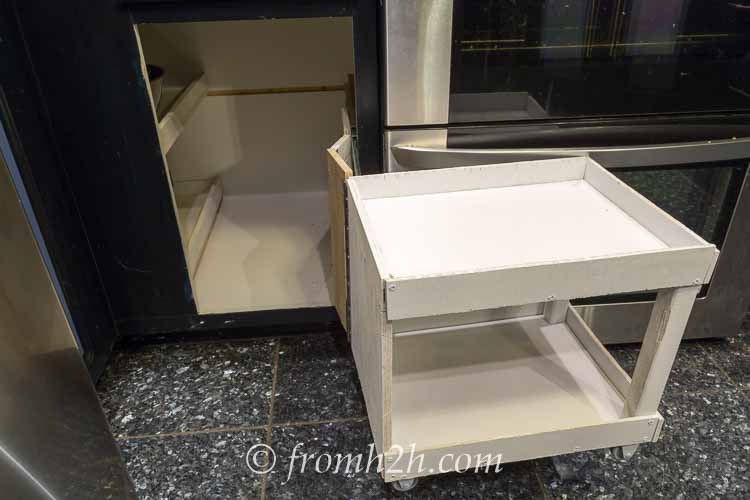
You should now have a drawer unit that looks something like this.
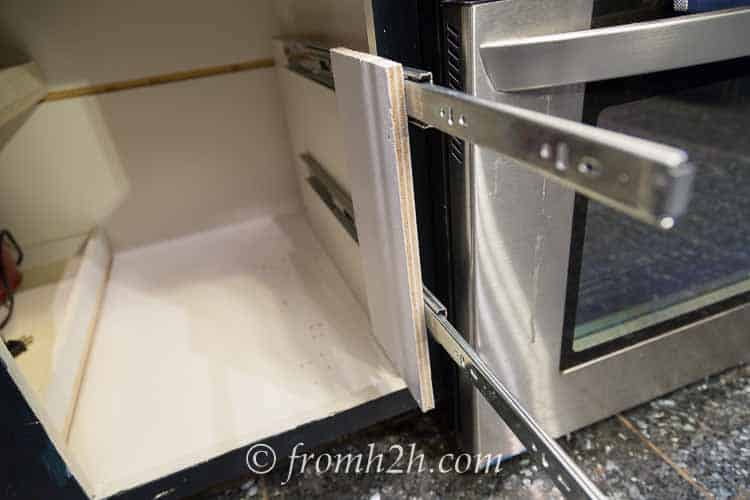
8 | Install the cabinet drawer slides
This shelf unit will be a little trickier to install since it needs to pull out and then swivel to give you access to get at the pull out shelves.
To accomplish this, we will be attaching 2 drawer slides on the same side of the cabinet.
Then installing the other side of the drawer slides onto a piece of wood that will be attached to your pull out cabinet with a piano hinge.
The shelves themselves will not actually be installed on the drawer slide.
First, you’ll want to remove the door from the cabinet to make it easier to work.
To make the drawer slides work for this function, you will need to modify them slightly.
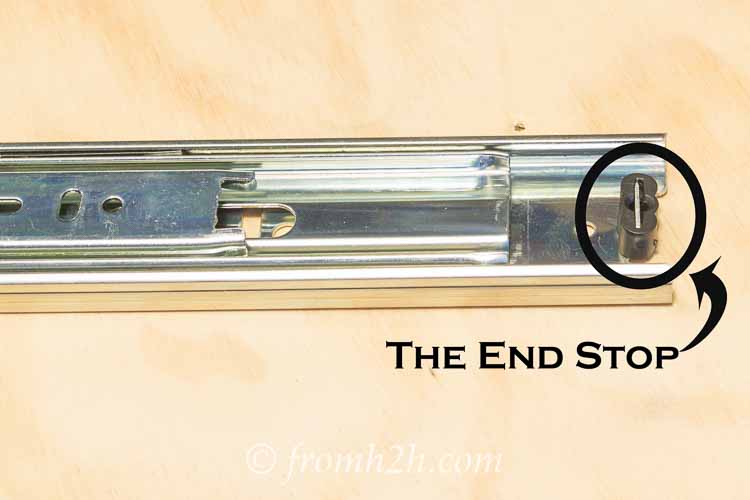
Find the piece of metal on the back end of the slide that stops the drawer slide from going backwards.
Use pliers to bend this piece of metal so that it is flat with the rest of the slide.
You should now be able to pull the slide out in both directions from the base. This is necessary to allow the drawer to close.
Just make sure not to pull it too far back or it may come off the rail (we have just removed the thing that prevents this from happening). Don’t worry, when we put the drawer slide into the cabinet, the back of the cabinet will prevent it from going back too far, so this won’t be an issue once it is installed.
Remove the drawer slide extension by pulling the drawer slide all the way out. You should see a little lever like this one on the back of the drawer slide. Press up on it and then pull out the end of the drawer slide.
You will end up with two pieces. One side gets installed in the cabinet and the other end gets installed on the drawer.
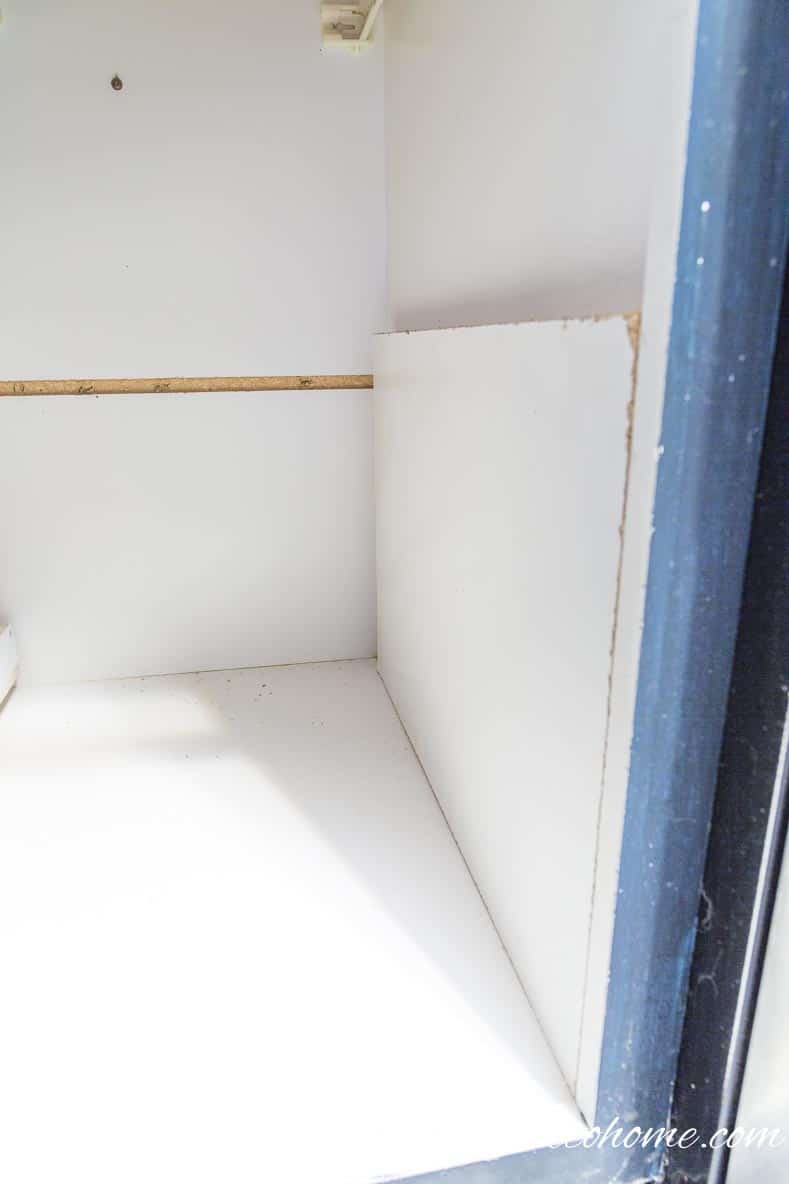
(Optional) If you have face frame cabinets like I do, you will need to install a piece of wood across the side of the cabinet so that it is level with the edge of the door.
Measure up about 5″ from the bottom of the cabinet.
Make a mark on the side of the cabinet that is closest to the door at this height.
I actually installed mine at 5½” so that I could use a 2″ x 6″ for a spacer. That makes sure that the drawer slide is level.
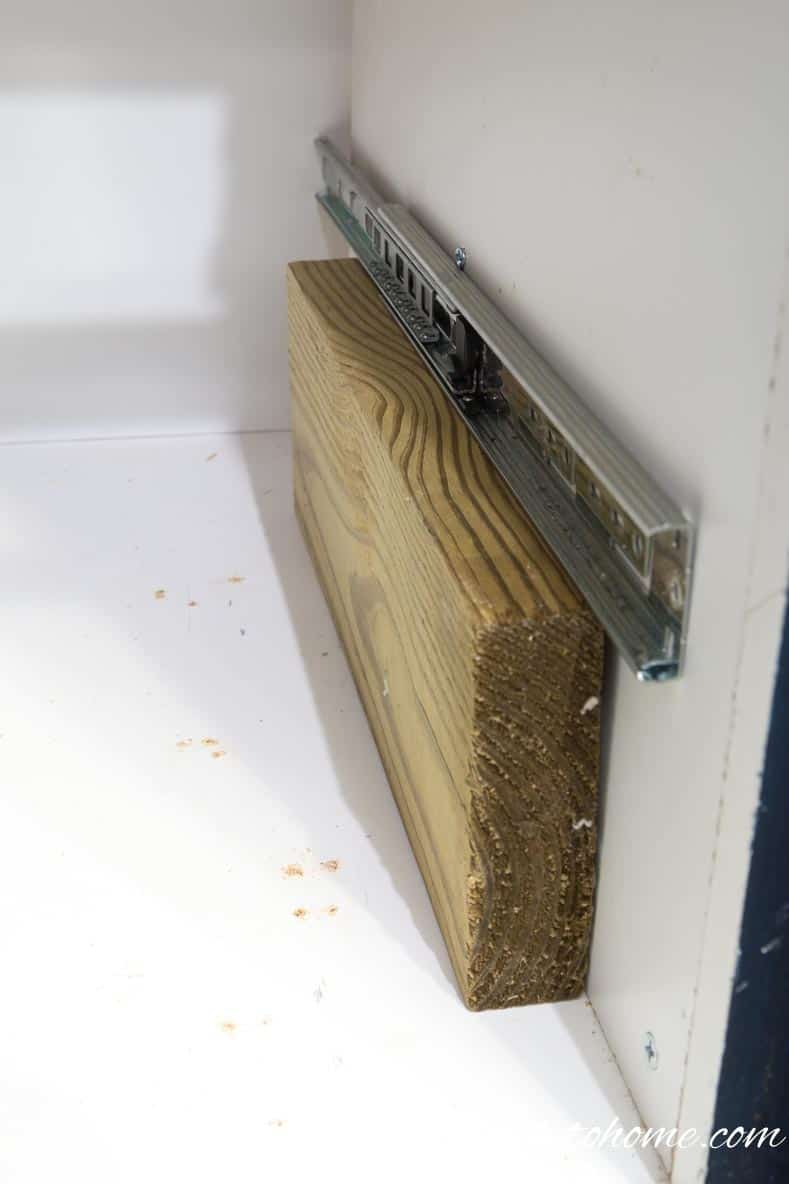
Install the first drawer slide along this mark, keeping the following in mind:
- Make sure the piece of metal that you flattened above is at the back.
- The back of the drawer slide should be 6″ from the back of the cabinet.
- You should be able to slide the mid-section of the slide back so that it touches the back wall.
Repeat the same steps at about 12″ up from the bottom of the cabinet for the second drawer slide. I re-used the 2″ x 6″ spacer by placing it on top of the lower slide.
9 | Install the other half of the drawer slides
Now we need to attach the drawer slide extensions to the 5½” x 12″ piece of plywood that you cut.
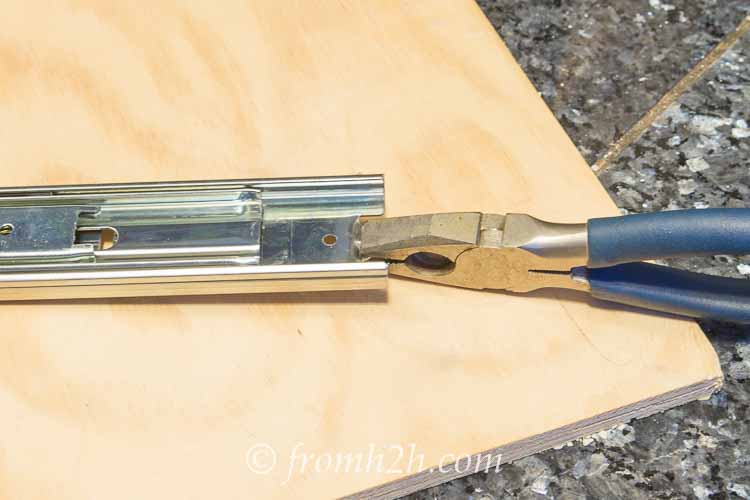
When I did this, the holes in the drawer slide extension were too far apart to fit onto the board, so I ended up drilling a new hole.
This is one time that I gave in and used a corded drill. Because of the extra power, it makes the process of drilling through metal go much faster.
Then attach the two drawer slides one above the other on the board, keeping the following in mind:
- The narrow end of the slide should be at the edge of the board
- To make it easier to install, you’ll want the bottom of the board to line up with the bottom of your drawer insert. To do this, the bottom slide should be attached the same distance up the board as the bottom slide in the cabinet, minus the height of the casters. In my case, this came out to 3 7/8″.
- The drawer slides should be the same distance apart as the ones that you installed in the cabinet. This meant that the bottom edge of my top slide was 7¼” above the bottom edge of the bottom slide.
Test that your drawer slide extensions are spaced correctly by fitting them onto the cabinet side slides.
The narrow end of the slide on the board should fit between the rails on the portion that is installed in the cabinet.
Push it all the way back onto the slide so that your board reaches the back of the cabinet.
You will have to push it hard the first time, but after that it should glide smoothly back and forth.
If it doesn’t fit, you will need to adjust the extensions on your board to make sure they are straight and at the correct height.
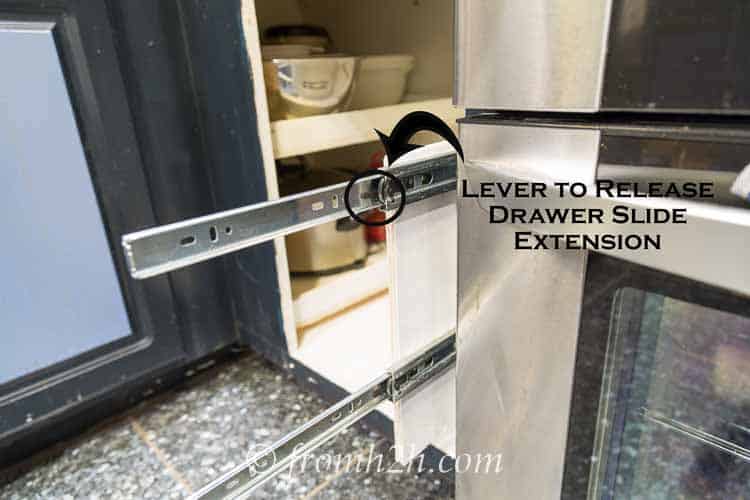
Once it all tests out, detach the board from the cabinet slides. To do this, pull it all the way out, push up on the little black levers on the back of the slide, and pull the extension off the end.
10 | Create the pull out mechanism
This is the part that will allow the drawer to pull out and swivel so that you can get at the shelves in the corner.
It does this by having one board attached to the drawer slide on the wall, and two other boards attached to that board with hinges.
These boards cover the length of the drawer slide when they are open and allow the drawer unit to swivel sideways at the end.
These two boards will be collapsed together when the drawer is closed which minimizes the amount of space they take up and allows the shelf unit to be pushed back further.
Here are the steps to actually make this mechanism.
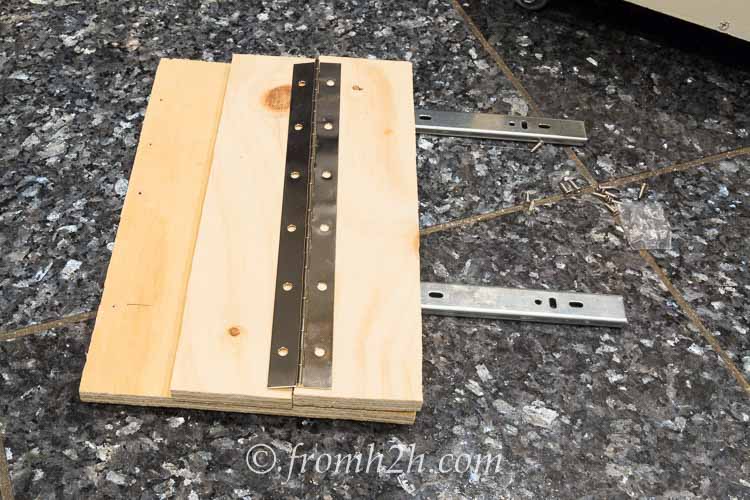
Flip over the board that we just attached the slides to so that the slides are underneath it.
The other 2 boards in the mechanism (they should be the last 2 you have left) will line up over the slide extension.
The board with the narrower width (4″ if you are using the 14″ drawer slide) should be in the middle.
Make sure that they cover the full length of the drawer extension, otherwise the swivel mechanism won’t work.
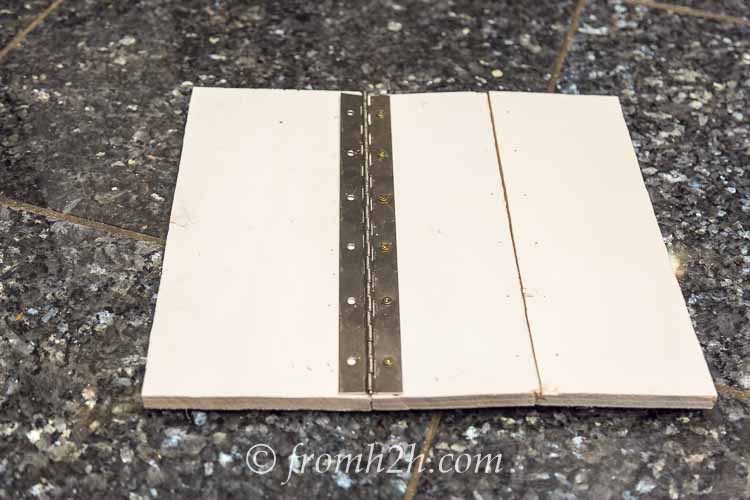
Attach the the board that has the drawer slide extensions on it to the middle board using one of the 12″ cabinet hinges.
Make sure that the boards are pressed tightly together, that the hinge is on straight, and that the bottom of the boards line up.
Close the hinge so that the middle board is folded flat against the board with the drawer slides attached to it.
Install the second cabinet hinge on the middle board and the end board. Again make sure that the boards are pushed tightly together, that the hinge is on straight and that the bottom of the boards line up.
Now you are ready to attach this mechanism to the back of the drawer unit (almost done!!).
Lie the shelf unit on its side. Make sure that the side which will be facing the drawer slides inside the cabinet is the one that you have on the ground.
Lay the extension mechanism boards down on the floor beside shelf unit.
Make sure that you have the narrower boards in the mechanism attaching to the drawer unit and that they are lined up with the back side of the shelf unit (the closed-in end).
Attach the last of the cabinet hinges between the shelf unit and the extension mechanism. Again try to get the boards as close together as possible and make sure that the bottom of the board lines up with the bottom of the drawer.
11 | Install the shelf unit
We’re finally at the last step!
Fit the ends of the slide extensions into the drawer slides that are attached to the cabinet.
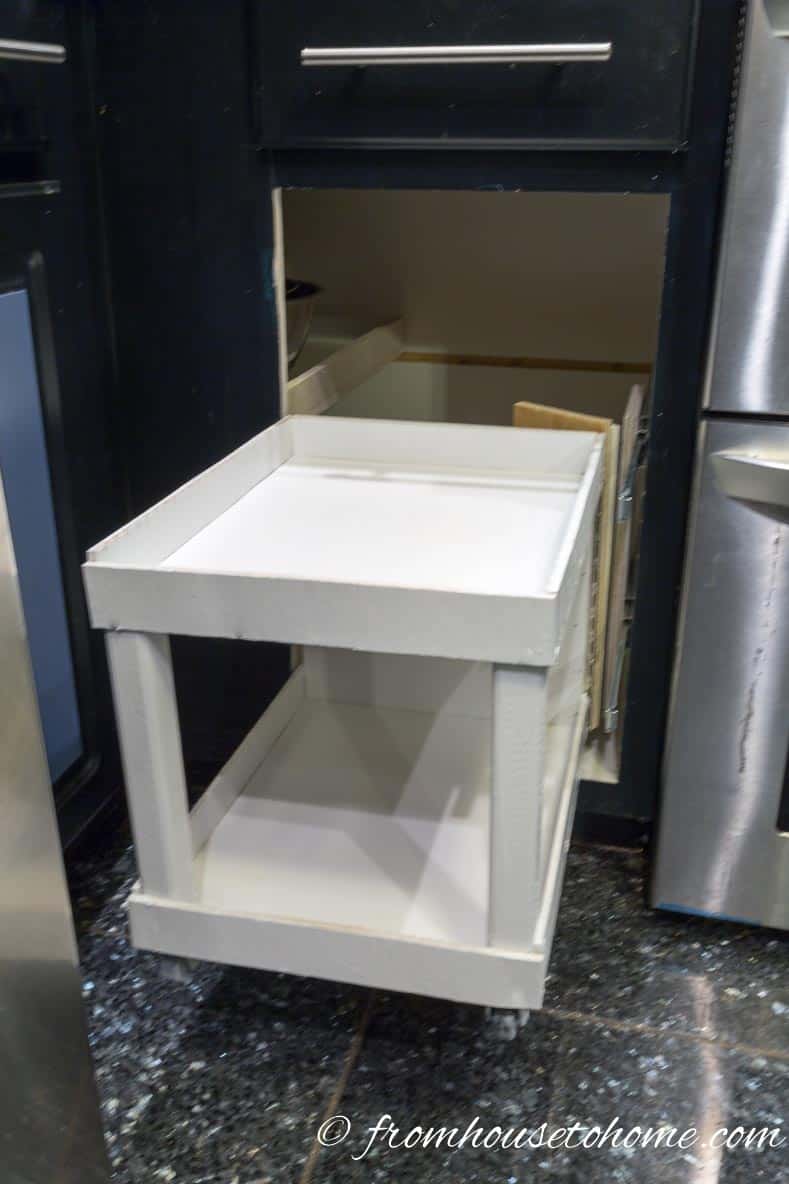
Then straighten the drawer out so that it is lined up with door of the cabinet.
Push the shelf unit all the way to the back of the cabinet making sure that the drawer slides are going in straight. Your piece of wood that is attached to the drawer slide should touch the back of the cabinet.
The first time you do this, you will have to push pretty hard to get them to go all the way in. But after it has been engaged, it should pull in and out smoothly.
Check that the wheels are touching the bottom of the cabinet when the shelf is pushed in. This prevents the drawer extensions and hinges from having to support the weight of the drawer most of the time.
If they’re not touching the bottom of the cabinet, you will need to re-install the hinge on the back of the shelf unit so that it is a little higher.
If you have a hard time getting the drawer into the cabinet because the wheels won’t roll in smoothly, they are probably too low.
In this case, you will need to re-install the hinge on the back of the shelf unit so that it is a little lower.
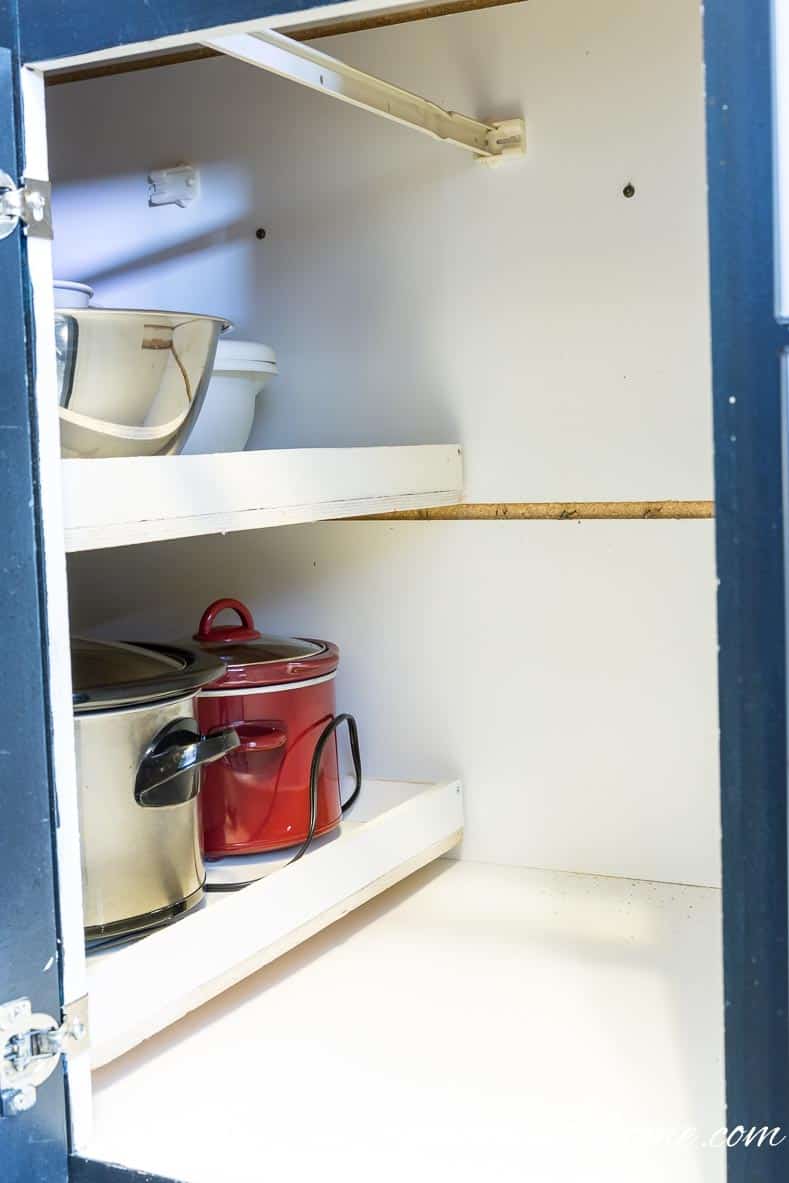
Now you can put the door back on your cabinet and the project is done!
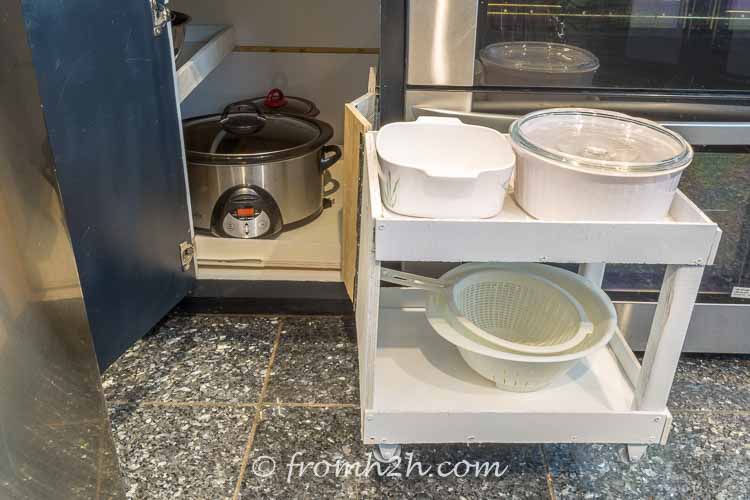
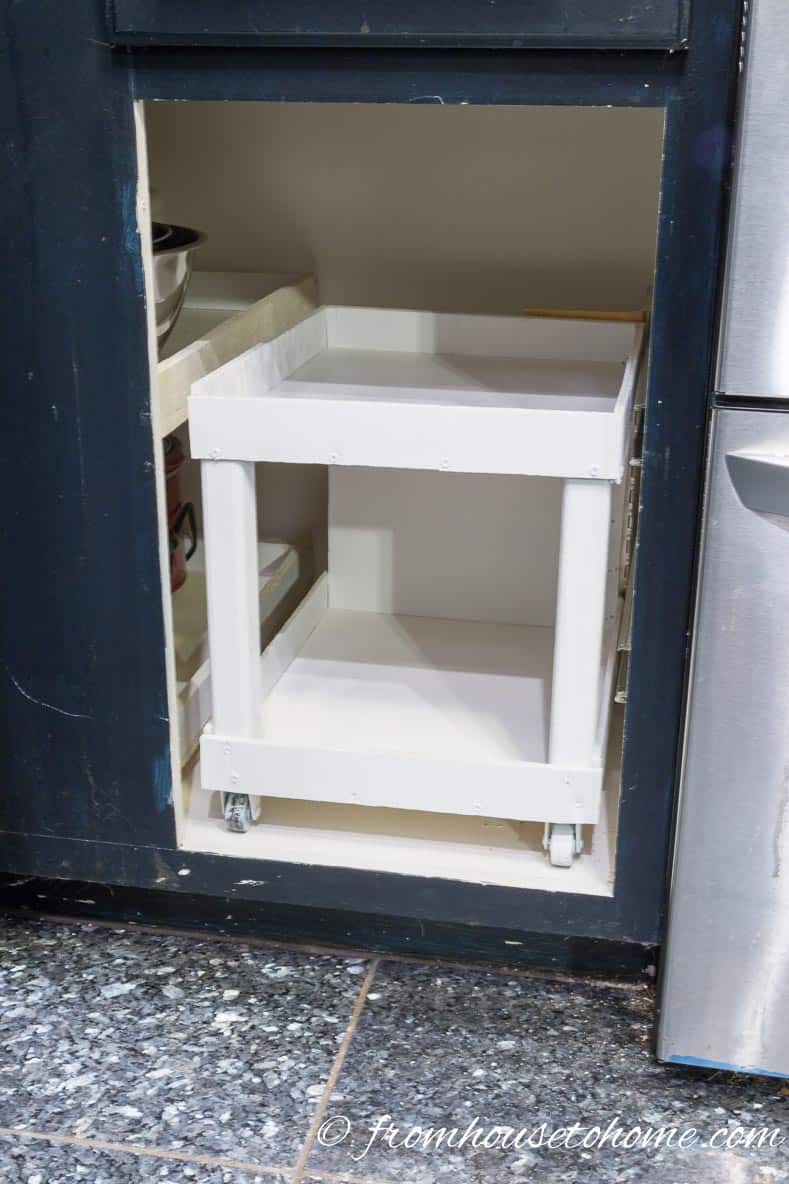
The finished cabinet
Here is the finished pull out shelf.
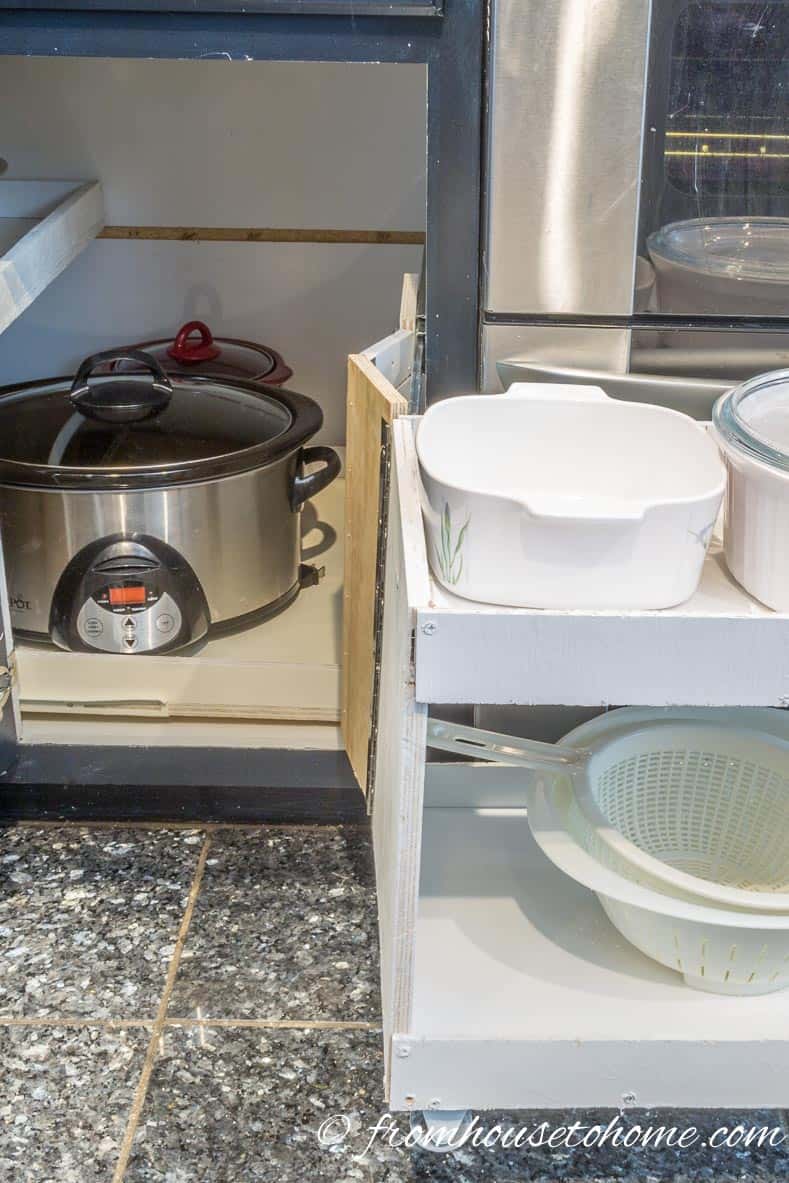
Just to recap how it works:
- You can get at the things that are on those shelves pretty easily just by reaching in (like you used to).
- Or to make it easier to reach the things at the back of the drawer, you can pull the drawer out part way.
- Finally if you need to reach anything in the back corner of the cabinet, pull the drawer out all the way and swivel it. Then pull out the shelf inside the cabinet if that’s what you are trying to reach.
I tend to store things that I don’t use that often, but need to be able to get to occasionally in the corner pull out shelves.
Since there is more space over the bottom shelf when it is pulled out, I store taller and heavier things on this shelf. The extra room makes them easier to get at.
Since the pull out shelf unit at the front does have to rest on its hinges occasionally, I don’t keep anything really heavy on it.
And there you have it…a blind corner cabinet that is much more accessible than it used to be!
Other DIY kitchen storage ideas you might like
- How to convert base cabinet shelves into drawers
- DIY over the fridge cabinet organizer
- DIY kitchen drawer organizer ideas
Or browse all of our kitchen storage ideas.
Have comments or questions on how to build pull out shelves for a blind corner cabinet? Tell us in the section below.
This post was originally published on March 22, 2016 but was updated with new content on April 13, 2024.
Do you think this would work on an upper cabinet (instead of a lower one)?
Hi Carmen…the measurements would be different, since the cabinet is smaller. But it should be able to work the same way.
I noticed on your YouTube video that you weren’t entirely happy with this section. Having read and watched a lot of instructional articles/videos, I think your problem is that you keep trying to attach the front section to the cabinet, whereas it would work better if you made a box for the back drawers and attached the front section to that. Here’s one of the best examples I found: https://m.youtube.com/watch?v=VK6HP9ktkXw
One issue (as the chap found out in the vid) is that it’s difficult to do as a retrofit; it’s a lot easier to install before the cabinet is in its final position, so that the whole thing is accessible. Nonetheless, it seems a better solution than a piano hinge setup. Hope this helps.
Thanks for the suggestion, Mary! Mine is working pretty well now. But if I were starting with a new cabinet, I would definitely try it out.
Hi, This is a great solution to a very common problem. You instructions and photos are clear and logical and give a “why I did this” perspective which helps novices get their heads around a bit of a Rubics cube of three dimensional jiggery pokery. What I really loved was that you used basic everyday tools and skills to create a quality end product at a level that would let readers say, “I can do that”. Two thumbs up!!
Thank you for the information. Just so you know one negative with the commerically availability is the limitation in the space between the top shelf and the bottom shelf. I love your directions and will be implementing them. Right now I have a closet that probably was a broom closet when the house was built. I am putting in adjustable pull out shelves. I bought the vertical pilaster strips. They came with buttons. Buttons are the piece that you attach the slider and the pilaster to. In my case they are rev a shelf and very limited in that the button cannot be used with any other pilaster. If I put in another one, I will be looking for a larger company’s product like Accuride for the pilaster and buttons. Apparently most sliders cab be used in any of these systems. I will buy the others for a linen closet that is quite deep. Can’t reach sheets in the back easily. Again thank you for your tutorial and definitely for the creativity.
Thanks for the helpful information, Maureen!
I love your blind corner pullout shelves. I have some questions.
My first difficulty will be removing the shelf that goes all the way to the back. Can the shelf remain in place with the top pull out drawer right above the shelf. Otherwise I will need someone to climb into the cabinet to remove the shelf. I am not able to do that.
When you slide your blind corner shelves towards the door opening, you still have about 15 inches of shelf still in the hidden/blind area of your cabinet.
I know the commercially available (very expensive) blind corner cabinets set ups have part of the pull outs from the blind portion come out of the cabinet. Is there a way to do that with these shelves?
Have you considered installing toe kit drawers.
Thanks for the tutorial.
Hi Maureen…if you’re just installing the slide-out shelves, you should be able to leave the fixed shelf in the cabinet. But I do have a second part to this where I built a pull-out that fills in the extra 15 inches you’re talking about (You can find it HERE). If you do that part, it won’t work with the fixed shelf.
I was trying to figure out how you had a cabinet that could just roll out, and then I realized that it looks like your cabinets are not set on my top of a 4″ toe kick box, but are set directly on the ground? I’ve never seen that in the house before in my entire life. Your solution makes a lot of sense for your unique setup, but I’m not sure how someone with traditional cabinet boxes set on top of a 4″ toe kick could use this method?
Hi Luke…my cabinets do have a 4″ toe kick. The pull out shelf rolls on the wheels when it is in the cabinet, but is supported by piano hinges when it is out of the cabinet (the wheels don’t touch the ground).
Hi Wanda,
I’ve been trying to get my blind corner to work since I bought my house last year. Thank you for figuring this out for me! 😉 I’m looking for part 2. Have you posted it? If so, I’m not finding it on your webpage. Thanks! I just signed up for your email too! =)
Thanks, Ann. I did post part two…you can find it here: https://www.fromhousetohome.com/build-pull-out-shelves-for-a-blind-corner-cabinet-part-2/. It takes a bit of work to put it together but it does work really well!
do you have instructions for organizing your pots and pans under the kitchen sink. Im interested in may be constructing pull out rolling shelves. do you have any ideas.
Hi Bernadette…I have some of my pots in drawers and I love it, so I think the rolling shelves would work well (I have never done that though, so I don’t have specific instructions). Making them under the sink is a little trickier since you have to work around the plumbing. But I think if you cut the back of the shelves out so that they would go around the pipes, they should still work. Or if there isn’t a lot of room around the plumbing at the back of the cabinet, you might just want to cut the shelves narrower so they don’t reach all the way back. Then you can install them like usual with drawer slides on either side of the cabinet (just like I did with the back of the blind corner cabinet). I would be tempted to put low edges on the front and back of the shelves just to keep the pots from sliding off. I hope this helps!
Good idea, Wanda. Now you just have to figure out how to pull out the front section so you don’t have to unload to get at the back section. Now there’s a challenge for you. (My attempt at being funny.)
Hi Aunt Elaine…yes, that’s definitely the challenging part…next week’s post!