How To Paint And Gold Leaf A Piano

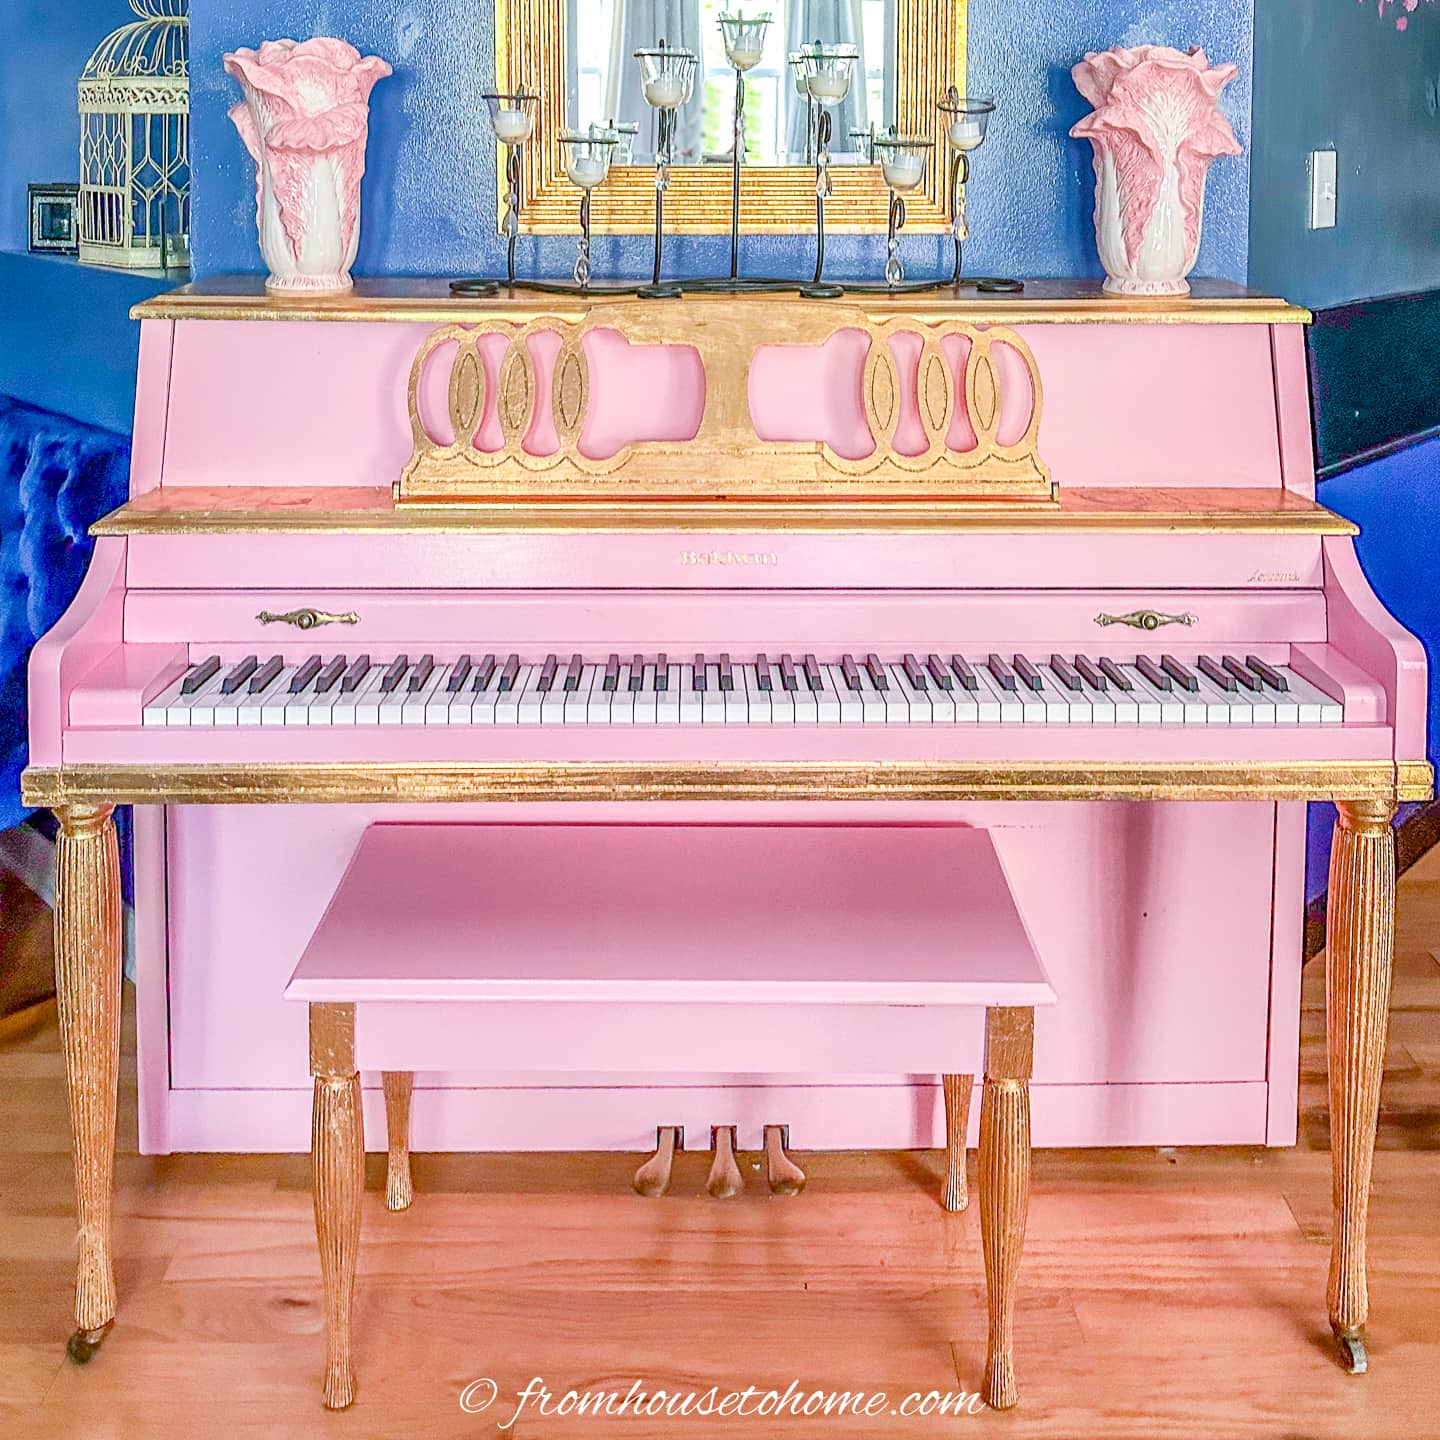
If you’re looking for a fabulous way to update the look of your piano, you’ve come to the right place! After painting our piano pink and adding gold leaf accents (what could be more fabulous than that?), we’re sharing the step-by-step process we used to get a professional looking finish.

It takes some courage to change the façade of a piano.
The surface of Wanda’s upright had not weathered its many moves well.
It had lots of dings and was looking the worst for wear.

Plus it looked very dated in her living room.
So we decided to do something about it that’s not for the faint of heart. (If the thought of painting a piano is giving you anxiety, you might want to stop reading now.)
Paint it pink with gold leaf accents.
It’s not a hard process but it is a little time consuming.
Especially if you want a great-looking finish that’s durable when you’re done.
So here’s the step-by-step process.
And you could choose to paint the whole piano or gild the whole piano in which case you can skip the section that doesn’t apply to you.
But in both cases, you’ll want to do all the preparation steps.
Preparation
As with any paint job, a thorough prep is mandatory for a professional looking outcome.
Prep equipment & supplies
- screw driver – may be necessary to remove some of the parts
- cleaner/degreaser – to thoroughly clean all of the parts. I like Krud Kutter*.
- Scotch brite scrub sponge – to apply the cleaner/degreaser.
- bucket and wash cloth
- wood filler and putty knife – to fill any knicks
- 220 sandpaper and sanding block
- Painter’s tape
- Cricut machine and vinyl (optional) – to create letters to cover the brand name on the piano if desired.
Take the piano apart

Remove as many of the panels and top from the piano façade as possible. This will make painting them much easier.
It helps to take pictures of how each part fits on the piano as you take it apart. That way you can remind yourself how to put it back together properly when the time comes.
Lay these pieces out separately on a workbench or table.
Remove the legs

If your piano has front legs like mine, you can make temporary legs with 2″ x 4″ boards cut to size.

Then remove the real legs and screw the temporary ones into the leg holes.
You will probably also want to put down a piece of plastic to catch any paint drips and gold leaf bits.
Clean
Next, clean all grime and wax from the piano wood and panels using a mix of ½ cup of Krud Kutter to 2 quarts warm water.
I applied this cleaner/degreaser with a Scotch brite scrub sponge.
Then, rinse all surfaces with clear water and let dry overnight.
Fill any dents

Fill all dents and chips with liquid wood.
After the filler dries, use 220 grit sand paper to sand the spots smooth.
Tape

Protect the keys by covering the edges with painter’s tape.
Sand

Lightly sand the entire piano to degloss the surfaces. Using a sanding block makes it easier to get into any grooves.
Wipe off all dust with a damp cloth.
Protect the brand name

We wanted the manufacturers name ‘Baldwin’, on the front panel board, to remain visible.
So we used the Cricut machine to cut same size vinyl letters, and attached them with spray adhesive over the existing ones as a protective barrier.
To do this, take a picture of the brand. Then import into Cricut Design Space, set it to the same size as the label on the piano, and cut out the vinyl letters.
Apply the gold leaf
Decide which parts of the piano you want to gild and which parts you’re going to paint.
I decided to gold leaf the horizontal pieces (such as the top), the legs and the sheet music holder. And paint all of the vertical surfaces.
For any parts of the piano that will be both painted and gilded, you’ll want to apply the gold leaf first.
Otherwise, you may get bits of gold leaf on the fresh paint which will be very difficult to remove without wrecking the finish.
Gold leaf equipment & supplies
- Gilding adhesive – I like the Mona Lisa brand* best. With this adhesive, a little goes a long way so you won’t need very much.
- Gold leaf foil sheets – These faux gold leaf sheets* look like the real thing at a fraction of the cost.
- 1″ wide small bristle brush or foam brush
- soft cloth or rag
- Rust-oleum spray paint in bright gold* (optional) – This is only required if you have grooved legs (or other areas on the piano) that are hard to get complete covered with the gold leaf.
Apply the adhesive
Working one panel board at a time, use a 1″ bristle brush to apply a thin layer of foil adhesive over the entire area that you want to be gilded.
Wait for the glue to dry.
Don’t hurry the waiting step. The foil will not stick to any wet adhesive spots. The adhesive should feel just barely tacky. This will take from 30 minutes to an hour.
Stick on the gold leaf

Start at one edge and apply the first foil sheet.
Pick up the gold leaf sheet with the accompanying paper as one.
Carefully lay the foil onto the board as straight as possible and rub the top paper to smooth the foil underneath.

Don’t worry if there are a few bubbles in the gold leaf after you stick it down. You can pat them down and they will be rubbed off later when you smooth it out.
The next sheet of foil needs to overlap the first a little bit.
If there are gaps or rips, position a piece of foil over the vacant space and gently rub it into place with your fingers.

When you have a few sheets stuck down, whisk off any excess foil with a soft dry paint brush.
Continue adding sheets of foil to the panel until the entire surface is covered.
Clean off the excess foil
To remove the excess gold leaf, rub the entire board with a soft cloth.
Rub the joins up and down where they meet, as opposed to across, in order to blend and eradicate the seamline.
Apply a second layer
If you have obvious seamlines or areas that are not completely covered, you can apply another layer of gold foil.
Follow the same process of applying a layer of glue, waiting for it to dry and then sticking on the gold leaf.
You can either do this over the whole area or just over the part that needs to be fixed.
Give the entire piece a good polishing with a soft dry cloth.
For more details, read about how to apply gold leaf to furniture.
How to gild grooves

If your piano legs (or any other part) have grooves like ours does, you will probably want to paint them with shiny gold spray paint first.
After the paint has dried add a layer of glue and gild as above.
Then use a dry 1″ brush to push as much of the gold leaf into the grooves as possible.
It is hard to get the leaf to completely cover the surface in the grooves. In these cases, the gold paint will help to hide any bare spots.
Paint the piano
Supplies and equipment
- primer – Use a good quality one such as Zinsser.
- 220 and 320 sanding paper and sanding block – We’ll use this to smooth out any bumps between each coat.
- Semi-gloss or gloss paint – I like the Advance semi-gloss paint sold by Benjamin Moore. It self-levels and dries to a very hard surface so it creates a beautiful finish. We had them match it to Sherwin Williams ‘In the pink’
- 4″ low pile wool roller and tray – The wool rollers create a smoother finish. I used this one* from Amazon.
- 2″ to 2½” sash brush — I like these new grip free ergonomic brushes*.
- damp cloth
- small flat scraping tool, such as a butter knife
Prime
The first painting step is to apply a primer.
Use a good quality one such as Zinsser. Let it dry overnight before continuing.
Lightly sand the primed panels with 220 grit sandpaper and wipe free of dust with a damp cloth.
Paint

Apply a thin layer of the semi-gloss paint.
Use a wool, low pile 4″ roller for the larger flat surfaces and a brush for smaller areas.
Use light pressure to prevent ridges.
If you are using the Advance paint, avoid the urge to overwork it. Since it is self-levelling, it will smooth itself out.
Let the paint dry
Allow the first coat to dry for at least 24 hours and ideally 48 hours to make sure the paint is completely dry.
This will make sure the final finish is hard and durable.
Sand
Lightly sand the painted pieces with 320 sandpaper in the sanding block.
This removes any small bumps and ensures a smooth finish.
Repeat
Repeat the painting, drying and sanding steps until you have applied 4 coats of paint. Do not sand after the last coat.
Four thin coats of paint with long drying times between coats will result in a harder finished surface than 2 thick coats. Even though it takes a long time to complete, it is worth it in the end.
Remove paint from the brand name

If you want to have the brand name show through the paint, carefully scrape off any excess paint from the letters.
A flat butter knife is good for this (or your finger nail if you don’t mind getting them dirty).
Let the paint cure

Let the paint cure undisturbed for 2 to 4 weeks before putting the piano back together.
This helps to prevent getting scratches on it before it has completely hardened.
Reassemble the piano
Then carefully reassemble the piano (using the pictures you took earlier to remind you where everything goes).
The paint will continue to harden over the next few months, when it will become a tough durable surface.
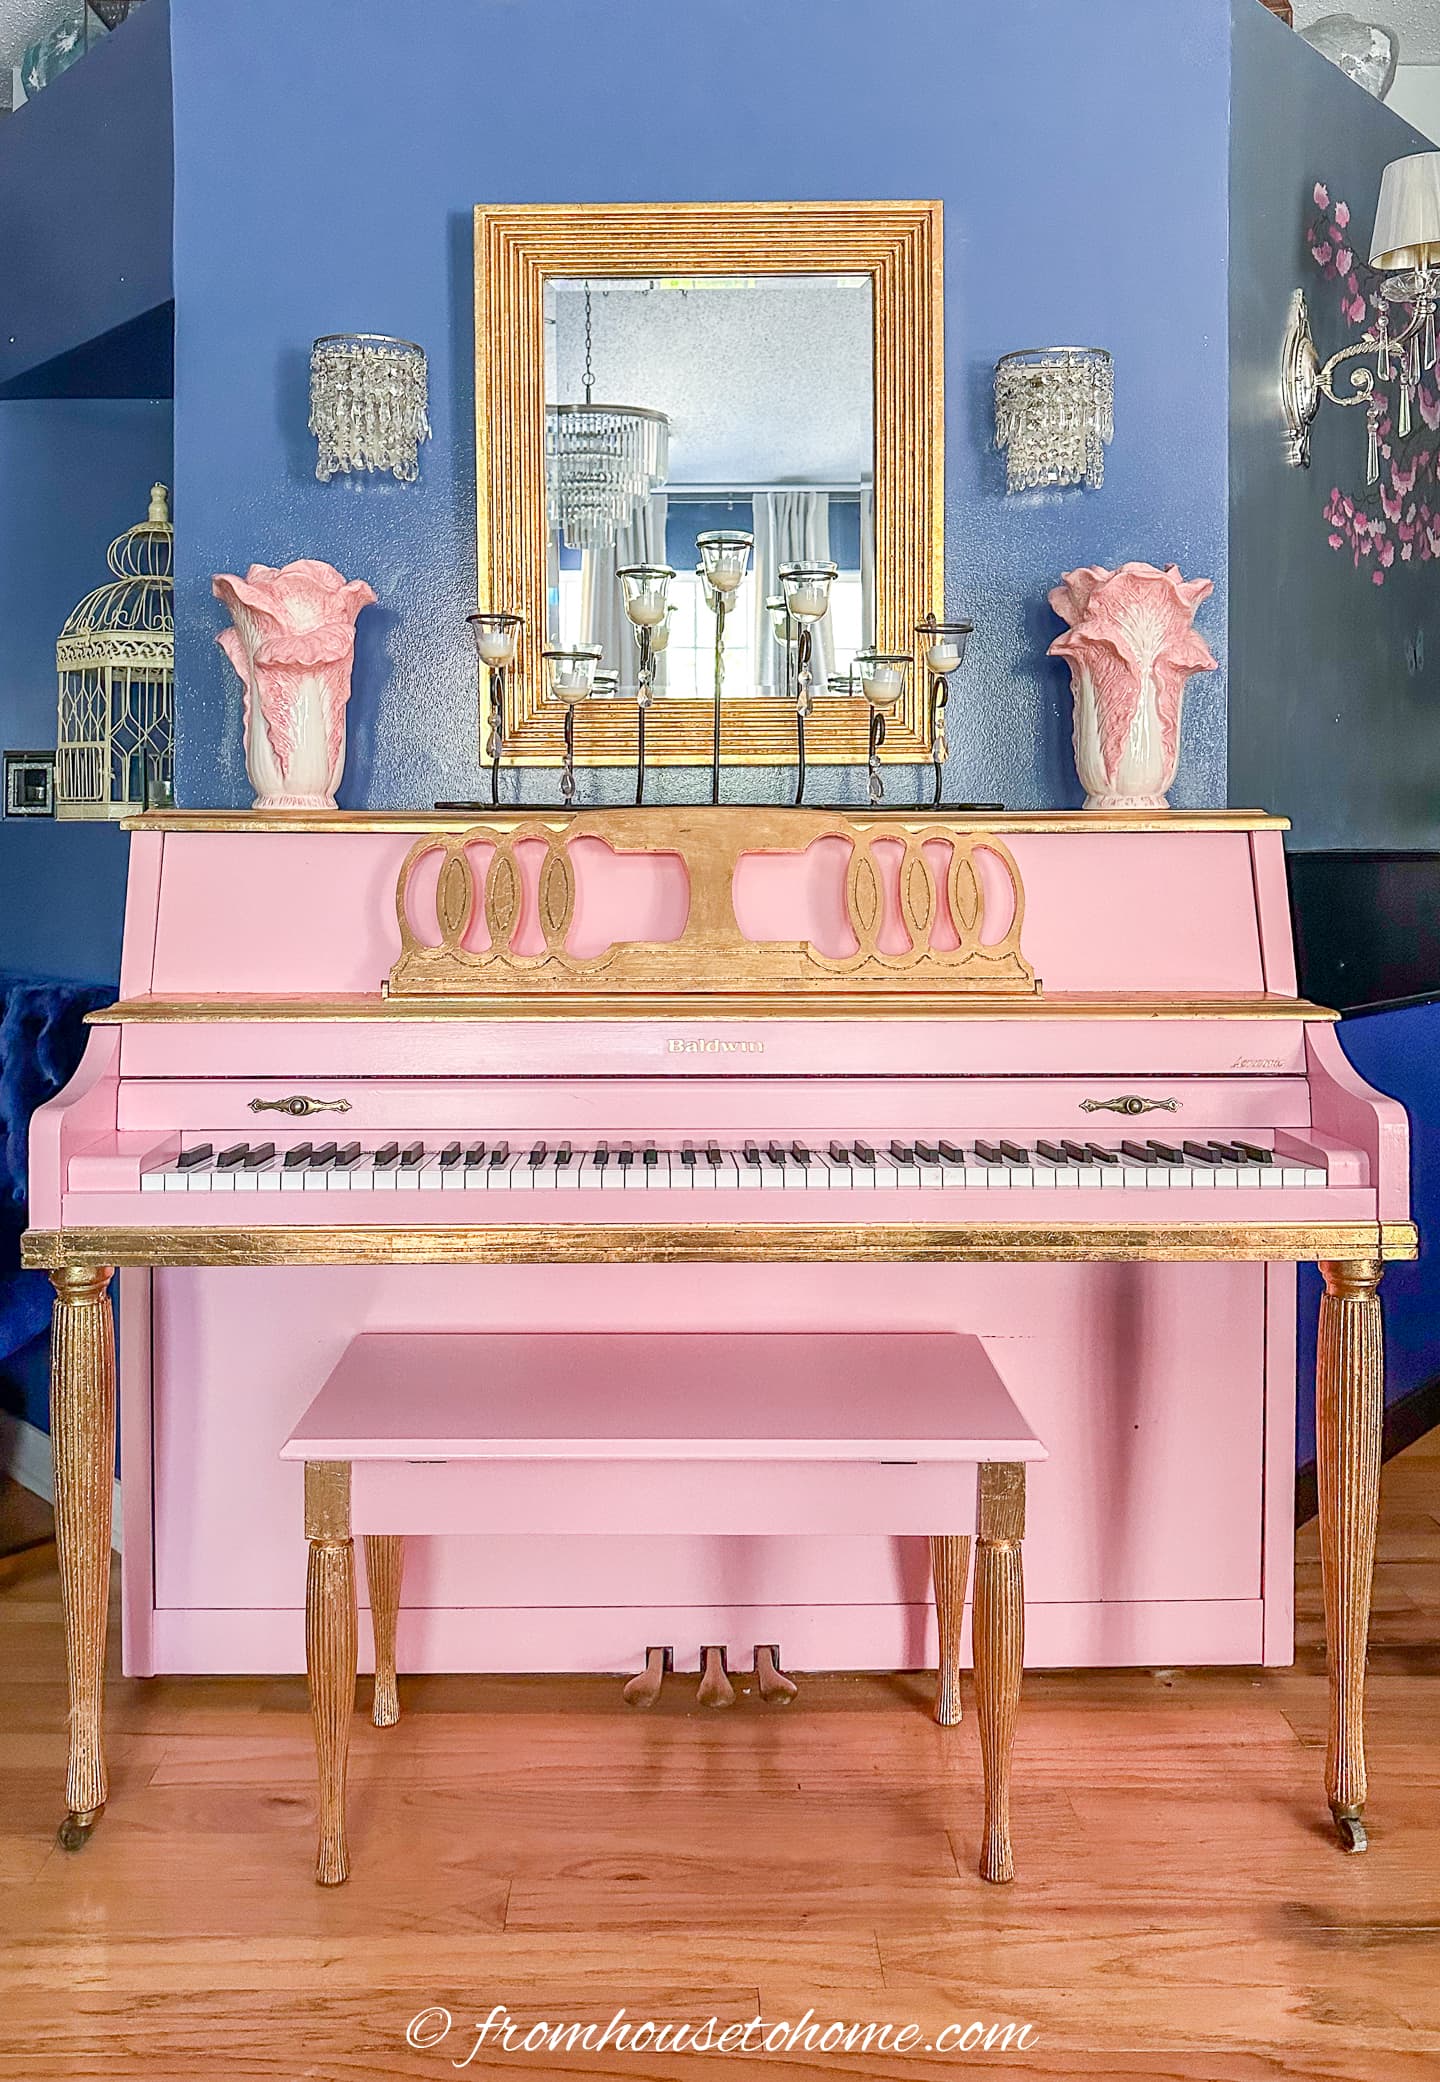
I liked the look so much that I also gilded the mirror over the piano. And added a couple of pink and white vases to finish the look.
Now it’s no longer the ignored, uninspiring wall in my living room.
I hope I have inspired you to try refurbishing a large piece of furniture like a piano.
Turning it into something you love can really make a different in how the whole room feels.
Other painted furniture ideas you might like
Or browse all of our DIY glam decor ideas.