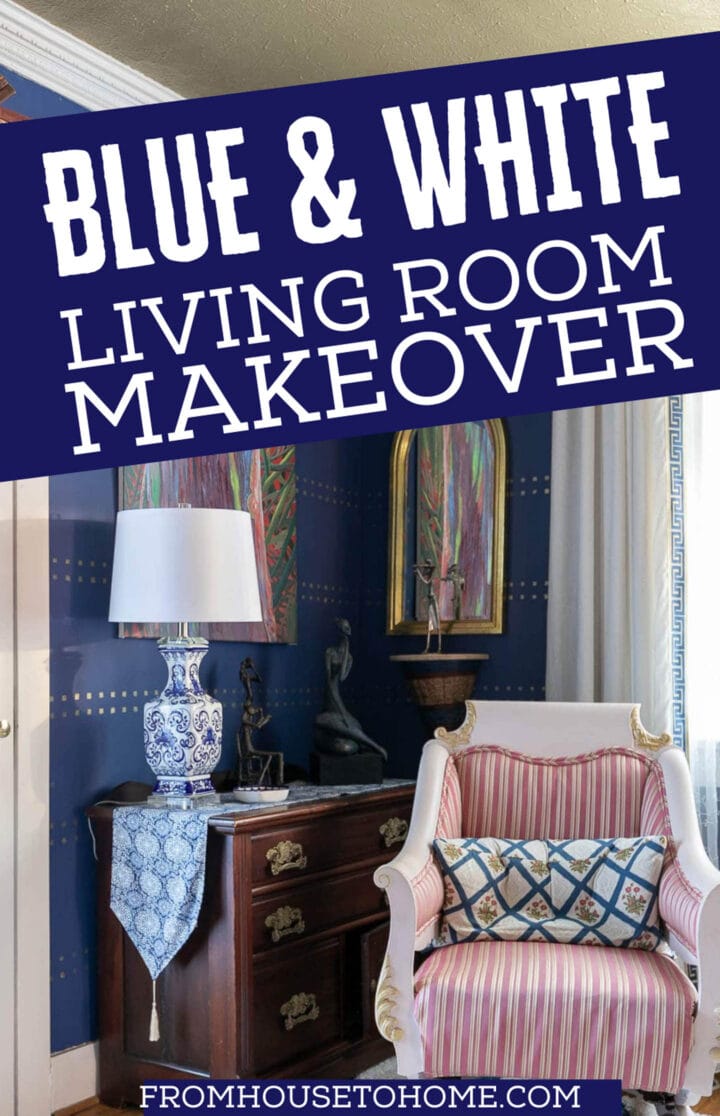
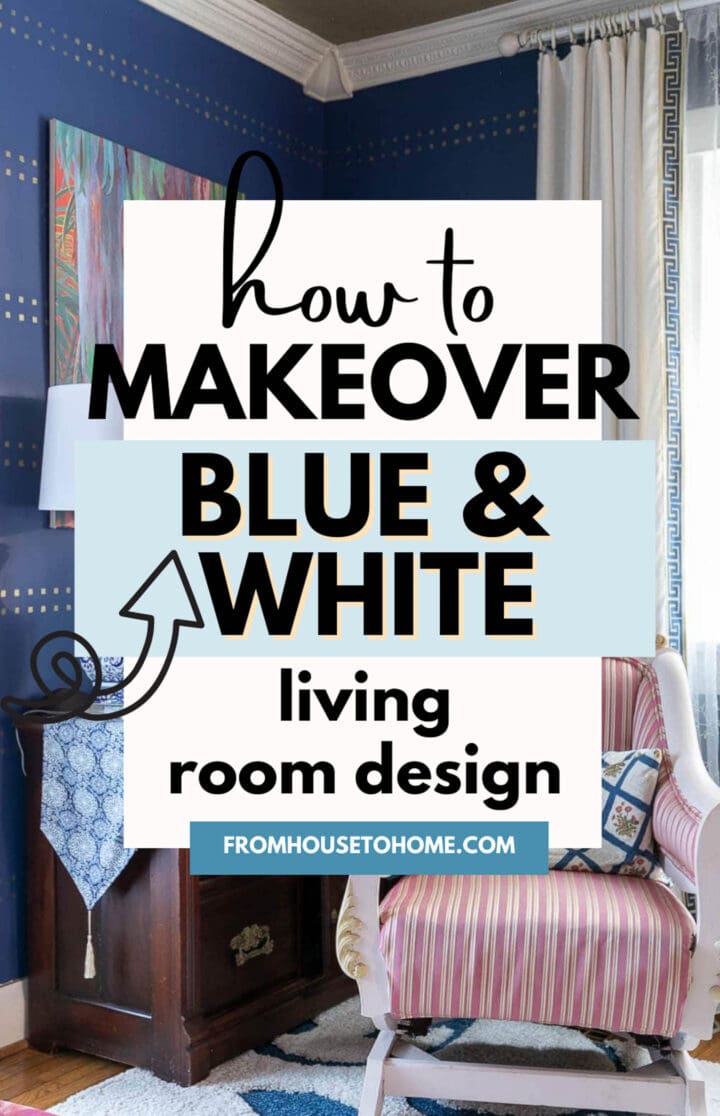
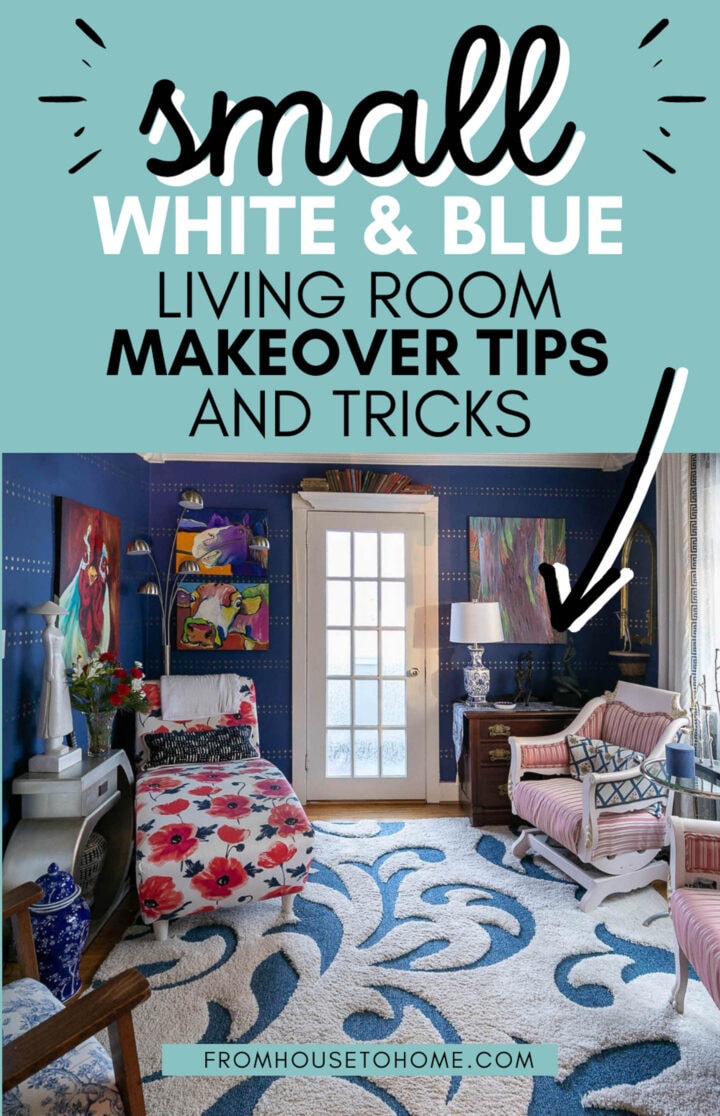
How To Decorate A Small Blue, Gold and White Living Room

If you’re like most people, you probably don’t have an unlimited budget to decorate your home. But that doesn’t mean you can’t create a stylish and inviting living room on a tight budget. We’ll show you how to use blue and white colors to create a small but chic living room.

A couple of weeks ago, I showed you the library portion of my winter makeover, and promised to reveal the other half…my living room makeover.
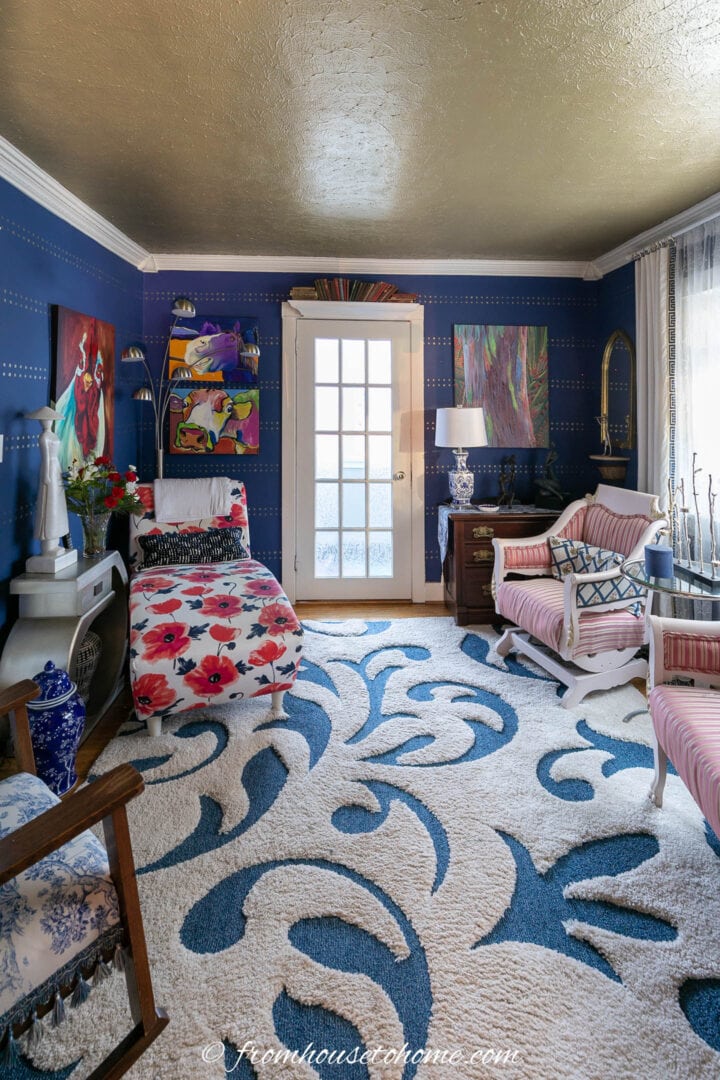
This is the room where I watch TV, read, and listen to music. My all important chaise is in here — my ‘relaxing’ place!
The room is located off of the front porch so it’s the first room that guests see. Therefore it needs to present a good first impression, but also be very aesthetically pleasing to me.
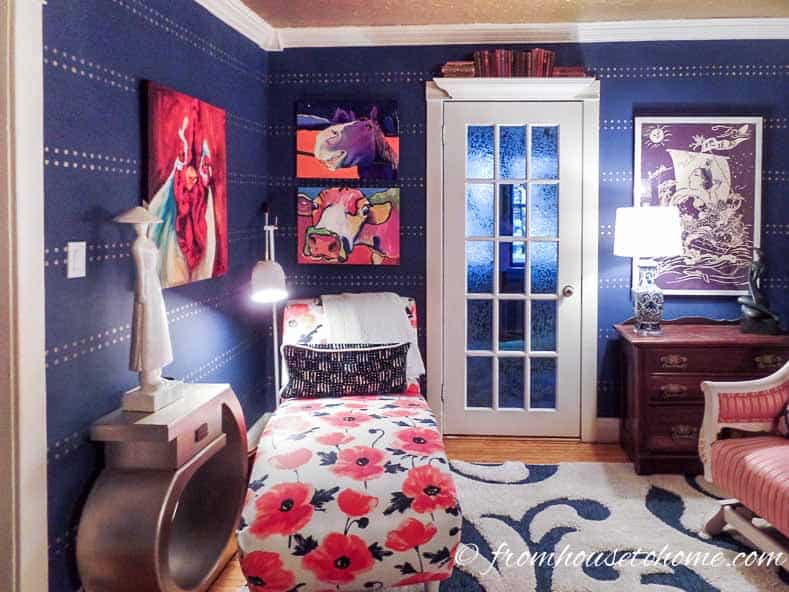
And as with all the rooms in my house, it’s tiny! No more than 10′ x 10′, with 3 doors so making it feel comfortable is always a challenge.
The Room “Before”
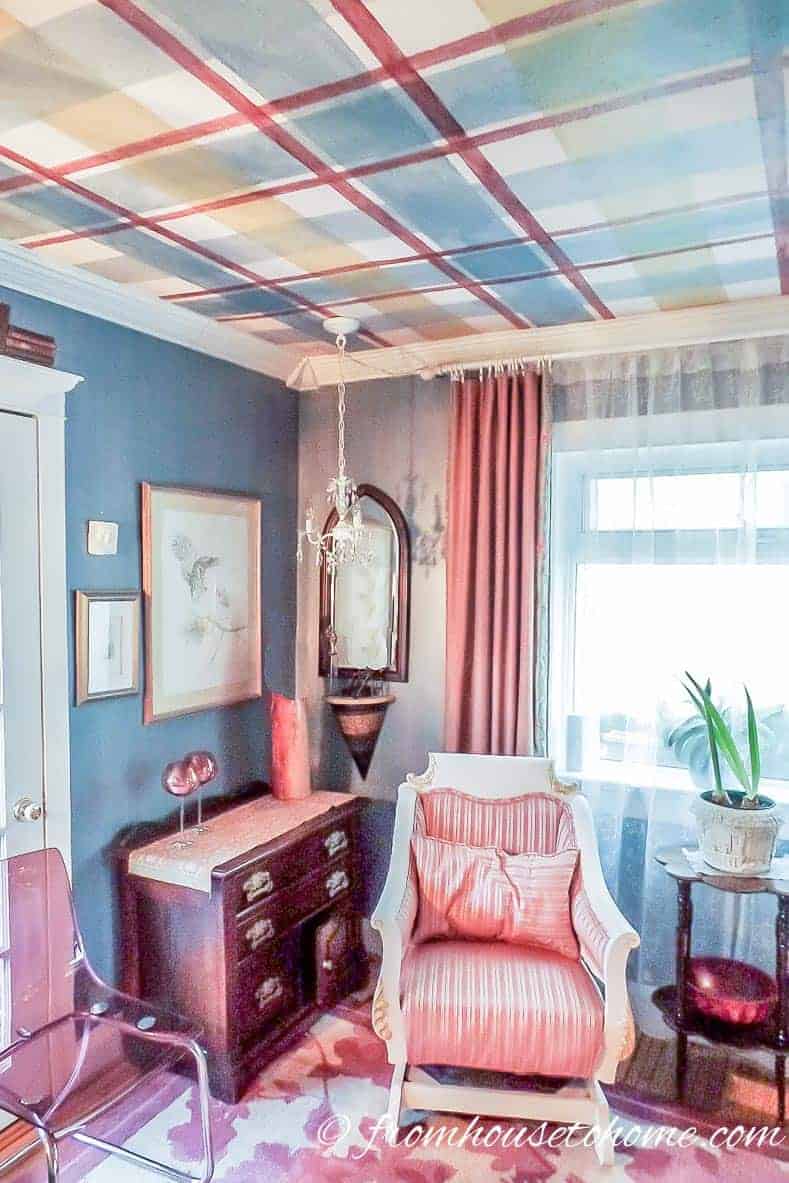
It looked okay before, but the silk-look teal walls and plaid ceiling had been there for several years and they no longer inspired me.
The Inspiration

Then I found a picture of a room I loved in this issue of House Beautiful.
Reading that article, I had an “ah ha” moment. I realized that I had gotten away from decorating my home in my favorite color — blue.
No wonder I felt restless and dissatisfied in my house even although other people gave me compliments on the décor.
The Design Challenge
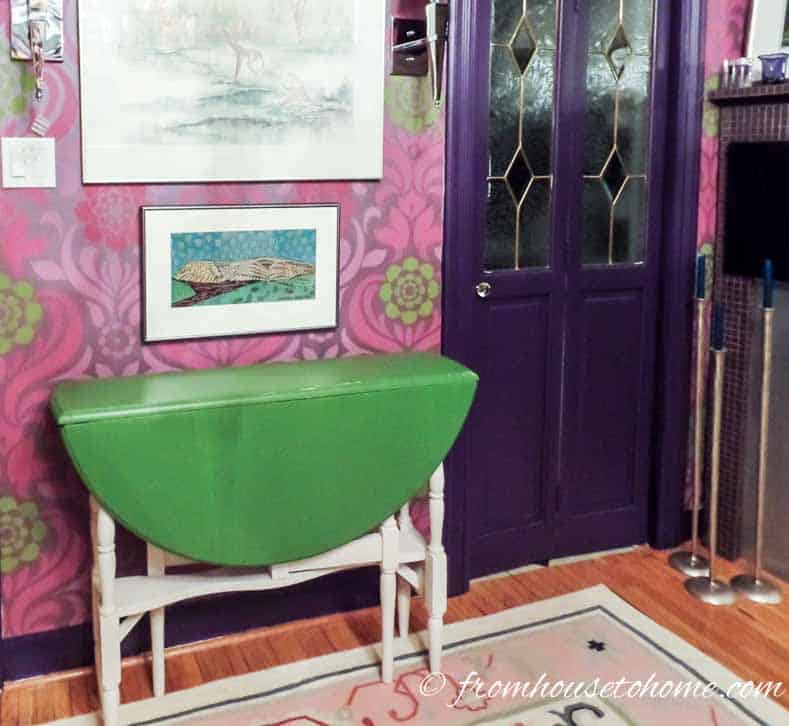
However, deciding to do the room blue did present a bit of a challenge. The rest of my 800 square foot home is decorated with different shades of purple.
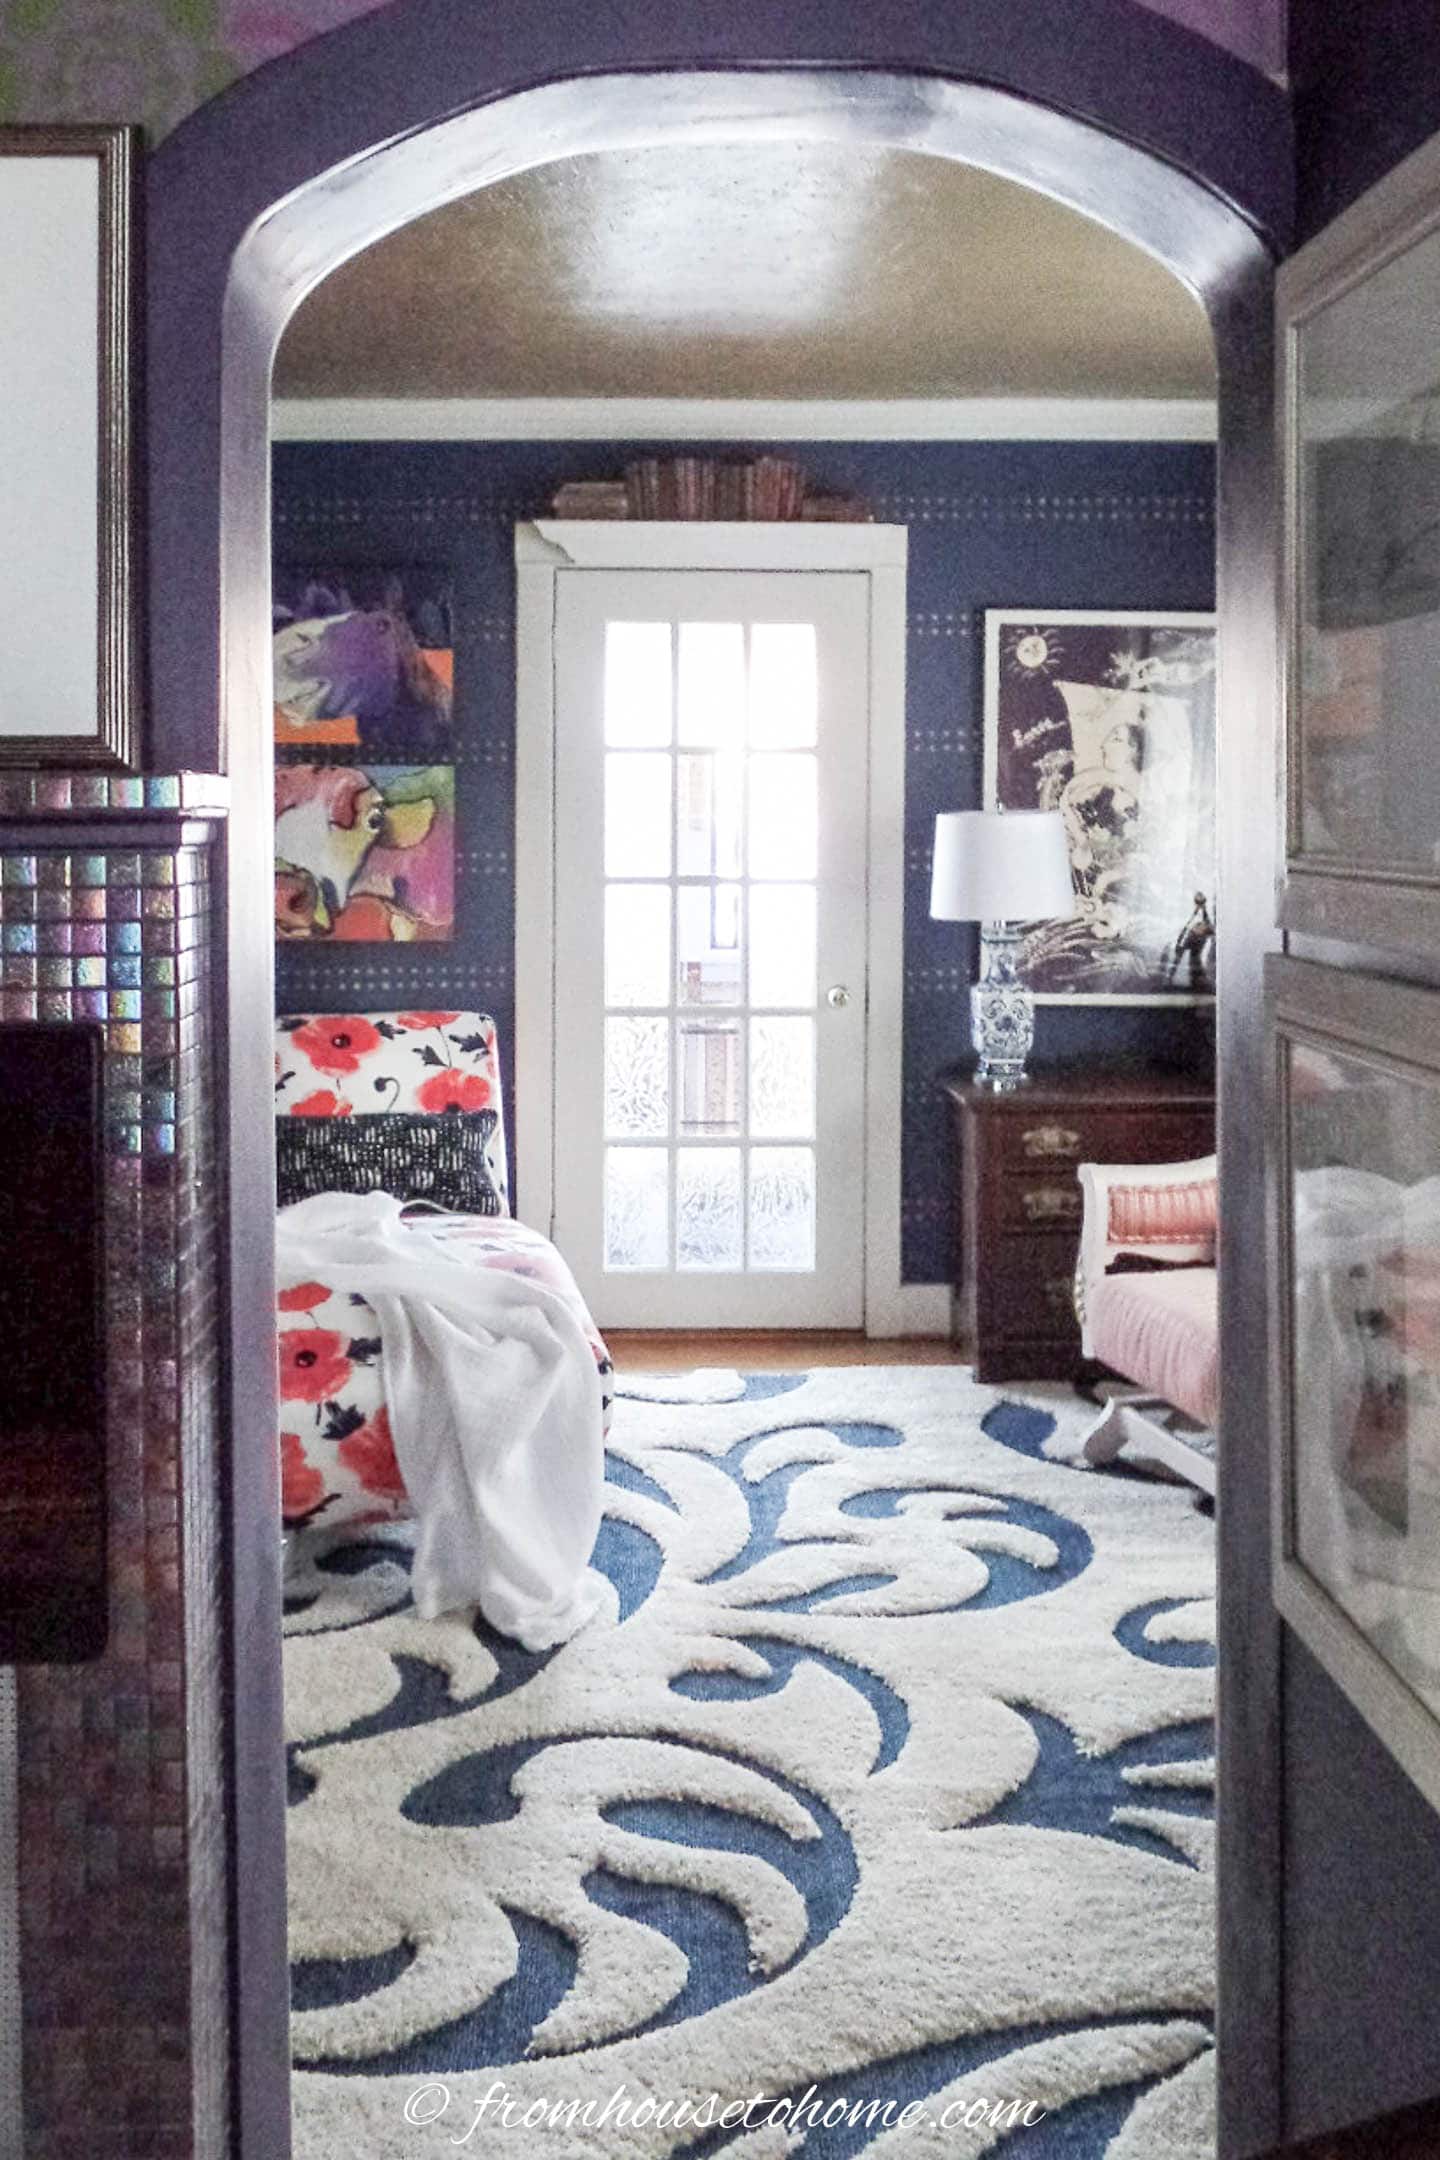
Because I like my rooms to flow, I had to think how to add a blue room but still maintain continuity with all of the other rooms, especially the other half of the living room that you can see through the arch.
I decided that by bringing blue fabrics into the library room and having some pink and purple in the living room, I could achieve my goal.
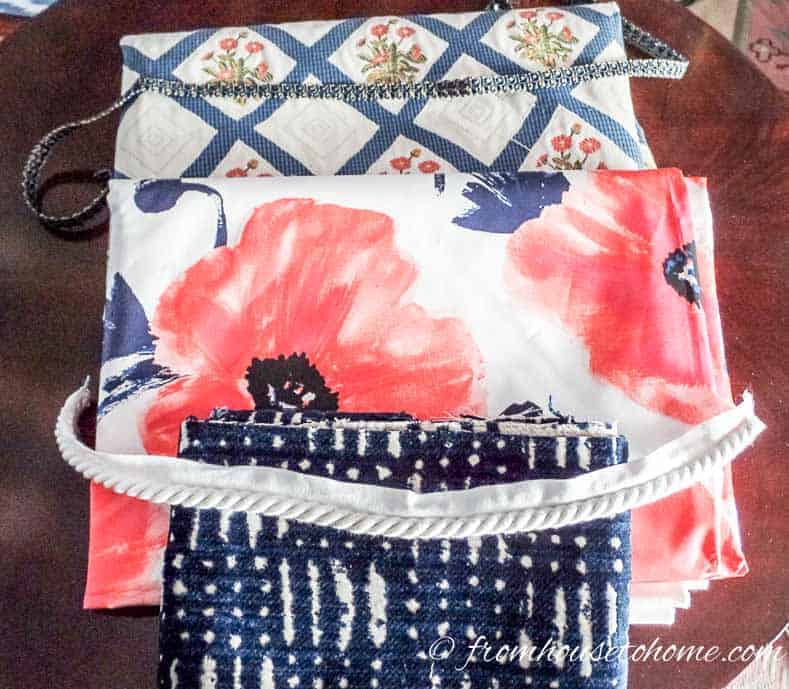
So my first step was to go shopping for fabrics. I brought home fabric samples to try them in both the media room and the living room. Once I found the co-ordinating fabric patterns and colors I wanted, everything else just fell into place! I love it when a plan comes together.
The plan
What I Kept
Since I didn’t want to spend a lot of money on this makeover, the furniture pretty much stayed the same with a few updates (that you’ll see coming up).
The To Do List
The rest of the makeover was DIY projects, which is how I kept it from being too expensive:
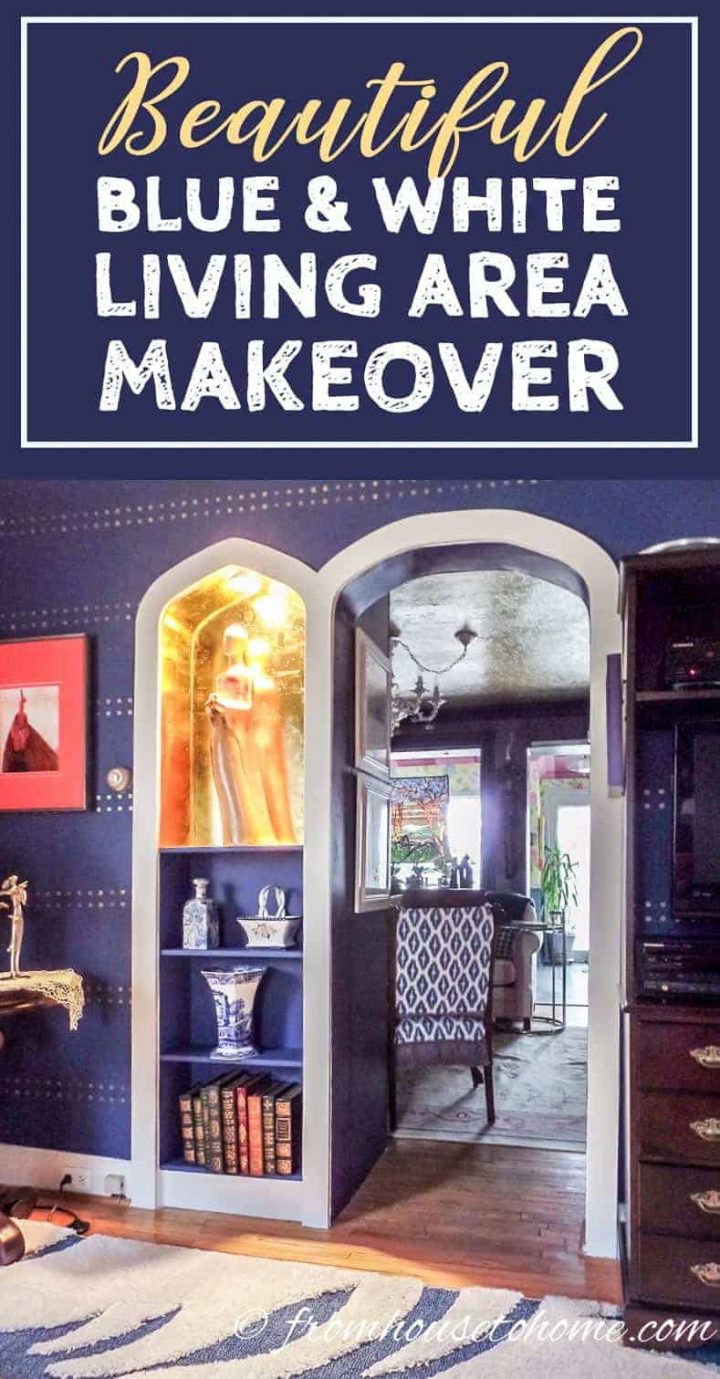
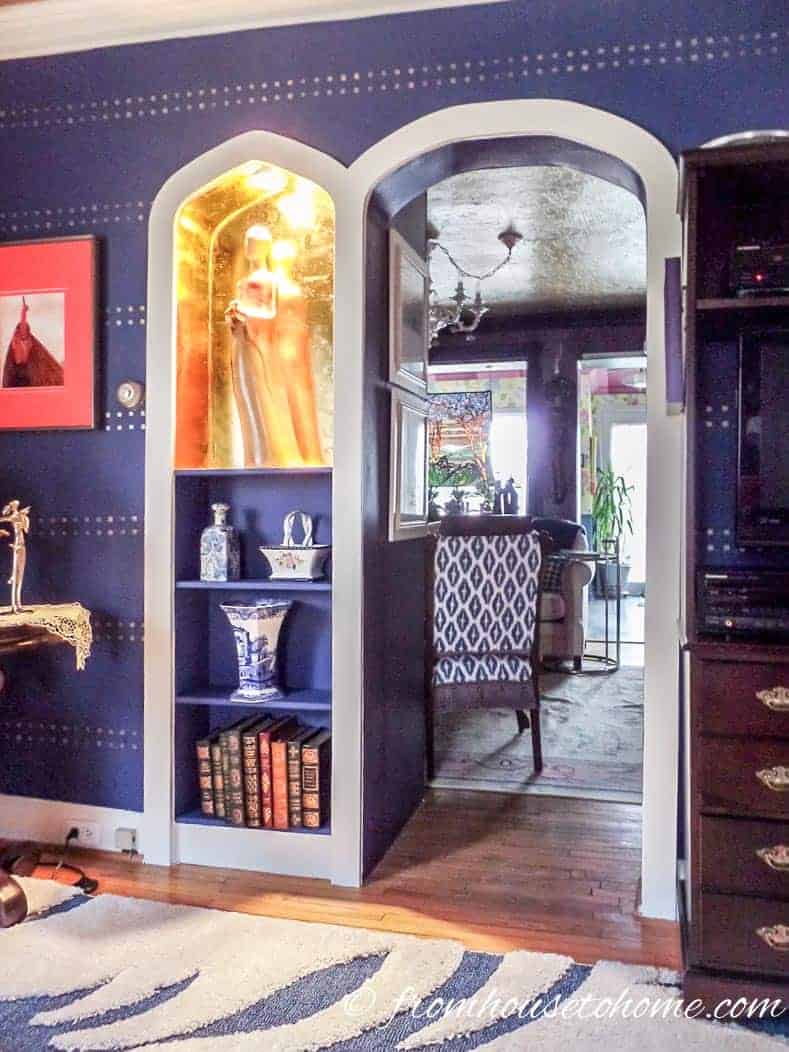
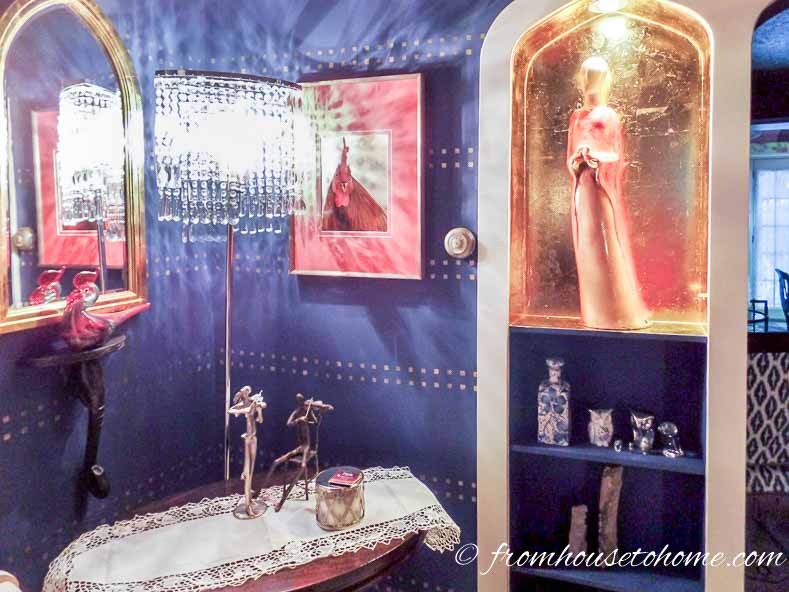
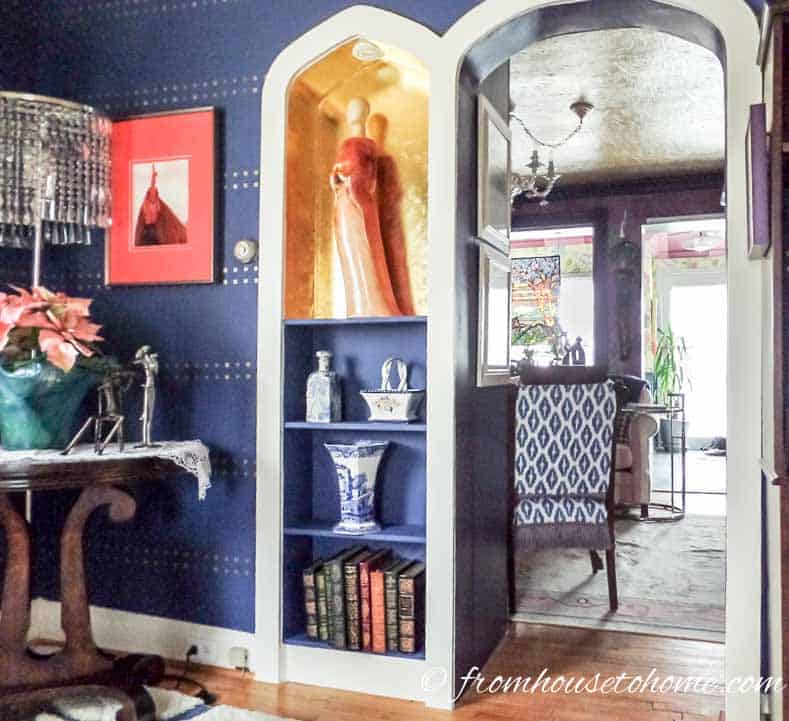
- Build a seamless archway and niche incorporated into the existing archway to camouflage the back of the living room cupboard.
- Lots and lots of painting!
- Reupholster the sides and back of the two antique chairs and the chaise
- Sew new curtains.
- Make new cushion covers.
- Gild two mirrors and the top section of the niche.
Build An Archway and Niche
Why?
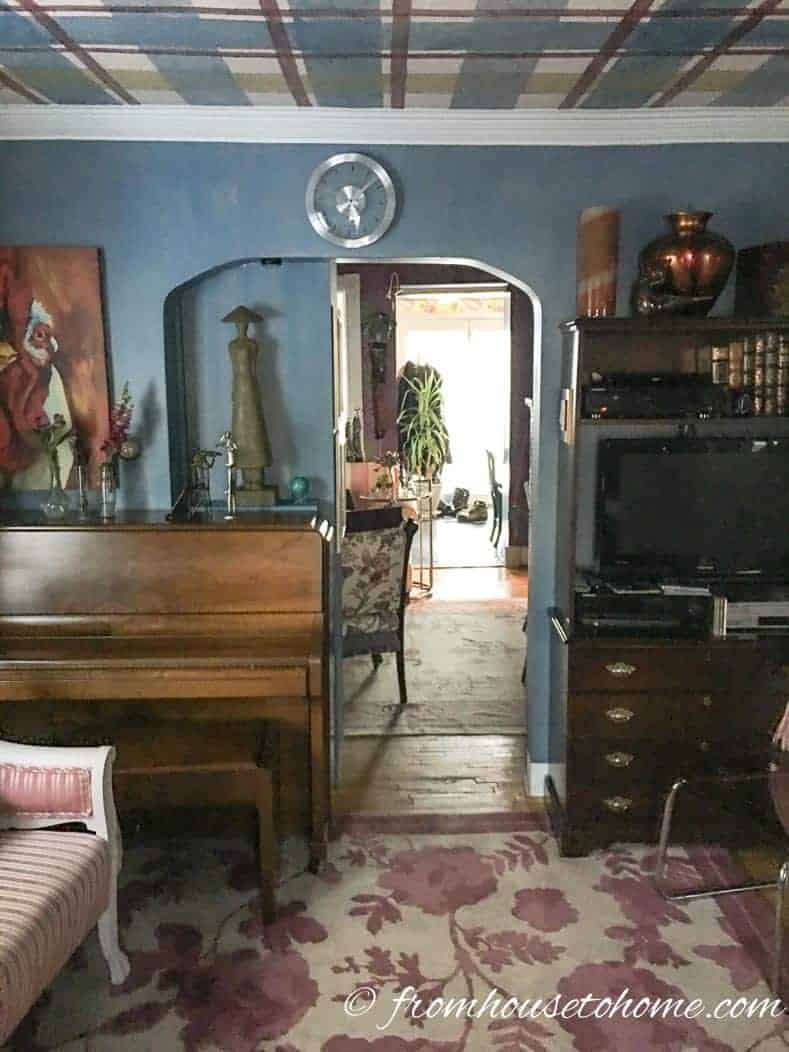
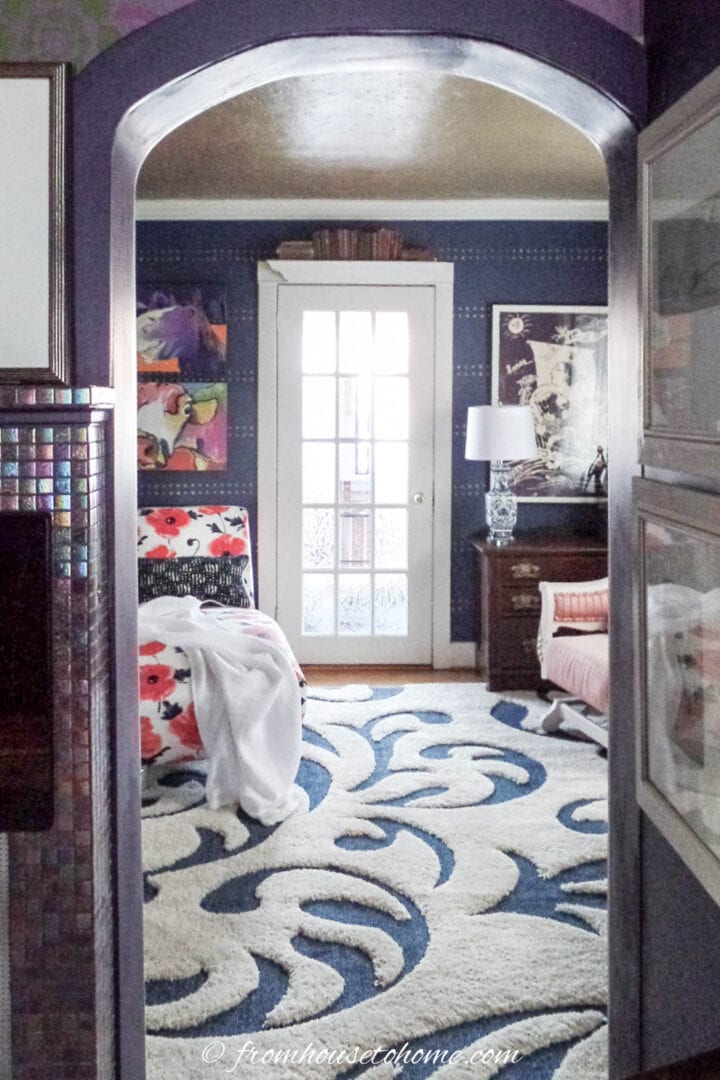
One of the things I disliked about my current room set up was the arch between the two rooms that make up my living area.
With such a small house, the large arch didn’t leave enough open wall space.
So the mirrored cupboards in the other half of the living room stuck out into the archway.
It wasn’t that noticeable when I had the piano in this room, but with the piano gone, it really was an eye-sore.
I wanted to fix it by making the arch narrower and adding a recessed niche beside it that would create a focal point in my media room.
The Arch Construction
There is no way I felt I could get a professional looking outcome by doing it myself.
Fortunately, I knew just who to call. I appealed to my brother who is known for his meticulous, inventive and creative work.
Much to my delight he and my sister-in-law agreed to fly from Winnipeg to Toronto for a working visit.

He drew a design to scale first and used this drawing to determine what to purchase for the job. We got everything he needed in one trip to Home Depot (that never happens when I’m constructing things on my own!)
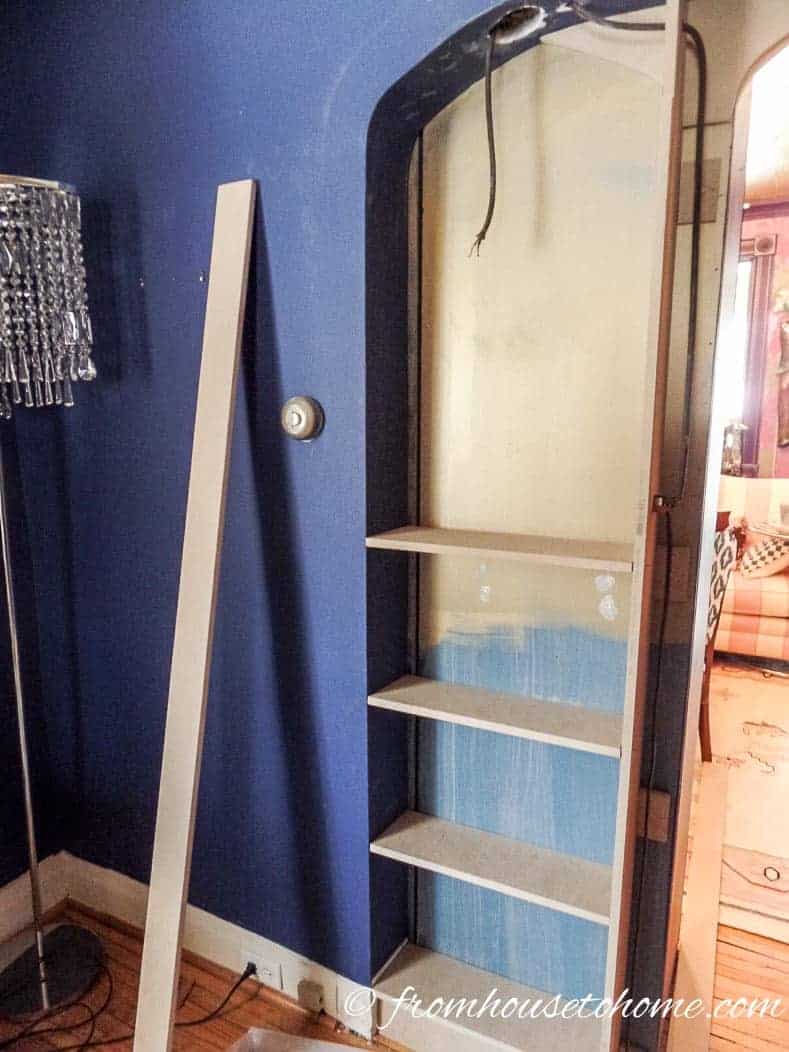
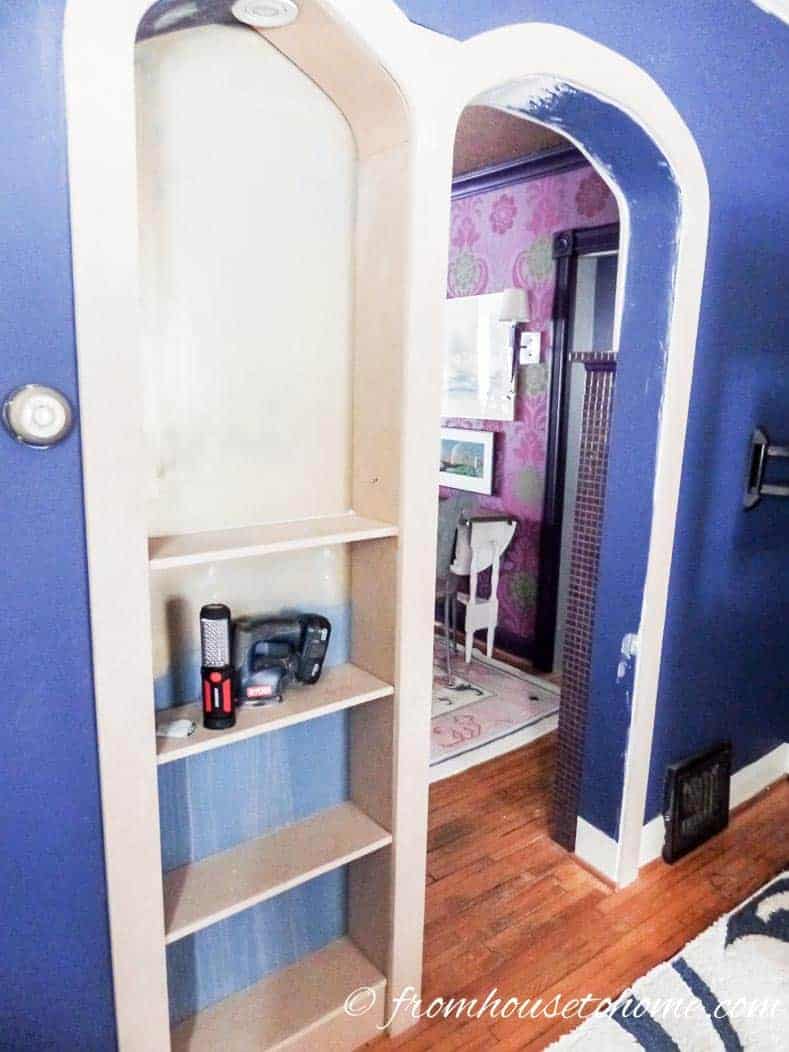
The plan was to build the tops of the niche and the doorway with symmetrical curves that match the old arch curve.
Then install a hard-wired light at the top of the niche (to show off my lady statue that I planned to put there), and open shelves below. And that is exactly how he built it.
After assembling the pieces, he carefully caulked the nail holes and joints.
When the caulking was dry the whole piece got a careful sanding.
He kept inspecting for shrinkage of the caulk and refilling and re-sanding until he was satisfied that everything was smooth and perfect.
He has more patience for these details than I do!
The archway was finished with matching molding on the living room side.
When he was done, my new arch and niche look like they have always been there…and are definitely the focal point of the room!
Paint
There was a ton of painting required to get this living room makeover into shape. But it definitely did the trick!
The arch and niche
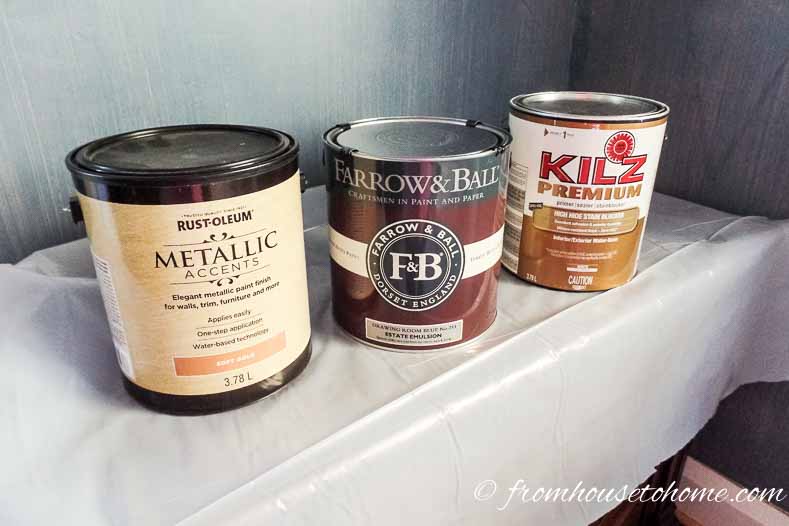
I started by painting both the archway and the niche with a coat of Kilz primer.
When it was dry, I followed up with a light sanding.
Hint: These steps are very important for a smooth finish! Primer makes any furry bits on the unfinished material stand on end. You will get a perfectly smooth surface by going lightly over the entire piece with a foam sanding block. It is important to do this prior to applying the paint.
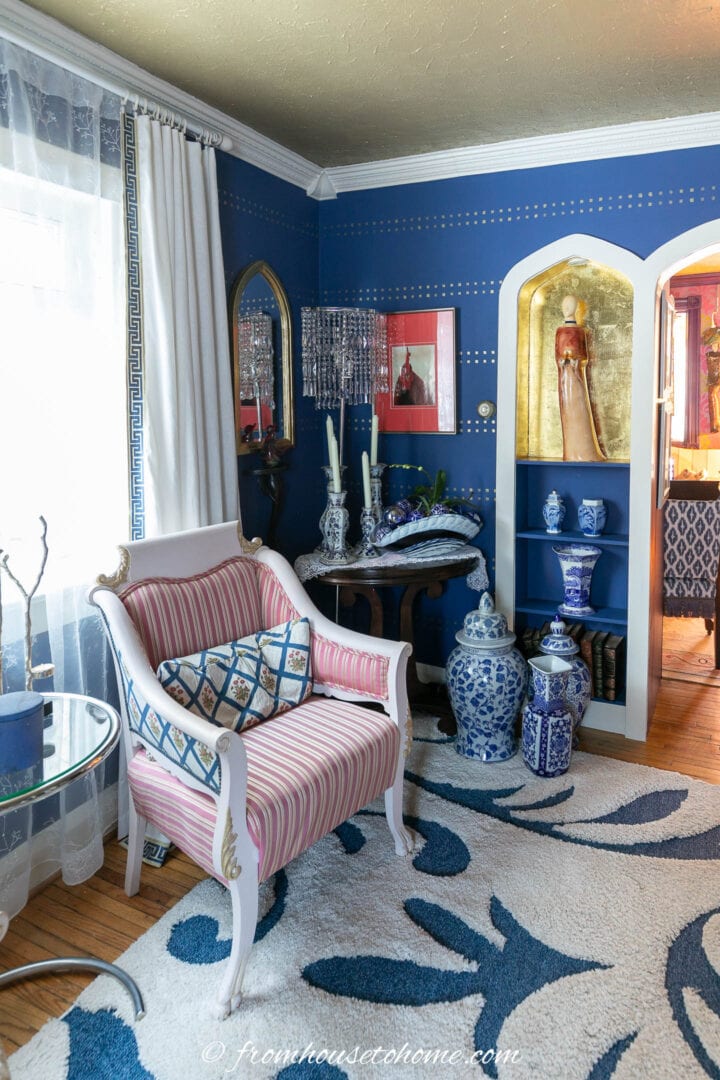
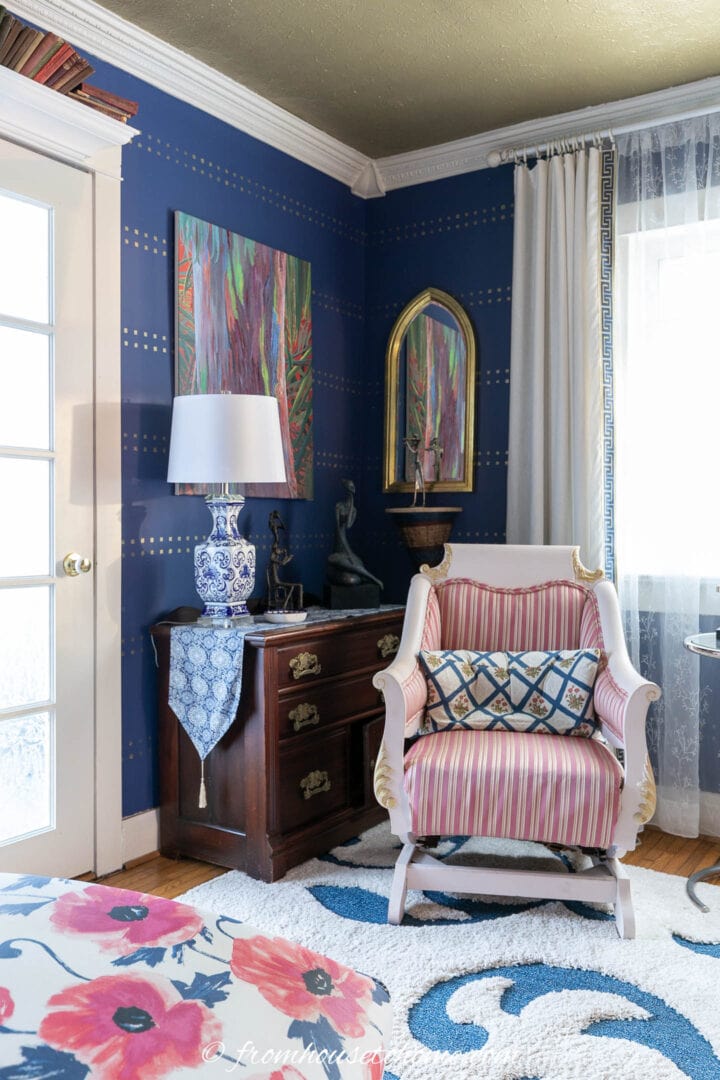
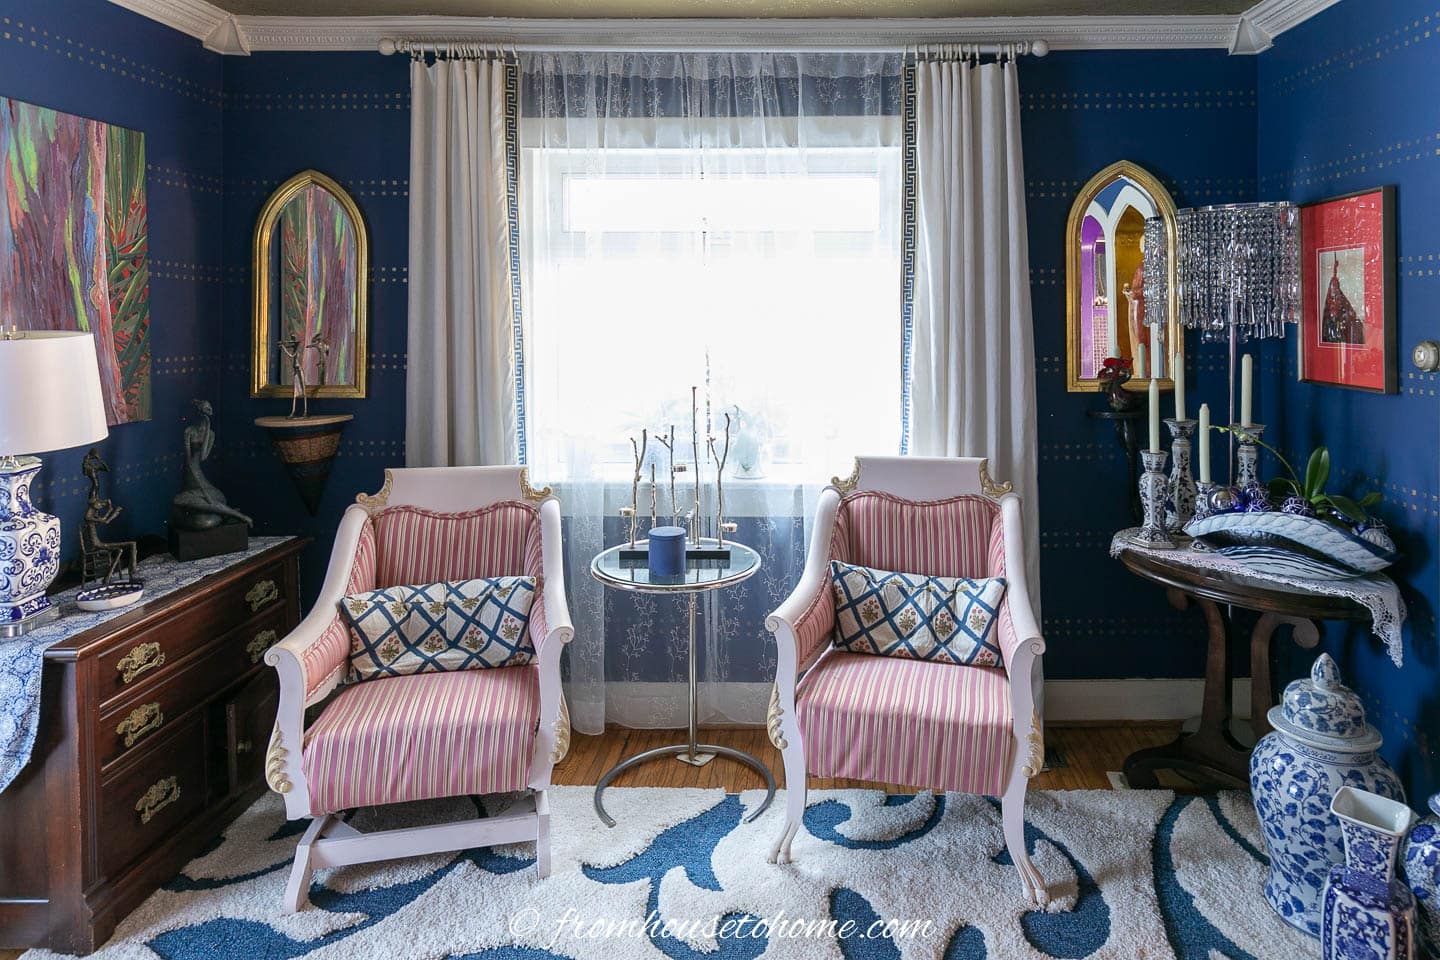
The surrounding woodwork was painted Farrow and Ball ‘Slipper Satin’.
The lower shelves were painted dark blue to match the walls.
Inside the arched doorway and the living room arch trim were painted Sherwin Williams ‘dewberry’ – the same color as the living room woodwork and trim.
The end result is better than I could ever have imagined!
Note: If you don’t happen to have a niche in your living room, you can get the same effect by painting some shelves.
Ceiling
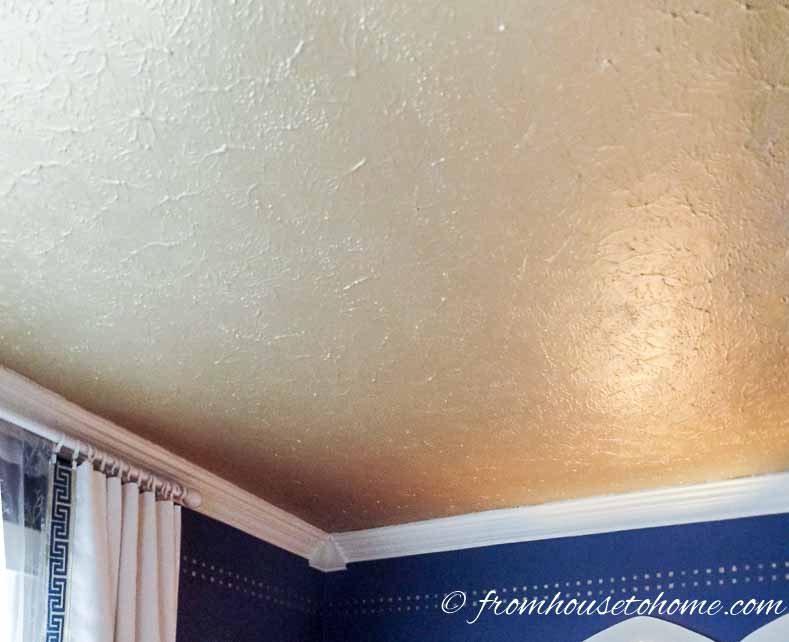
The first coat of paint that went on was Kilz primer* to help hide the old plaid design.
Then I applied three coats of Rustoleum metallic soft gold*.
Each coat had to be painted in roller width strips and dragged in one direction afterwards to produce a uniform sheen.
To my chagrin it looked bronze in my room. Not the look I was going for!
Off I went to find another metallic gold paint that was a little more subdued. I found Metaltech gold base by Protek paint. After two more coats, the ceiling looked much better! Which is a good thing since I had no intention of painting that ceiling again!
Walls
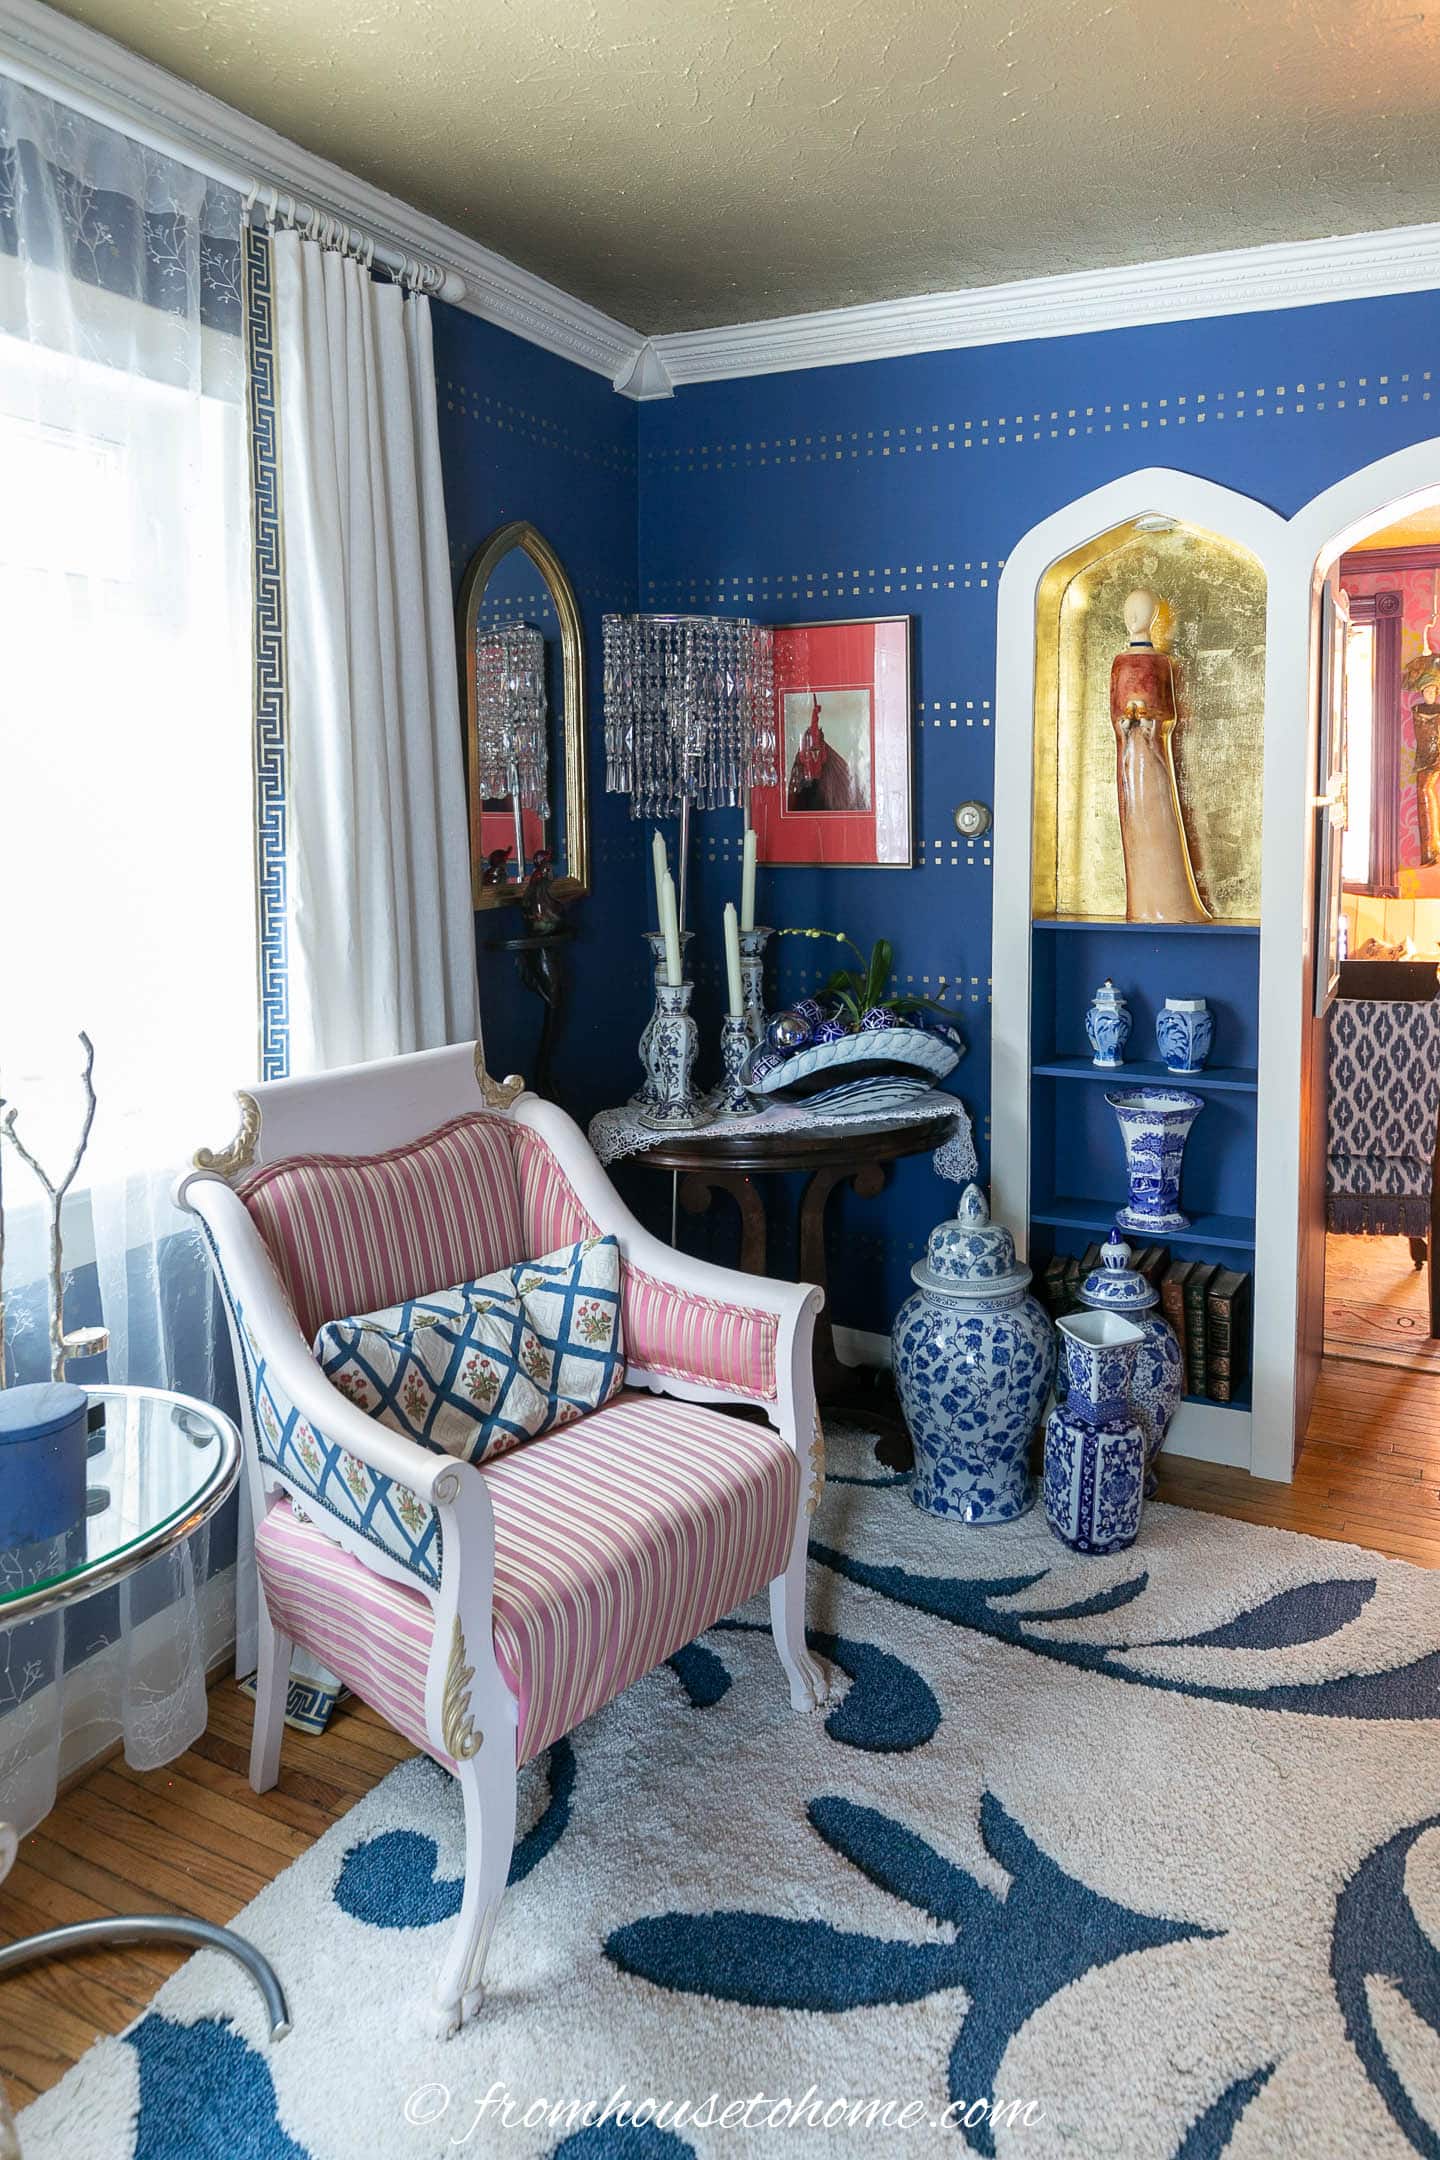
On the walls, my inspiration picture had a wallpaper with a dark blue background and rows of gold dots.
I loved the look of it but not the price. So I decided to re-create it with paint and a stencil.
I hadn’t realized how tired I was of the old teal paint in the media room until I painted it out with Farrow and Ball ‘Drawing Room Blue’.
I love this new color! It makes my heart sing! The one advantage of painting over the teal is that it acted as a dark primer so I only needed two coats of navy to get good coverage.
I am so lucky that Wanda was able to make me three stencils for the dots using her Cricut machine*. They definitely helped to make sure the rows looked straight.
Get the stencils and all the details on how to paint the dots HERE.
Woodwork and crown molding
Because the woodwork and crown molding in this room were originally white, I was able to get away with only one coat of Farrow and Ball ‘Slipper satin’.
And a statue
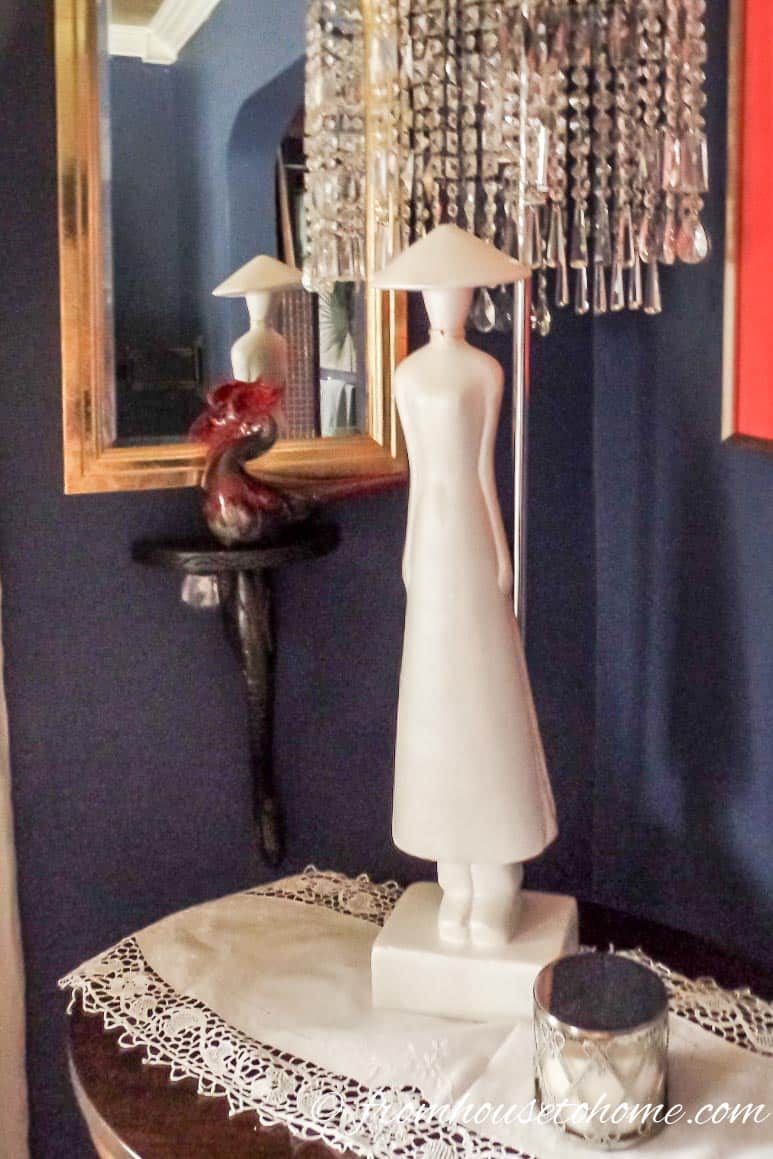
The color of one of my lady statues was very drab, and I just didn’t think she would make much of a statement in my room.
I wanted to paint her white but agonized over the ethics of changing a piece of art so drastically.
Wanda eased my qualms by saying, “You own it. Therefore you can do what you want with it.”
Just what I needed to hear!
After painting with Kilz primer first, I gave her three coats of semitransparent Modern Masters metallic ‘Snowflake.’
She looks amazing now and I’m so glad I did it!
Re-upholster The Seating
The chaise
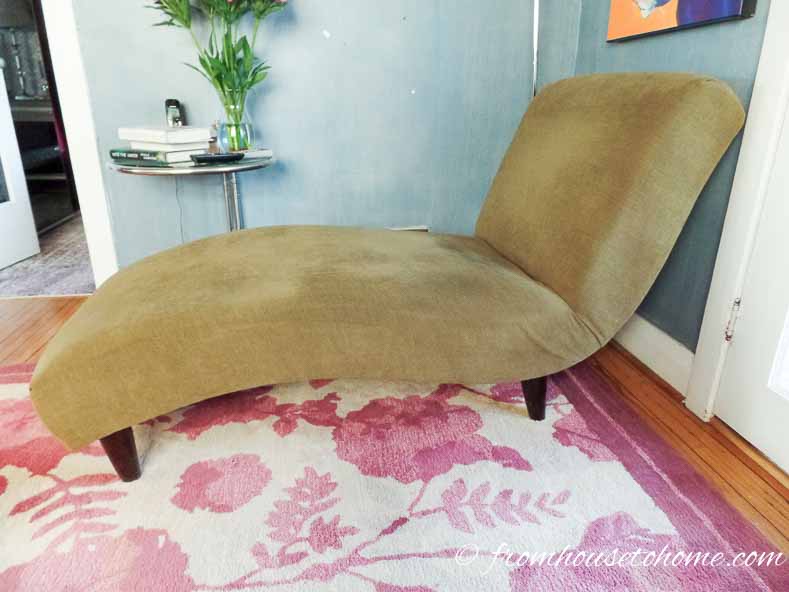
My chaise is my favorite place to sit and relax.
But the old green cover just didn’t go with the new room.
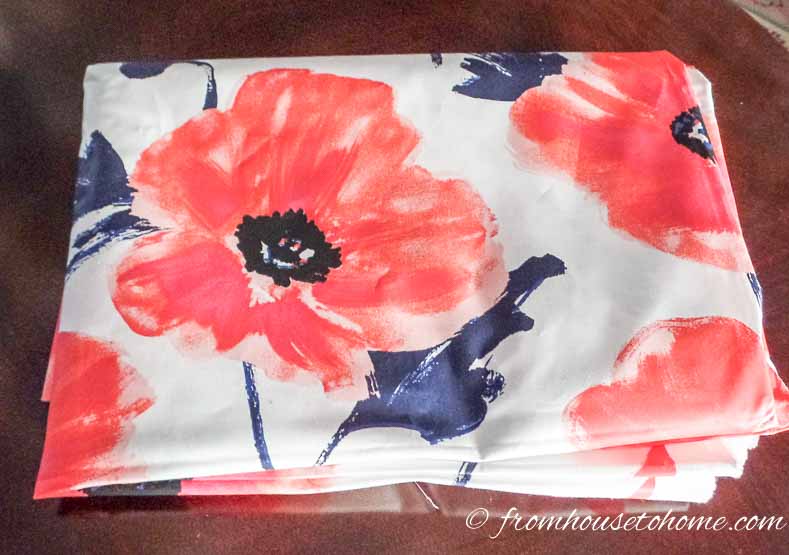
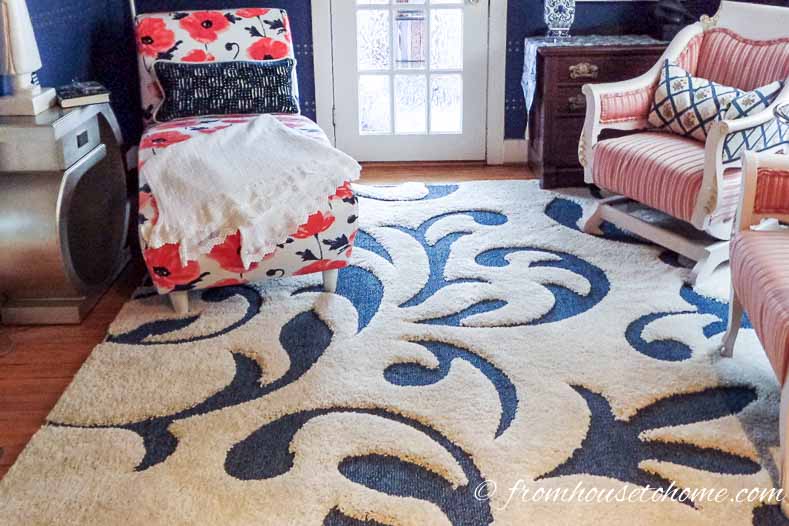
I decided to re-upholster it in Kate Spade’s “poppies” fabric.
It has bold and colorful fuchsia multi tone poppies with navy leaves and buds on a white background. For sure the chaise makes a statement dressed in this gorgeous contemporary polished cotton!
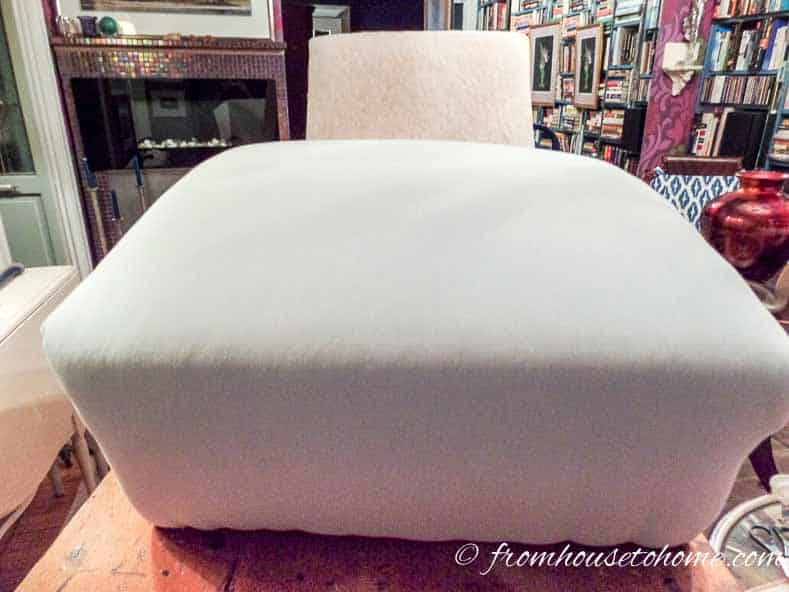
Although I love my chaise, I have always thought that it would be more comfortable with some extra padding.
Since I was re-upholstering it anyway, this was the perfect opportunity to add that padding! Here’s a brief overview of the steps I used to cover the chaise:
1. Remove the old fabric from the chaise keeping it intact. (You’ll need it later).
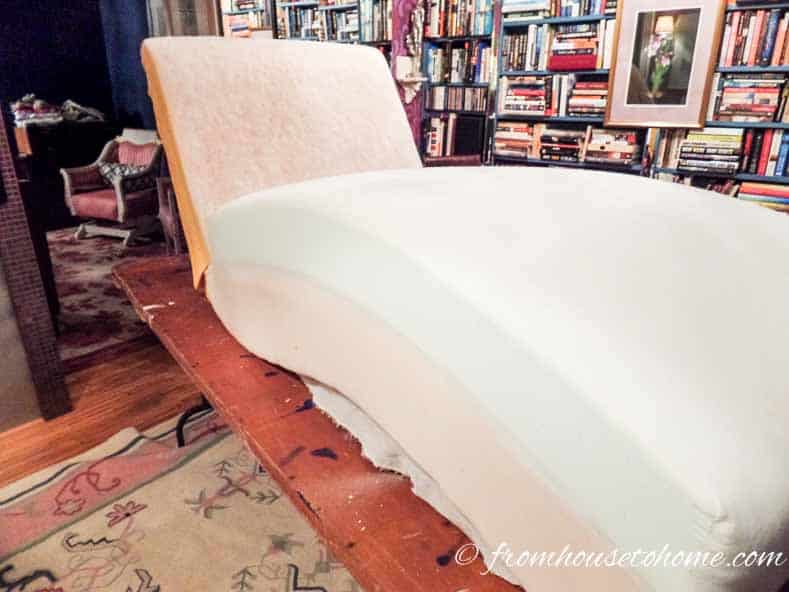
2. Glue 4″ thick foam to the back and the seat of the chaise with spray glue.
3. Spray glue a layer of Dacron wrap over the foam.
4. Stretch underlining over both the foam and fiberfill to make everything firm and smooth.
5. Staple the underlining tightly to the frame.
6. Use the old fabric cover (that you removed in step 1) as a pattern to cut the new fabric. You’ll need to add 4″ to the sides to fit the new cushion.
7. Staple the fabric to the frame under the chaise, starting on the seat first and then working your way up back.
And the backs of the chairs
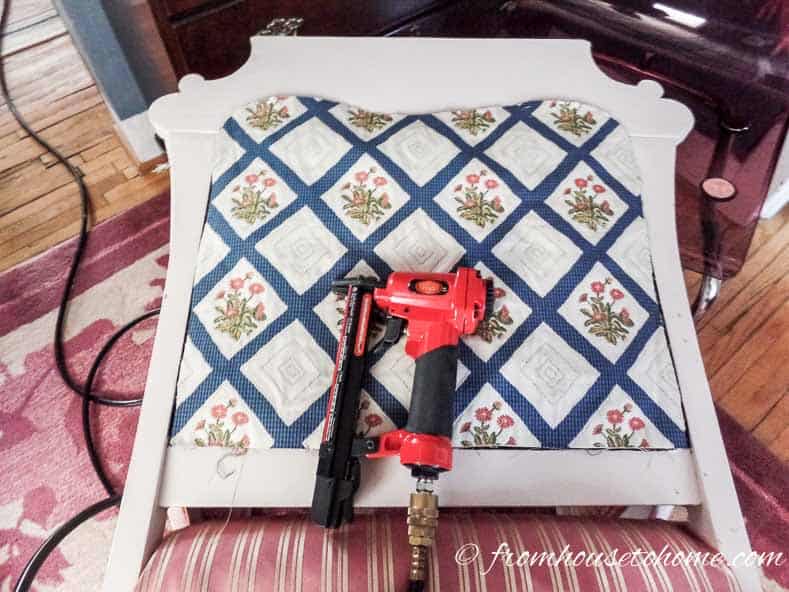
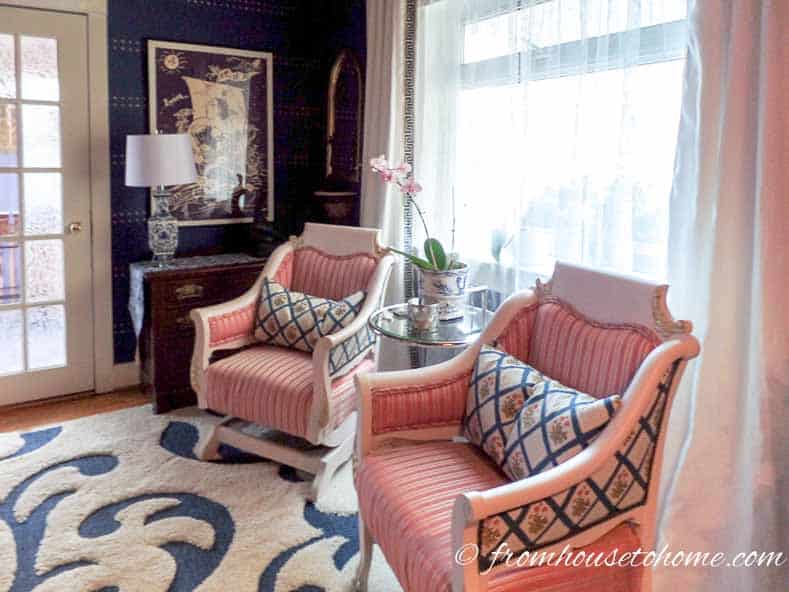
For my chairs, I wanted to keep the pink and gold fabric on the front and seat of the white painted antique rocker and arm chair because I think it will speak to other elements in the room — like the ceiling, the lady statue in the niche, and the poppies on the chaise
But the green fabric on the sides and back of the chairs had to go!
I opted for a blue and white diamond patterned cotton damask. It has small pink and gold flowers inset in the diamonds that compliment the color of the stripes of the chair fronts, and pulls everything together.

To finish the edges, I glued on blue trim.
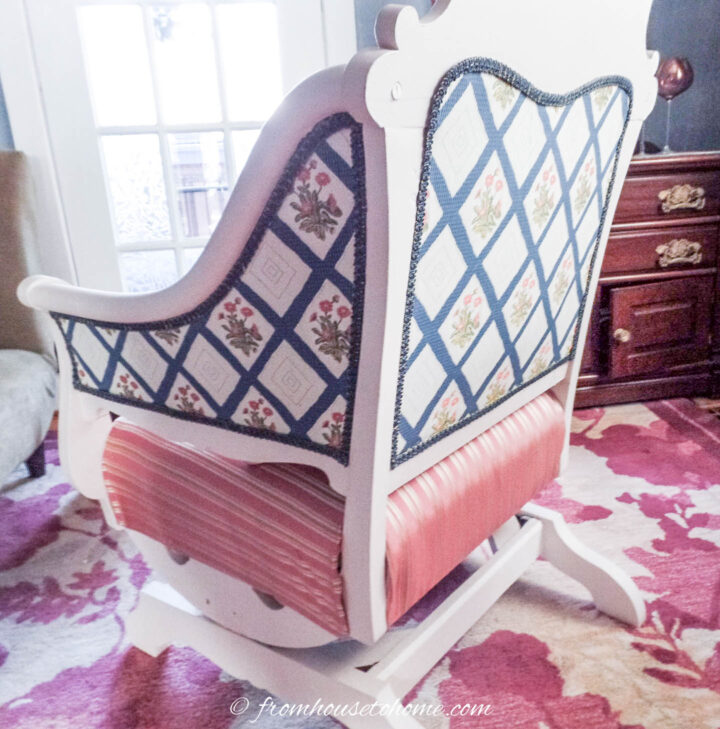
I love the way they turned out.
Sew Drapes and Cushions
Drapes
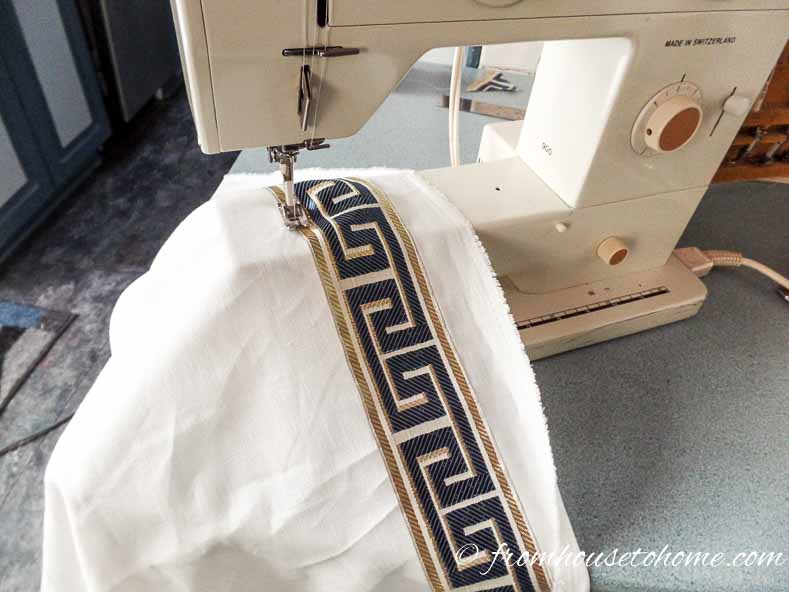
Since I already had a white curtain rod with white rings that would accommodate the sheers and panels on each side of the window, I sewed two identical off-white non pleated drapery panels that are long enough to have a slight puddle on the floor.
To create some interest, I added a lovely gold and navy 2 1/2″ trim in a Greek key pattern to the inside and bottom edges.
Hint: Adding a trim to plain drapes is a really inexpensive way to dress up any curtain panel (even store bought ones).
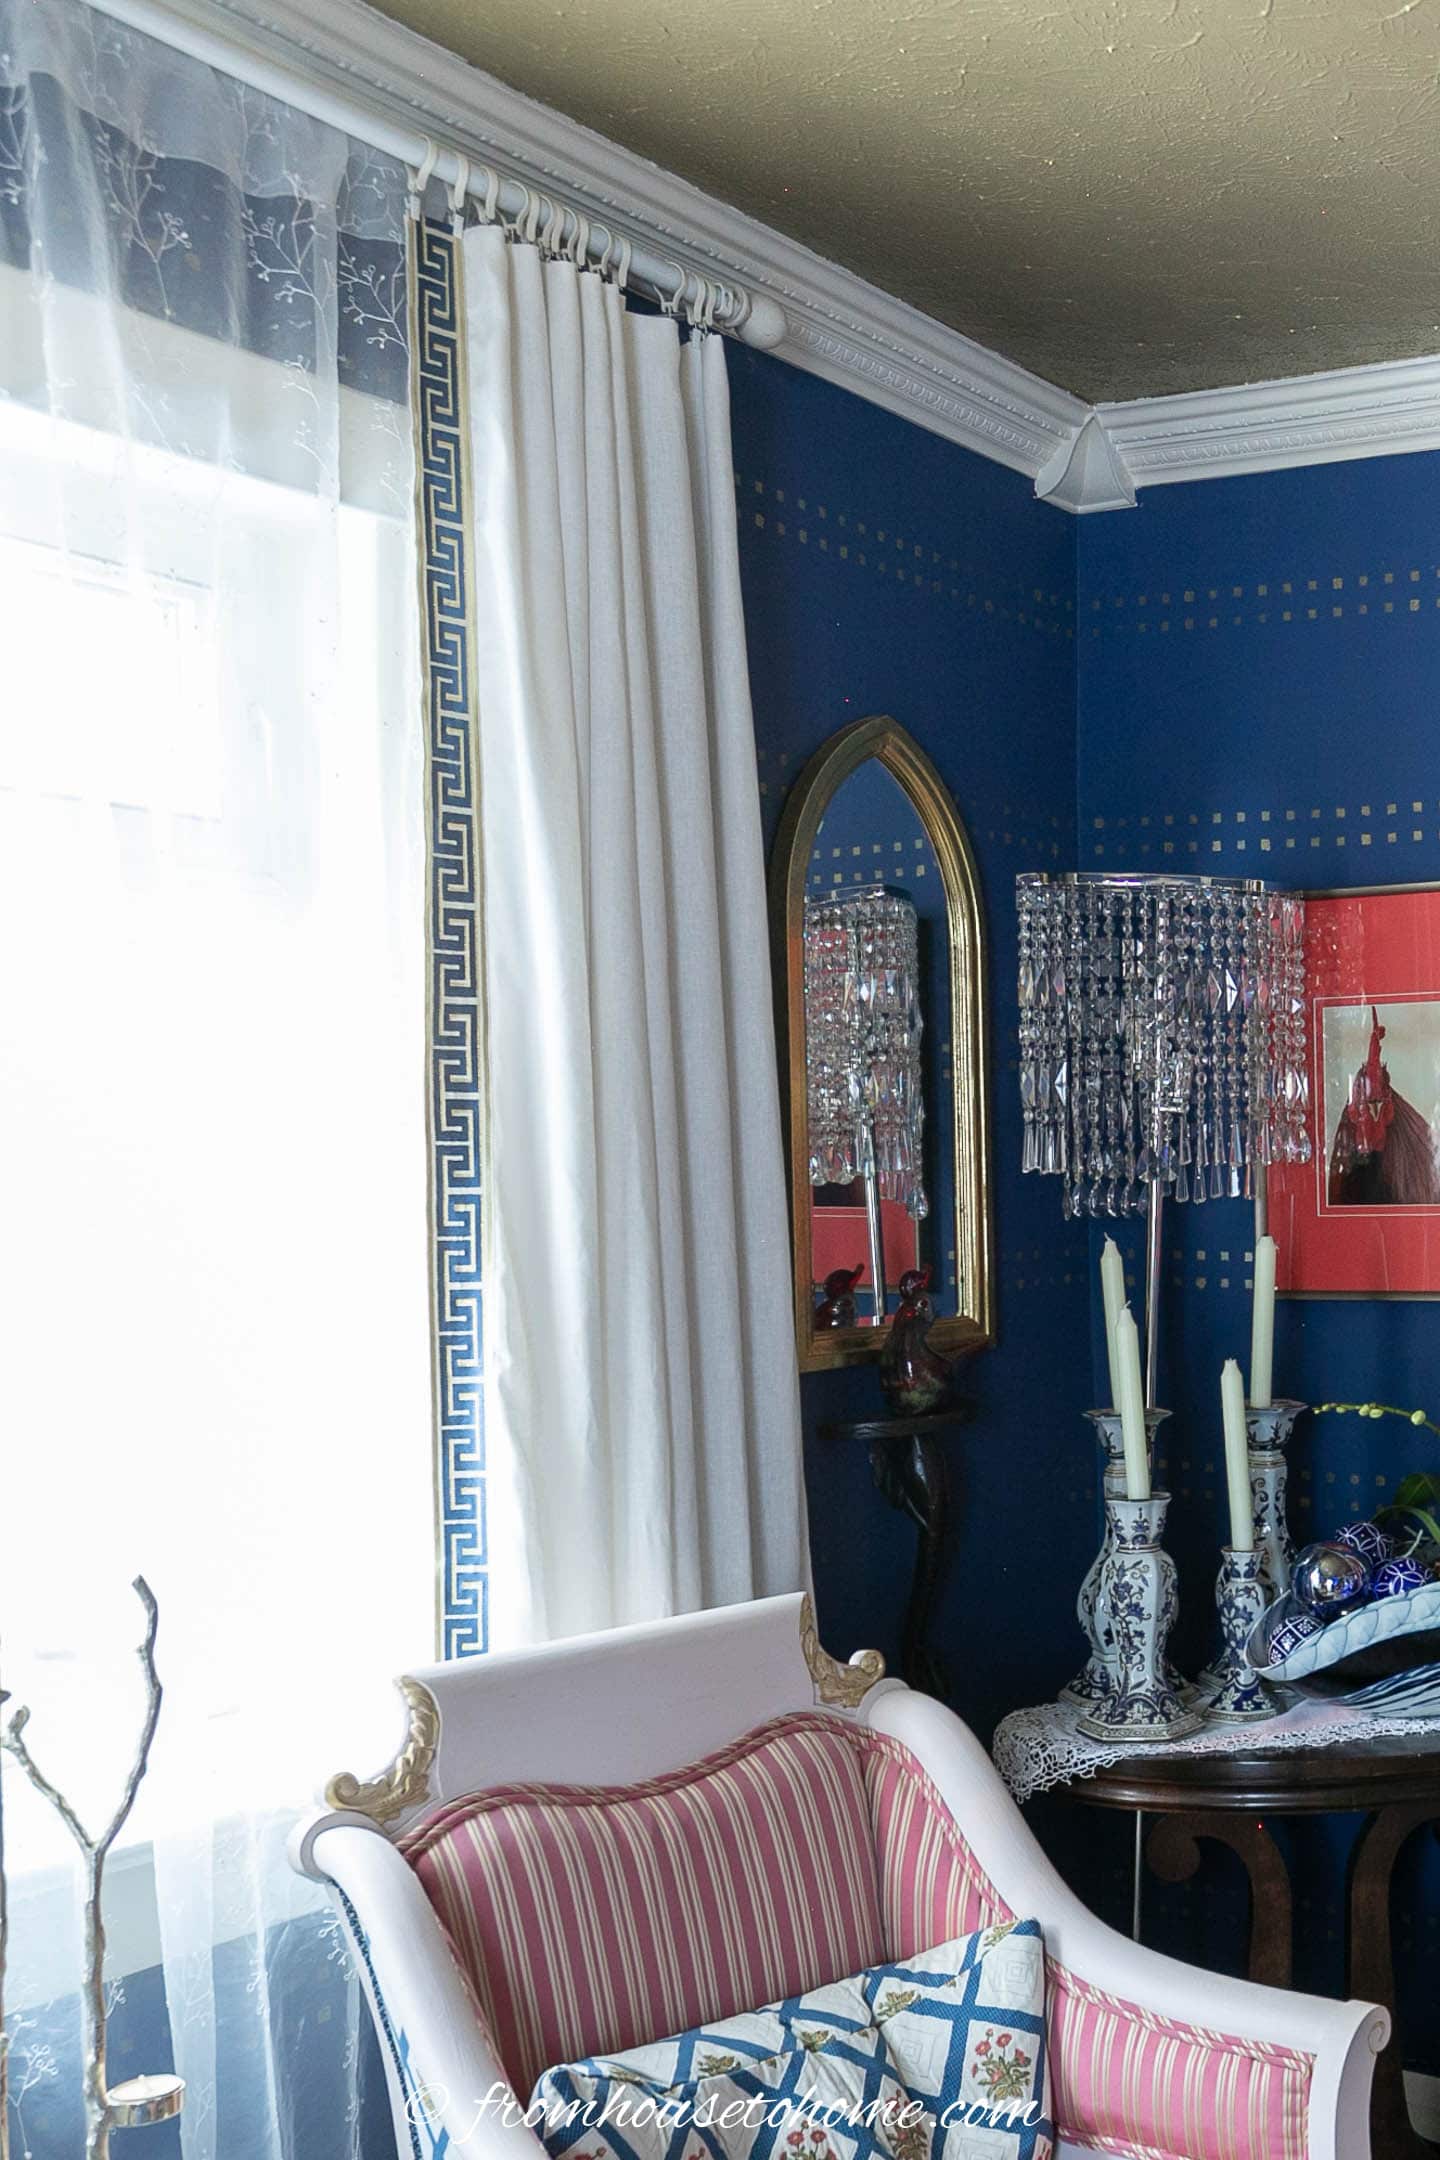
The end result looks very regal.
Cushions
Of course, I couldn’t have all of this seating without adding cushions!
I used feather forms and made three big lumbar cushions.
Two go on the chairs and were sewn in the same blue and white with floral accents cotton damask fabric that is upholstered onto the sides of the chairs.
The pink flower bouquets inserted into the blue diamonds picks up the pink stripe in the chairs and the diamond pattern reflects all the diamond accents in the adjoining living room.
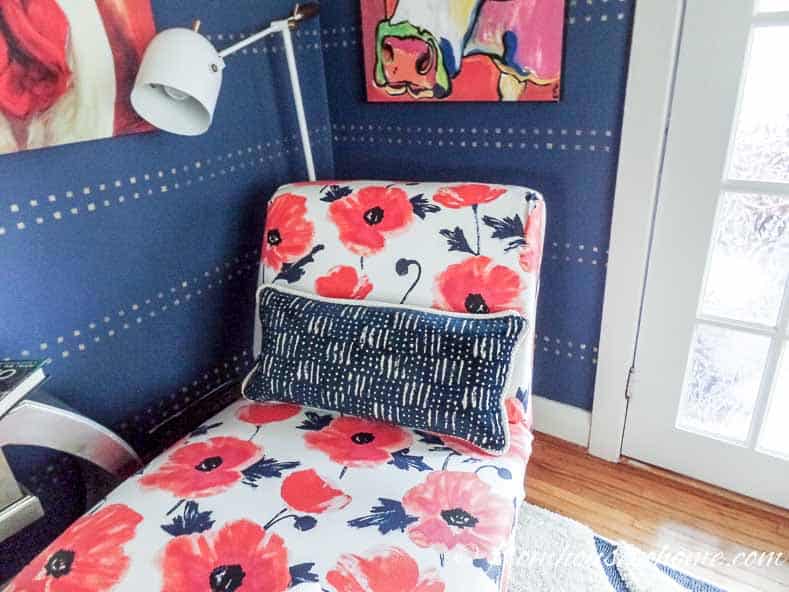
The third cushion was made for the chaise in a navy and white velvet fabric.
I trimmed it with a large white shiny twisted braid.
This cushion adds some contrast in texture to the smooth polished cotton of the chaise.
Find out how to sew cushion covers HERE.
Apply Gold Leaf
Mirrors
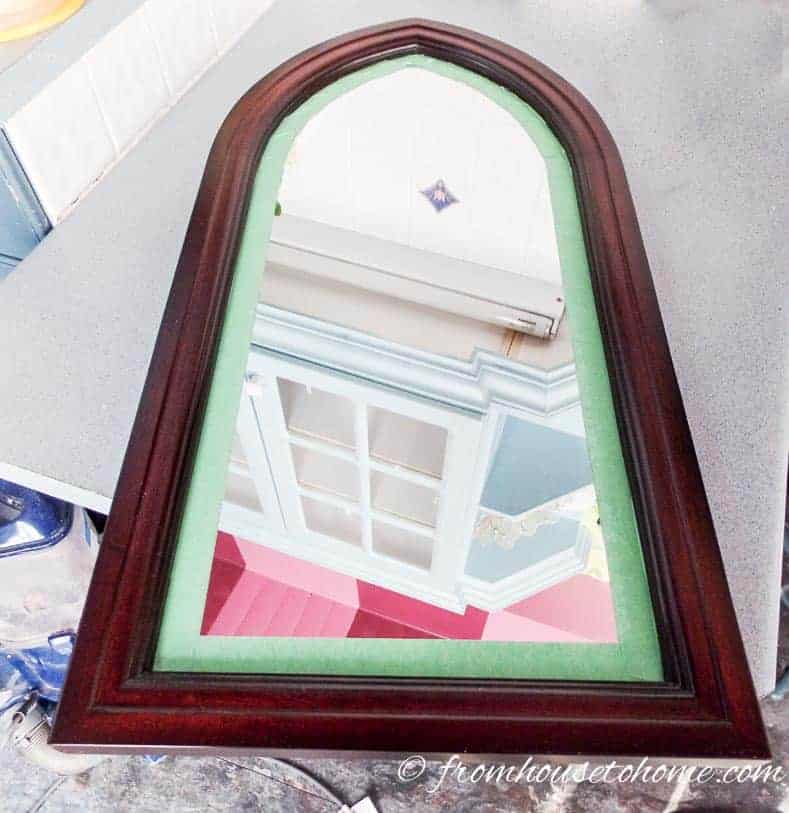
I had never applied gold leaf before but decided that I would try it on the frames of two dark mahogany mirrors to brighten them up.
I ordered 24k gold leaf* and the recommended glue* from Amazon.
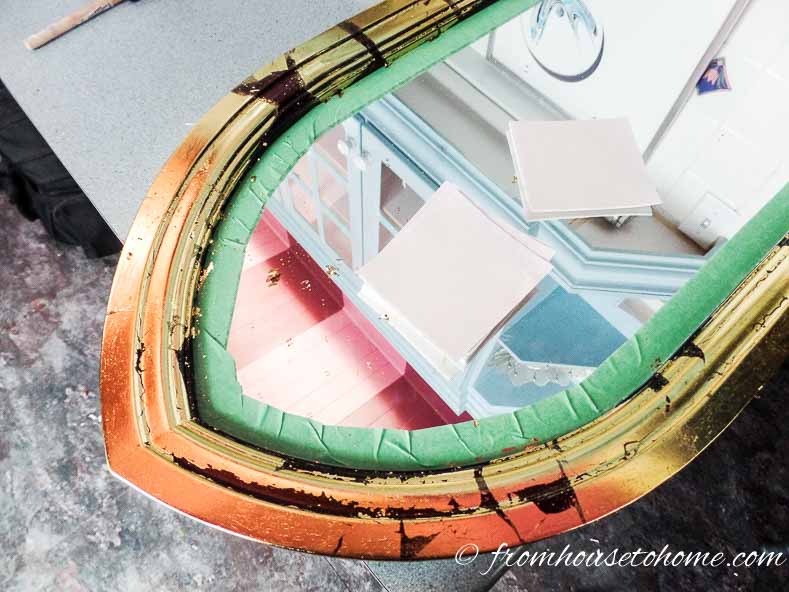
Then I followed our instructions on applying gold leaf. It worked out very well.
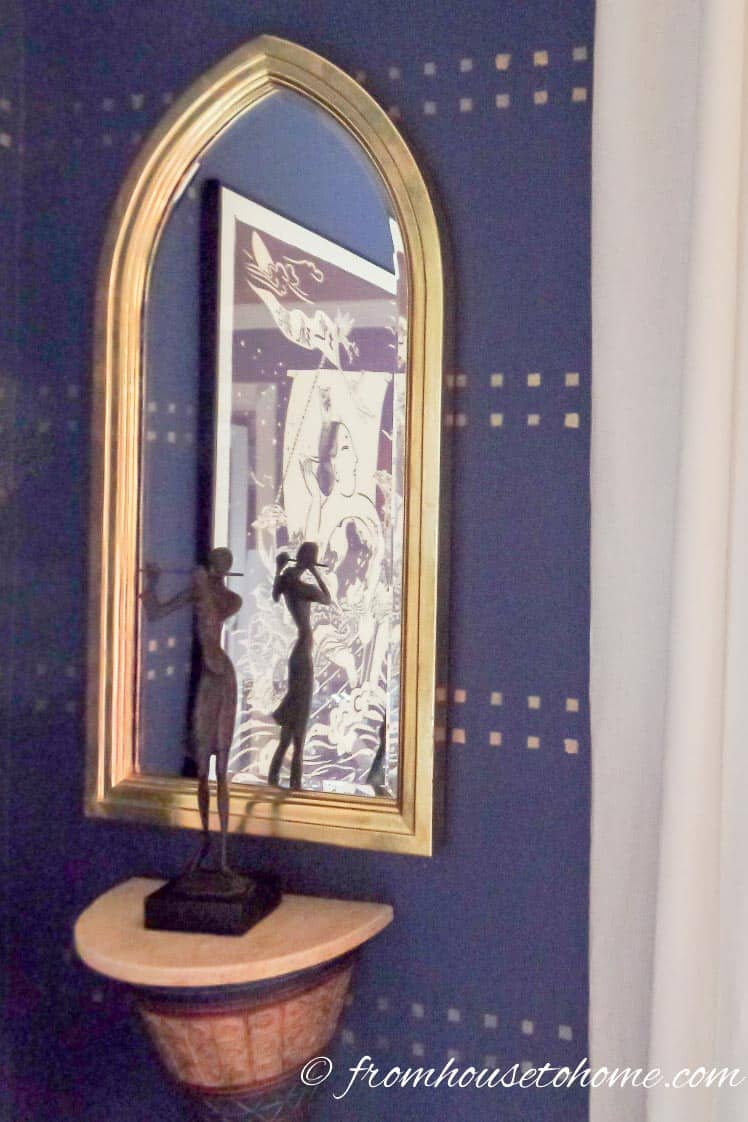
The only thing I would do differently would be to paint the frames gold before I started applying the gold leaf.
Niche
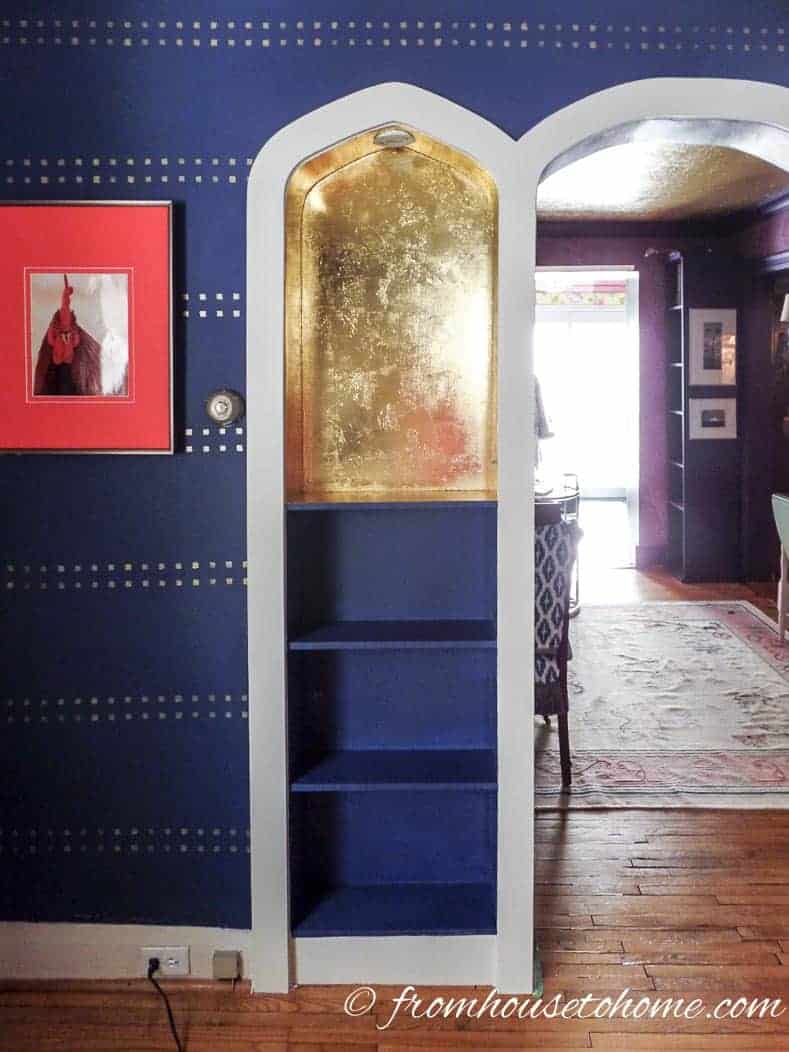
Since the mirrors turned out so well, I decided to follow the same procedure to gild the inside top of the niche.
The gold really makes the stenciled dots stand out.
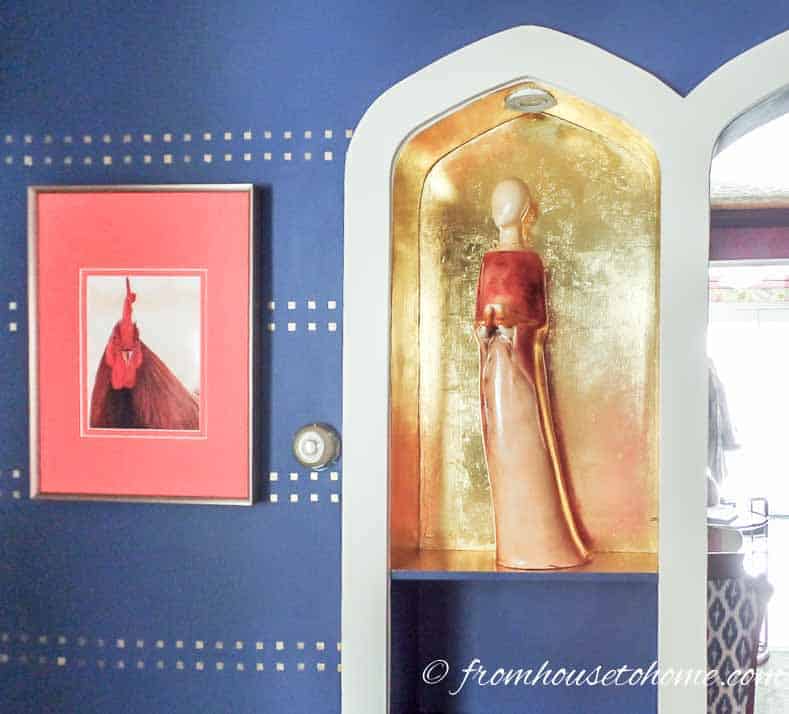
The pinkish lady statue is reflected in the shine of the gold, and looks magical when the light is on.
The results are so amazing! What an effective focal point!
The Finishing Touches
One thing that I knew I would need to replace is the old area rug.
I ultimately decided to purchase a beautiful white and blue shag .
The navy blue swirls in the carpet echo the navy patterns in the poppy fabric and the shag itself adds much needed texture to the room.
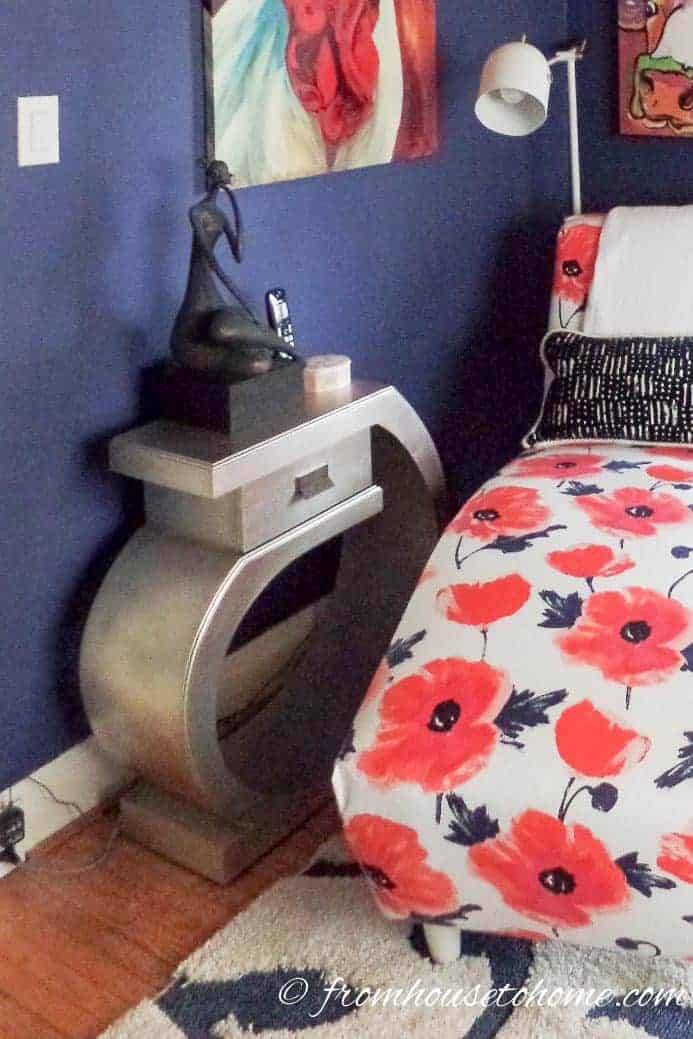
The contemporary silvery gold side table which I first saw and loved in Wanda’s home, is a lovely addition beside the modern Kate Spade fabric.
It even has a little drawer to hide the remotes yet keep them handy when sitting on the chaise.
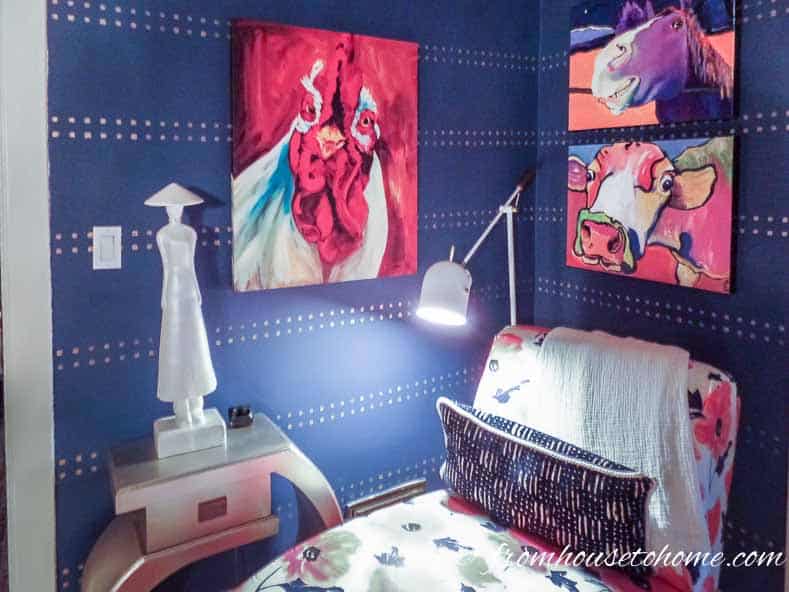
The pictures in the room bring in some humor and nostalgic memories.
Some have purple frames and content, which helps to bring in the color of the trim in the next room.
The rooster acrylic and photograph evoke fond memories of trips to the islands of Hawaii and Kauai. So do the other Hawaiian pictures in the room.
The comical horse, “Got more oats” and cow, “Cold hands” are by Patricia Sanderson White and were purchased from Overstock.com. They introduce some levity and make me smile.
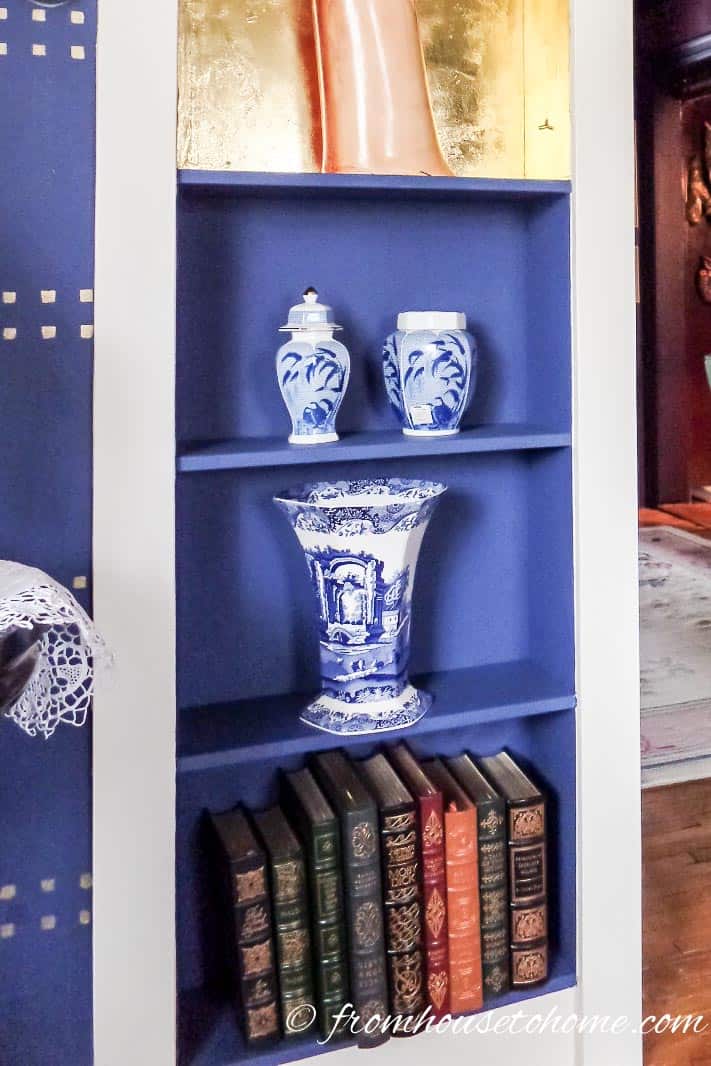
I have started collecting blue and white porcelain jars, vases, urns, etc. to place on the floor, on top of the wall unit, on the new shelves, and to hold plants or flowers.

I also got a blue and white lamp with a white shade and crystal accents to augment the theme.
As does the Chinese pattered blue and white runner that nicely perks up the old dresser.
The Room “After”
This room speaks to my soul and fills me with happiness.

I like to just sit in there and soak in all the details.
I am thrilled to share it with you and hope you have gained some inspiration, too!
Sources
- Blue wall paint: Farrow & Ball ‘Drawing Room Blue’
- White wall paint: Farrow & Ball ‘Slipper Satin’
- Blue and white area rug*
- Silver circular side table*
- White reading floor lamp (Similar to this lamp*)
- Blue and white table lamp*
- Blue and white cotton/linen table runner*
- Blue and white porcelain vase #1*
- Blue and white porcelain vase #2*
- Large blue and white ginger jar*
- Blue and white square jar*
- A couple of beautiful large urns found second hand
Other living room decor ideas you might like
- How to decorate a small living room
- Living room layout ideas
- Best living room paint colors that are not neutrals
- Living room wall decor ideas
- Easy living room updates that won’t break the bank
Have comments or questions about our blue and white living room makeover? Tell us in the section below.
This post was originally published on March 6, 2018 but was updated with new content on February 16, 2023.
Linda
I love the navy and pink, my two favorite colors. Where I live is small and I cannot do a lot with the walls but I am going to use the workbook and see what I can do to make me small in my rooms. The rug looks beautiful.
Thanks, Linda! Navy & pink are my 2 favorite colors, too 🙂 My mother’s house (where this room is from) is also very small, so I’m sure you can make it work!
Wow, wow, there are so many things I love in this post, such as the niches, arches and many, many other items to.
Hello Ivory, I’m glad you like the blue and white room with its changes. I am very pleased with how it turned out. Thank you for taking the time to write.
Beautiful. Blue is my favorite color too. I enjoyed how you made blue room not stand out in all the purple.
Thank you Jody. I am pleased with the results. I even like the purple living room better with the touches of blue added. It is important to keep ones favorite colors involved to get sustained pleasure from any changes.
That room looks beautiful, especially the seamless niche and arch and the perfectly horizontal gold dots. Good job. Thanks for sharing.
Hello Tom, I’m thrilled with the way the niche, arch and gold dots finish the look I was going for in the room. Good thing I had a smart, talented brother who was willing and able to contribute his considerable expertise. Every time I sit in that lovely room my heart fills with gratitude to him.